
Coffee lovers know that most budget espresso machines are different versions of the same device with minimal differences. Manufacturers, like shuffling a deck, change the feature sets: add something, remove something, but the main components and design remain unchanged. Sometimes there are unsuccessful models where savings are noticeable, and sometimes, on the contrary, the manufacturer tries, and a successful solution appears that surpasses the typical «average» home coffee maker.
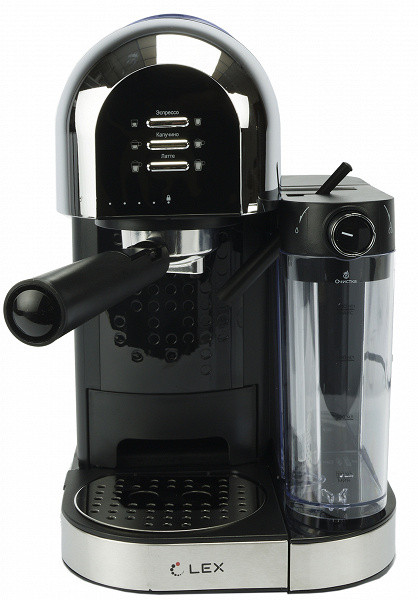
Today we will test another budget model — the Lex LXCM 3503-1 horn coffee maker, which has a non-standard design, but does not offer any innovations.
Characteristics
| Manufacturer | Lex |
|---|---|
| Model | LXCM 3503-1 |
| Type | horn coffee maker |
| Country of origin | China |
| Guarantee | 1 year |
| Service life * | 3 years |
| Declared power | 1500 W |
| Body material | plastic, metal |
| Tank capacity | 1 liter |
| Milk container capacity | 0.7 liters |
| Pressure | 15 bar |
| Control | electromechanical |
| Weight | 4.3 kg |
| Dimensions | 331×208×312 mm |
| Length of network cable | 0.9 m |
* Contrary to popular belief, this is not a period after which the device will necessarily break down. However, after this period, the manufacturer ceases to bear any responsibility for its functionality and has the right to refuse to repair it, even for a fee.
Equipment
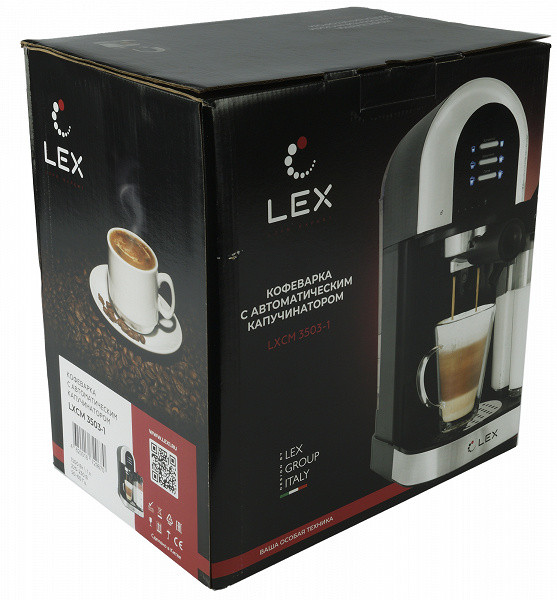
The coffee maker is packed in a box with the signature Lex design: a black background with bright red accents and color images of the device itself.
The packaging contains information about the key features and advantages of the model. The manufacturer claims a power of 1500 W, a pump with a pressure of 15 bar and an automatic cappuccino maker, which is quite impressive for the budget segment.
The contents of the box were neatly packed in pressed cardboard inserts and plastic bags, everything was securely fixed.
Inside the box we found:
- a coffee maker with a milk container
- a horn with two filters
- a plastic tamper spoon
- instructions
- a warranty card and advertising materials
The package is standard and does not raise any questions.
At first glance
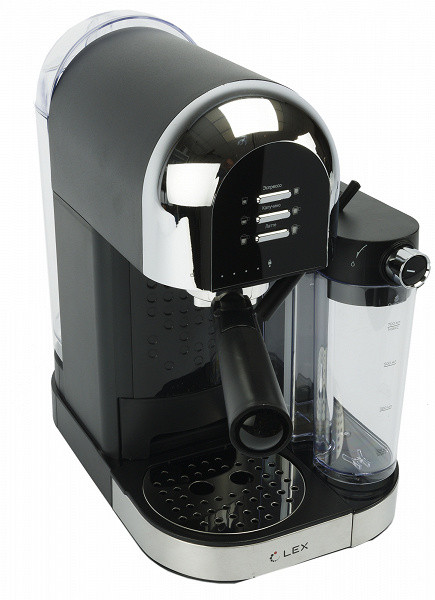
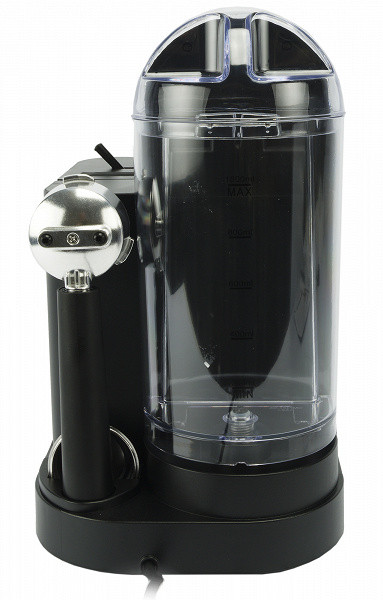
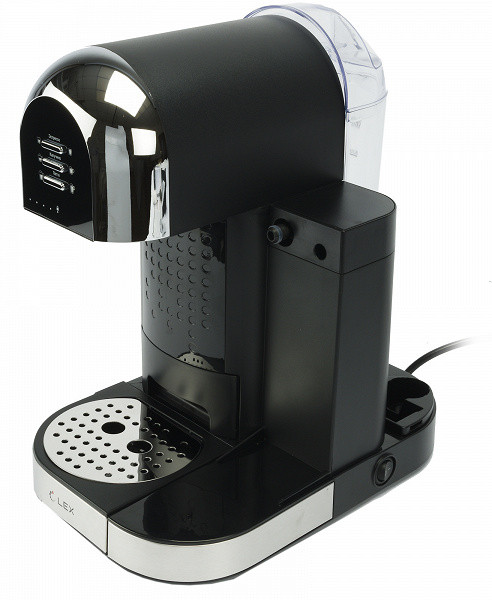
Externally, the coffee maker gives the impression of an inexpensive, but well-assembled device. The body is made of plastic with elements stylized as metal. However, this combination looks harmonious and does not create the feeling that the device was made cheaper at the expense of quality. The main black plastic also looks decent — it does not look premium, but does not evoke associations with cheapness.
The overall design evokes associations with both retro style and futurism. We have before us either a jukebox from the 50s or a device from the space future (as it was imagined in the 70s and 80s).
Let's take a closer look at the coffee maker.
As already mentioned, one of the main advantages of this model is its stylish design and good quality materials, which is especially important for a budget device.
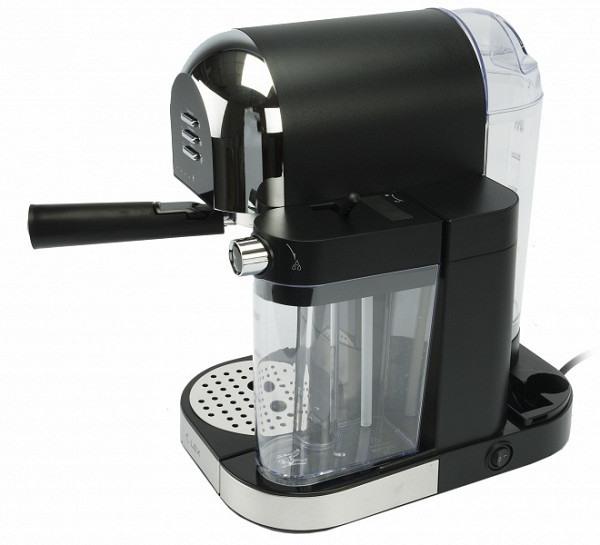
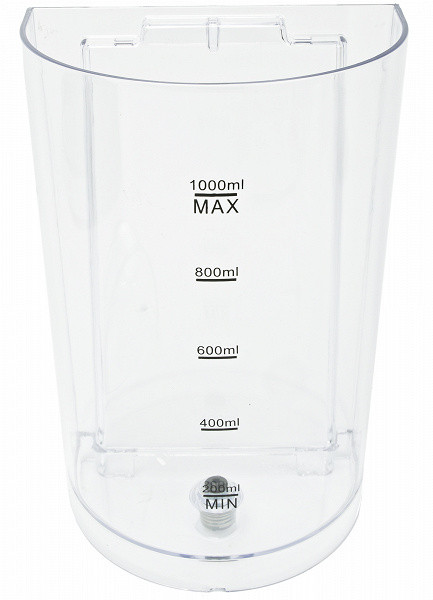
On the back of the coffee maker there is an outlet for the power cord and a removable transparent plastic water tank with a lid. Its volume is 1 liter, which, although not much, is quite enough for home use.
The maximum and minimum water marks are on the back side, so they will not be visible in real-life operation. However, the water level can be seen from any side.
The lid is equipped with an original «handle» that allows you to remove it with literally two fingers, which makes it convenient to use.
At the bottom of the tank is a water supply valve that automatically closes when the tank is lifted, preventing water leakage. The tank is attached to the body of the coffee maker using a pair of guides, which ensures reliable and easy fastening.
This model does not have a cup warming area, which does not upset us — in budget coffee makers this function is usually more decorative, since they heat ineffectively.
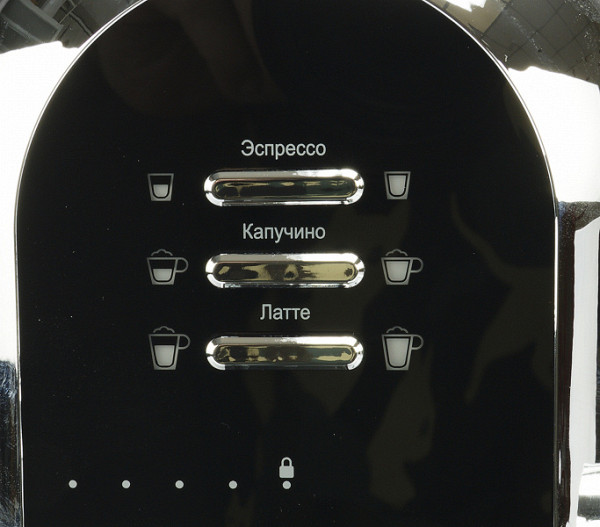
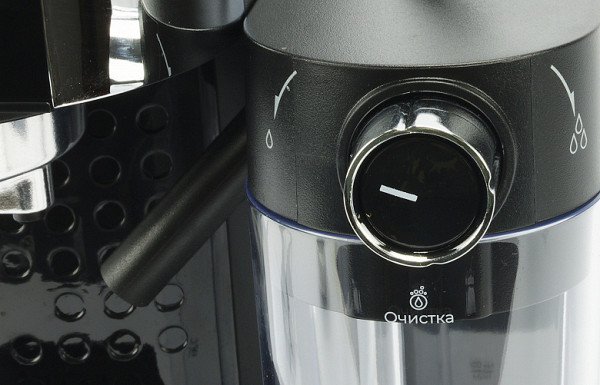
On the front panel there are three control buttons with LED backlighting, which we will talk about in more detail in the «Control» section.
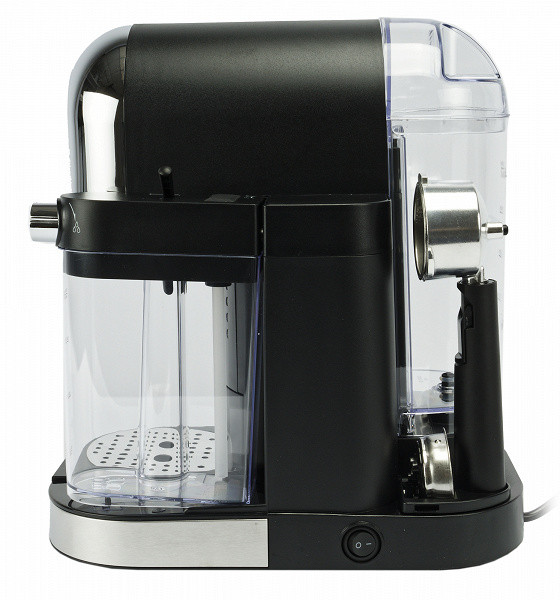
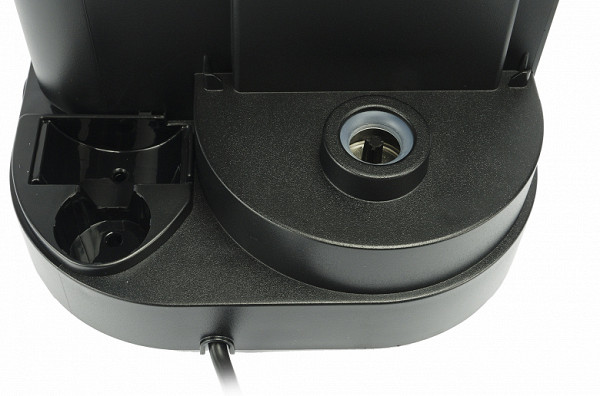
On the right side of the body, at the bottom, there is an on/off switch.
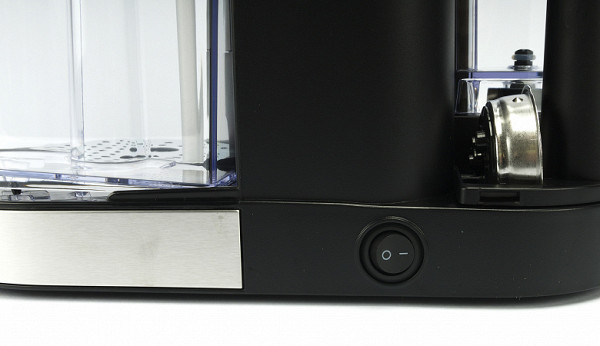
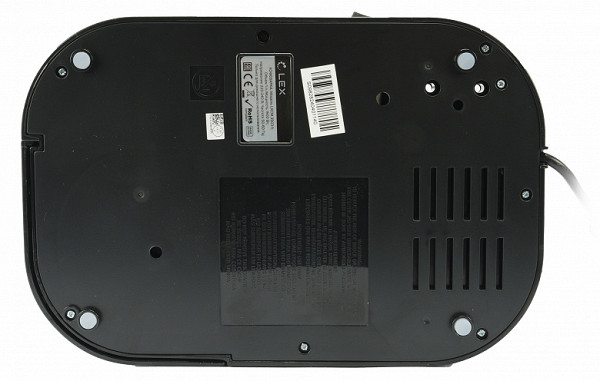
There is nothing special on the bottom of the coffee maker. There are ventilation holes, some stickers with technical data and a bar code, and rubber feet that prevent the device from sliding on the work surface.
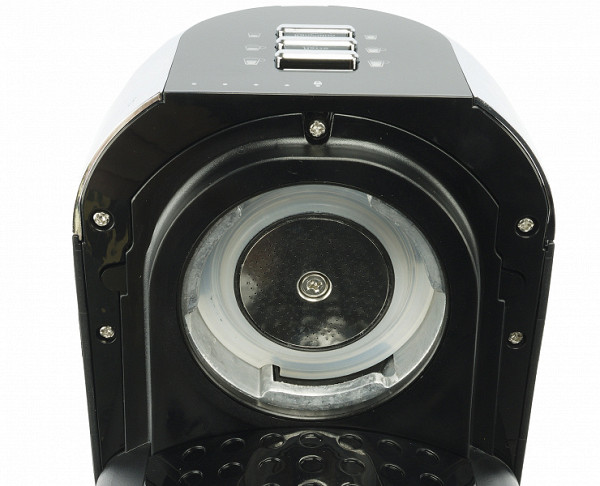
The device has a classic layout: in the center there is a brewing group with a horn, under it there is a drip tray, and on the right there is a jug for the cappuccino maker. The horn is installed with the handle to the left and is fixed by turning it counterclockwise. The maximum height of the cup that can be placed under the horn is 14 cm.
At the same time, we have the option of extending an additional platform for small cups. In this case, the maximum height of the cup will be 9 cm.
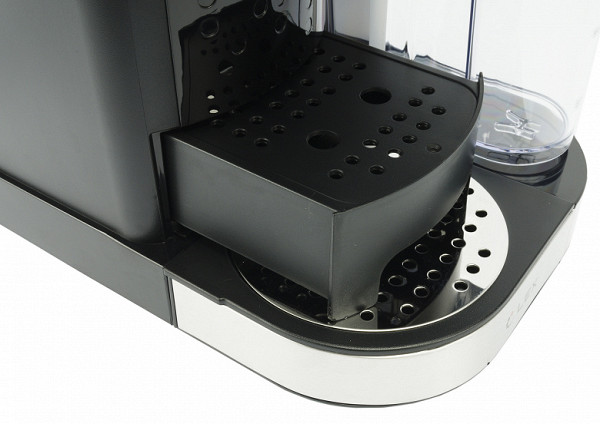
The removable plastic drip tray is covered with a metal lid, but there is no overflow indicator. The pull-out tray for small cups also serves as a drip tray, but this time it is made of plastic rather than metal.
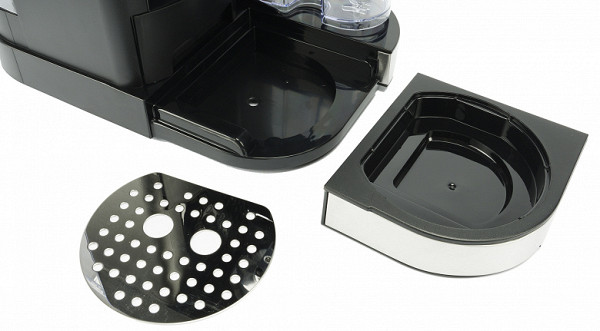
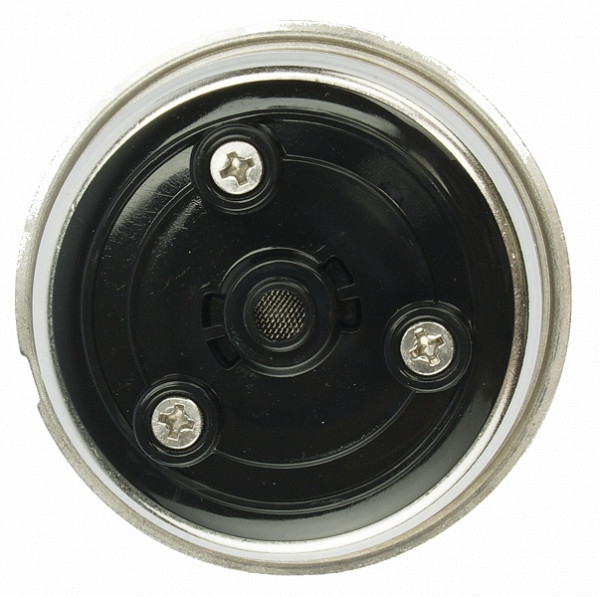
The inside of the brewing group is made of white metal, probably silumin, which is common for budget coffee makers. The photo below shows the water inlet holes and the rubber sealing gasket.
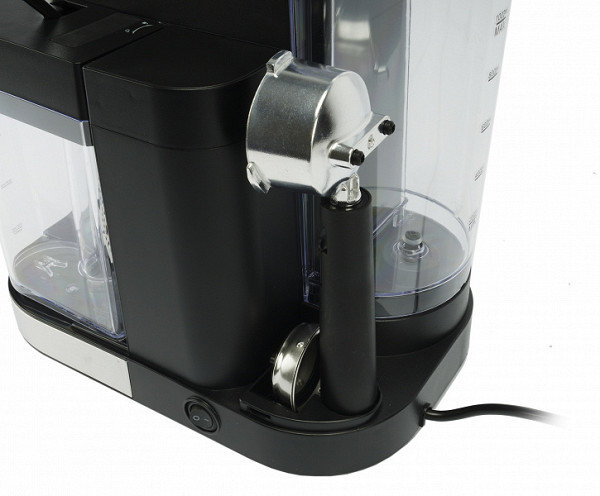
Now let's take a look at the cappuccino maker. It looks like a budget version of the automatic cappuccino jugs we've seen on many coffee machines.
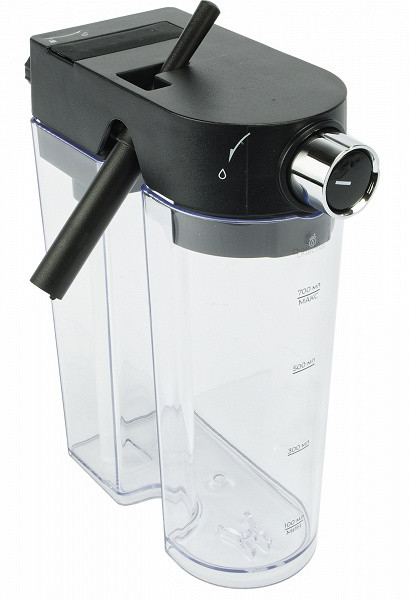
The jug has a capacity of 0.7 liters. On the front side it has graduations — from 100 to 700 ml with a step of 200 ml.
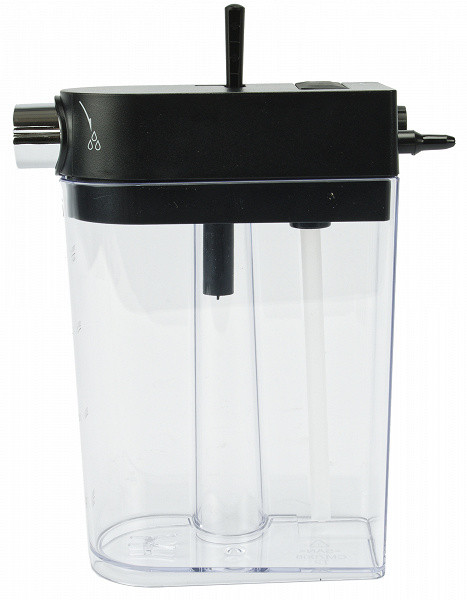
The frother is located in the lid, and milk is supplied through a plastic tube. The plastic tube is a characteristic feature of a budget solution. The jug is equipped with a handle for adjusting the tilt of the milk foam supply tube, and on the front side there is a switch for choosing between milk and milk foam supply.
By removing the cappuccino maker and the lid, you can get the adapters, cappuccino maker tube and milk supply tube, which allows you to thoroughly clean the device from milk residues.
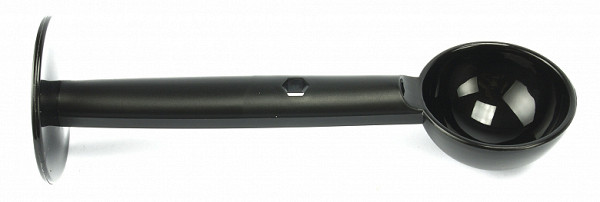
The portafilter is standard, with a plastic distributor on the bottom that directs the coffee to two spouts. This allows you to simultaneously prepare two cups of espresso.
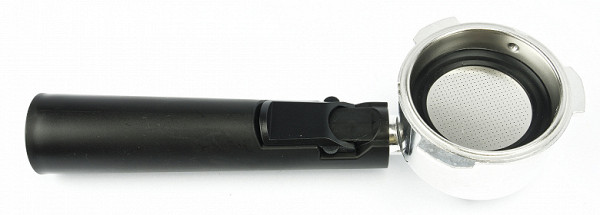
The kit includes two filters for 1 and 2 espresso servings, which are attached inside the horn using a small protrusion. The filter is installed in the correct position and rotated to fix it. The kit also includes a plastic locker to hold the filter when cleaning out the spent coffee.
The diameter of the filters is 51-52 mm, which is standard for budget models.
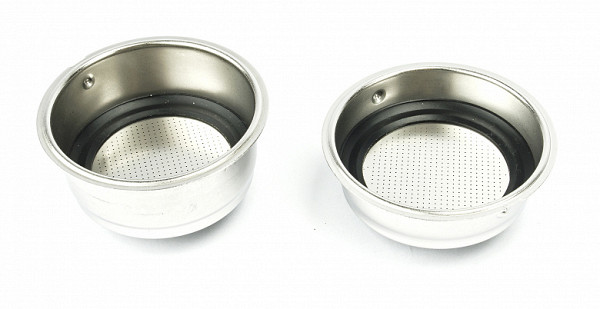
The filters have a double bottom, with many small holes on the inside and one mesh on the bottom. It is important to remember that coffee that is too finely ground should not be used in such filters, as it can get stuck between the double walls and be difficult to remove.
The double bottom of the filters is designed to equalize the pressure inside the portafilter, which improves the quality of the drink. This helps reduce the likelihood of errors when preparing coffee, especially for inexperienced users.
Each filter has a mark indicating the maximum coffee level.
The kit includes a plastic tamper spoon, which is easy to use, but for best results, it is recommended to replace it with a metal tamper when possible.
In the far right corner of the coffee maker there are two compartments: one for storing the filter and one for installing the portafilter. This is a convenient solution, although the remaining water can flow onto the countertop through the holes. However, since there is little water left, this does not lead to significant contamination.
Overall, by the standards of budget coffee makers, our test sample looks quite decent. We hope that the device will not disappoint us during testing.
Instructions
The user manual is made in the form of a black and white brochure on high-quality glossy paper, using full-color printing. All necessary data is presented on 26 pages.
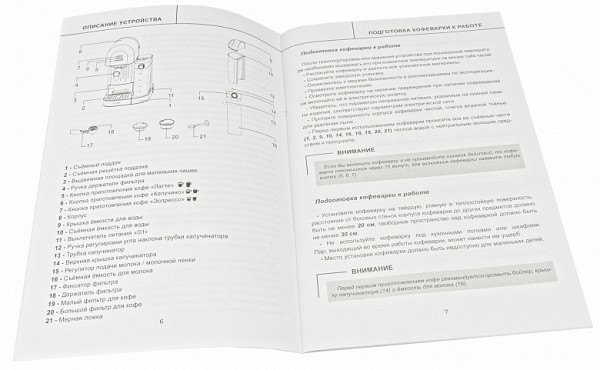
The contents of the manual are impressive in their completeness: it describes in detail all aspects of working with the coffee maker, accompanied by comments, explanations and illustrations. The only inconvenience may be the need to constantly search for the necessary elements, for example, the cappuccino maker (14) in figure (11) and the container (16) in figure (1). It is logical that figures 1 and 11 are on pages 8 and 19, respectively.
There can be quite a lot of such digital references — up to more than 20 per 10 lines of text.
Control
The coffee maker is controlled by three buttons, with indicators to the left and right of them.
The first button is designed to make a single or double portion of espresso (one or two presses, respectively). The second button is responsible for making a single or double portion of cappuccino. The third button is used to make one or two portions of latte.
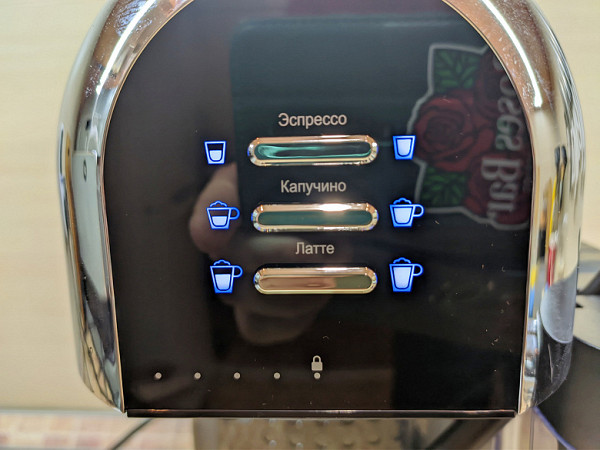
Pressing the button once to prepare the drink will light the left LED, and pressing it twice will light the right LED. The controls are quite intuitive.
The user can also turn on the milk foam without making coffee. To do this, hold the Cappuccino button for 3 seconds and then press it again when you reach the desired volume of milk foam.
The preparation process can be stopped by pressing the button of the selected program again.
The portions of single and double espresso can be adjusted (the manual contains a description of this process). The standard values are up to 90 ml of water for a single and up to 130 ml for a double espresso. However, it is preferable to set shorter volumes, for example, 20 and 40 ml.
Operation
Before using the coffee maker for the first time, you need to prepare it. Remove the packaging material and advertising stickers, wash the water tank, portafilter, filter, and tray. Wipe the body of the coffee maker with a damp cloth and start the coffee brewing mode without coffee to rinse the device. Don't forget to rinse the cappuccino maker as well. After that, the coffee maker is ready for use.
Here are some features of the device that we noticed during testing:
The coffee maker heats up quickly. It signals that the desired temperature has been reached in just 22 seconds after switching it on. There may be short-term additional heating, but this does not cause any inconvenience. The maximum power during heating was 1260 W. The coffee maker comes out of sleep mode in 10-20 seconds, which is very convenient.
The water container is securely fixed in the body. Water can be added without removing the container, simply by opening the lid. The water level is checked from both sides of the coffee maker.
The portafilter is lightweight, which reduces its heat capacity. Sometimes the ground coffee gets stuck inside the portafilter and you have to slam it hard against a soft surface to get the coffee out. We found it easier to rinse the portafilter under running water. To do this, it is better to place the coffee maker near the sink.
The drip tray is easy to remove, clean and install back. The maximum cup height for use with the coffee maker is 14 cm, or 9 cm if the additional stand is pulled out.
The coffee maker allows you to adjust the volume of drinks, and we rated the noise level as low.
Now about the disadvantages. Budget coffee makers often give out more water than necessary, and our model is no exception. It is important to be able to interfere with the standard programs.
The «cappuccino» and «latte» modes are actually different versions of the same program — first milk foam, then espresso. The amount of milk is set in seconds, and the volume of milk foam depends on the position of the regulator on the cappuccino maker. For a predictable and repeatable result, you need to adjust the position of the cappuccino maker handle and not change it.
Care
Maintenance of the coffee maker includes regular rinsing of the portafilter after each use of coffee. After rinsing and between uses, it is recommended to store the portafilter separately so that it dries faster.
It is necessary to periodically remove and rinse the filter and the space underneath it. The cappuccino maker jug should be rinsed after the milk has run out to prevent milk residue from drying out, which will make it more difficult to clean. To clean the cappuccino maker, remove the lid, rinse the steam nozzle, and dismantle and rinse the cappuccino maker tube and adapters. After that, assemble the cappuccino maker and start dispensing milk foam with plain water.
The drip tray should be emptied regularly. The body of the coffee maker can be wiped with a soft cloth.
If scale forms in the coffee maker, use a special cleaning agent. To do this, pour in a 3% solution of citric acid instead of water, then run the coffee maker several times in the coffee and milk foam modes. After this, rinse the coffee maker with plain water to remove any remaining citric acid.
To ensure trouble-free operation, it is recommended to use filtered or bottled water and descale the coffee maker at least once every 2-3 months.
Our measurements
Before testing, we measured the power consumption and warm-up time of the coffee maker. In heating mode, it consumes up to 1260 W, which is slightly lower than the declared value, but enough for quick and effective water preparation. In standby mode, the power is only 0.4 W.
The coffee maker warms up in about 22 seconds. The transition to making milk foam takes 5-7 seconds.
If you use a preheated cup and turn on the hot water supply, the water temperature will be about 82 ° C, which is a good result (the temperature of the coffee will be discussed in the «testing» section).
The noise level of the coffee maker does not exceed 58 dBA, which is considered low. The energy consumption of this device is not significant.
Practice tests
During our testing, we prepared single and double espressos, as well as drinks with milk, measuring the pour time, temperature, and volume of the finished coffee. We also assessed the taste of the coffee.
For the tests, we used freshly brewed coffee beans, which we ground in a burr grinder set for espresso in a semi-professional portafilter.
We found that the coffee maker uses a pre-infusion technique: it dispenses a small amount of water into the portafilter, pauses, and then begins the main brewing process.
Espresso and double espresso
Before preparing a single espresso shot, let's review the coffee brewing standards.
According to the recommendations of the Espresso National Institute, one shot requires 7±0.5 g of coffee. The temperature of the water when leaving the coffee machine should be 88±2 °C, and the temperature in the cup should be 67±3 °C. The volume of the finished drink should be 25±2.5 ml, and the brewing time should be 25±5 seconds.
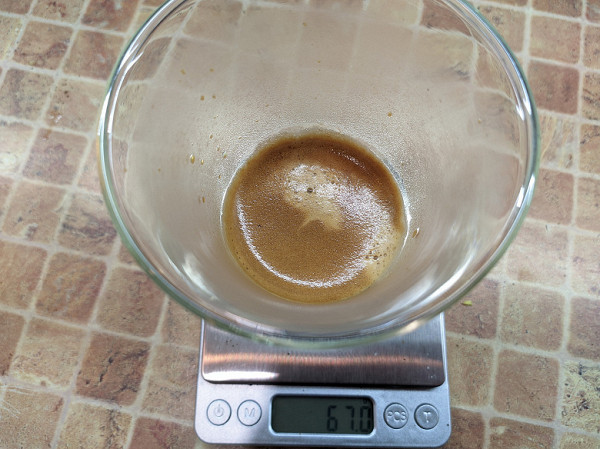
Our single filter holds 8 g of coffee, which allows you to prepare a stronger drink, satisfying lovers of rich espresso.
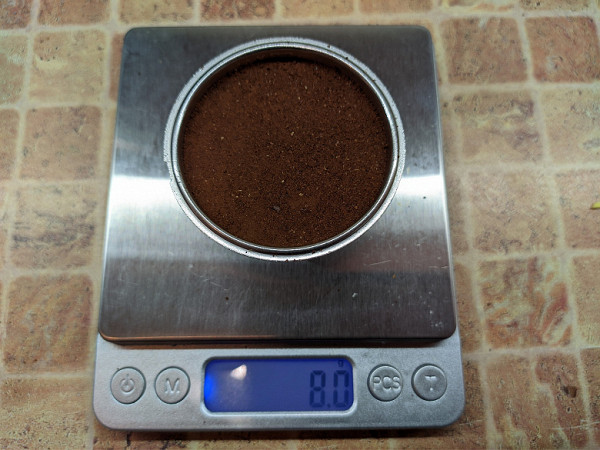
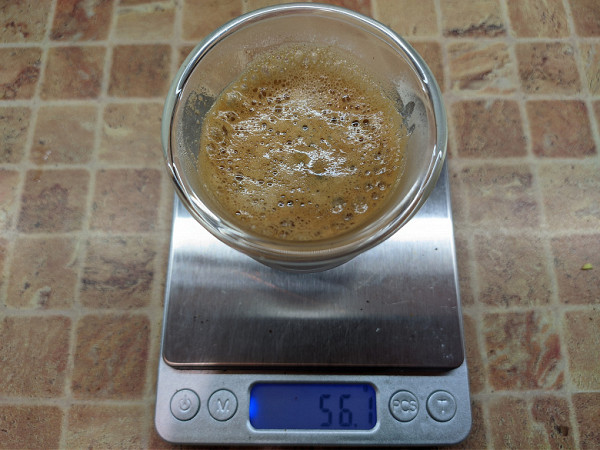
On the default (factory) settings, in 22 seconds (including pre-infusion time) we got 56 g of coffee at 78 °C in a slightly warmed cup. This volume is significantly larger than desired, indicating the need to adjust the grind and pour time.
The results on the standard settings were average. The horn with the «enhancer» whips up the foam during the pour, resulting in a lot of large bubbles instead of a thick cream. A single espresso was not very rich, but still suitable for drinking.
After reducing the grind, the results improved, but working with budget coffee makers and a plastic tamper remains difficult. Therefore, we decided to move on to making a double portion, where the impact of errors would be less noticeable.
The spent coffee grounds turned out to be quite dry. However, it was not possible to avoid the appearance of drips from the horn after the end of preparation. Like all budget horn coffee makers, the Lex LXCM 3503-1 is leaky.
Result: good
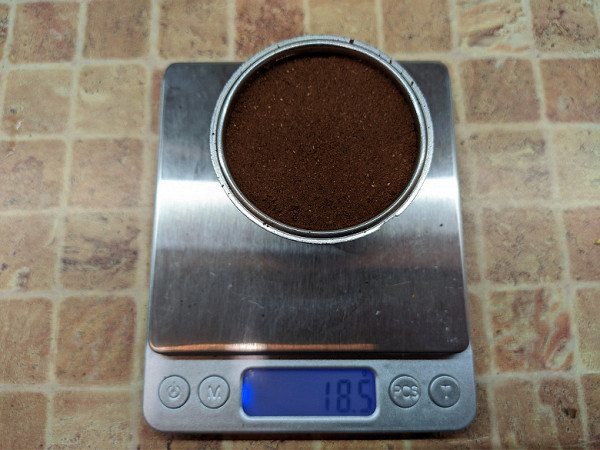
Espresso (two-shot filter)
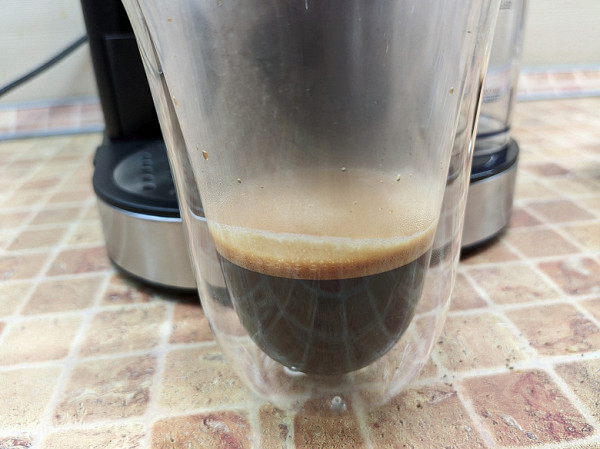
To make a double espresso, we used a double portion of coffee (the double filter can easily hold up to 18.5 g).
We left the grind unchanged and started by testing the coffee maker in automatic mode.
When making a double espresso on the same settings, the process took 40 seconds and we got 67 g of drink — again too much!
This time we liked the crema foam, but the factory settings need adjustment again. We would be happy to see up to 40 g of drink in 25-30 seconds. What we have in front of us is not espresso, but rather lungo.
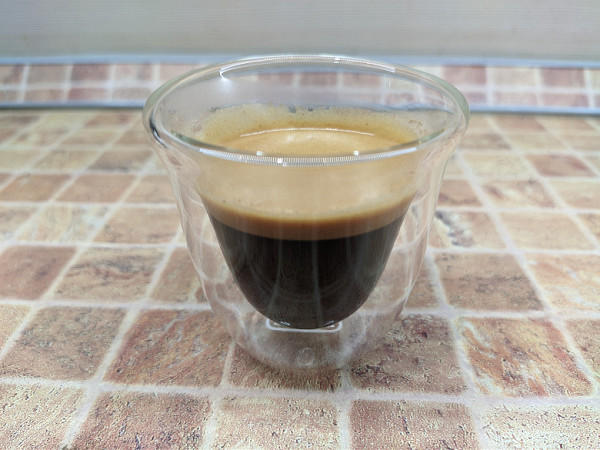
We repeated the test, slightly reducing the grind, which predictably improved the results.
With a reduced grind, we got 30 g of drink in 20 seconds. Further preparation can be stopped at any time according to your taste — this allows you to achieve the best result. In taste, color and foam, the drink began to resemble a real double espresso. The temperature of the finished drink also increased to 84 degrees, which is higher than that of a single espresso.
As always, we recommend espresso lovers to completely abandon the single filter in favor of a double one. It provides a more stable result and brings the taste of the drink closer to real espresso. In addition, using a double horn makes the preparation process more convenient.
If you prefer a weaker coffee, such as a lungo (with a large volume of water and a long brew time), you can use a single filter or set the brew time to a longer time. However, to return to espresso, you will need to re-adjust the settings, which can be inconvenient.
Result: Excellent
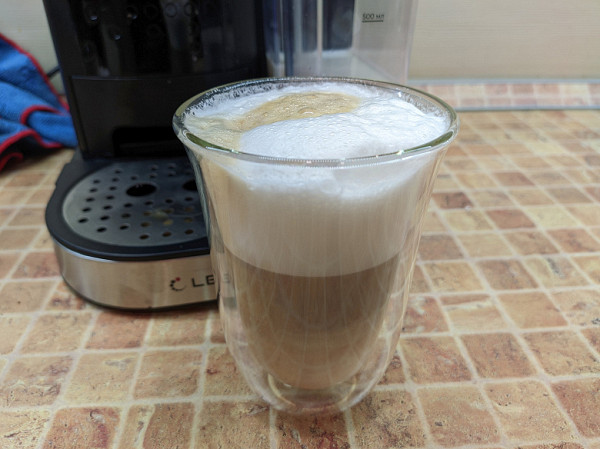
Milk drinks
As already mentioned, milk drinks are prepared according to the following principle: first, a certain amount of milk foam is dispensed, the time of which is regulated by a timer, and then a single or double espresso is added to the foam.
For the «cappuccino» mode, the milk supply time is approximately 22 seconds for a single and 30 seconds for a double. For «latte», milk is supplied for 33 and 45 seconds, respectively.
The volume of milk also depends on the position of the adjustment knob on the cappuccino jug. Turning the knob can change the settings, affecting the final result.
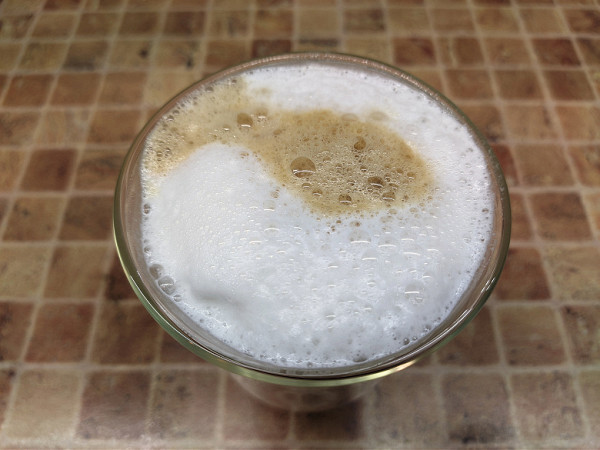
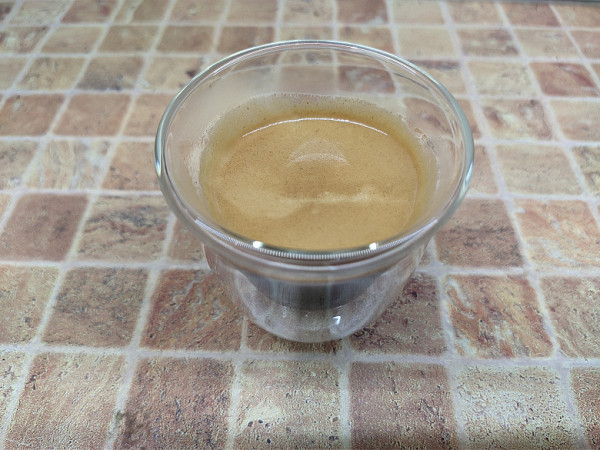
What does milk foam look like? There were quite a lot of large bubbles here, and the foam itself was lush and stable.
We rate the result as quite decent for budget coffee makers, although not ideal. We would like to have the option to choose between two modes: first milk, then espresso, or vice versa — first espresso, then milk.
Result: good
Conclusions
The Lex LXCM 3503-1 coffee maker left a controversial, but overall positive impression. This is largely due to its attractive price of 11 thousand rubles, which makes it a good offer among automatic cappuccino makers. The advantages include a good drink temperature, fast heating and a pre-wetting function for the coffee tablet.
The ability to program the portion size is also pleasing. However, it is worth noting that the «cappuccino» and «latte» modes essentially prepare the same drink, differing only in the volume of milk foam.
Overall, despite some shortcomings, the Lex LXCM 3503-1 coffee maker looks like a pretty good deal for its money. It offers decent (for budget models) espresso quality and standard (for budget coffee makers) milk foam.
Pros:
- reasonable price
- two modes — single and double espresso
- programmable serving volume
- pre-wetting mode
- automatic cappuccino maker
Cons:
- the “cappuccino” and “latte” modes serve coffee and milk in the same order