
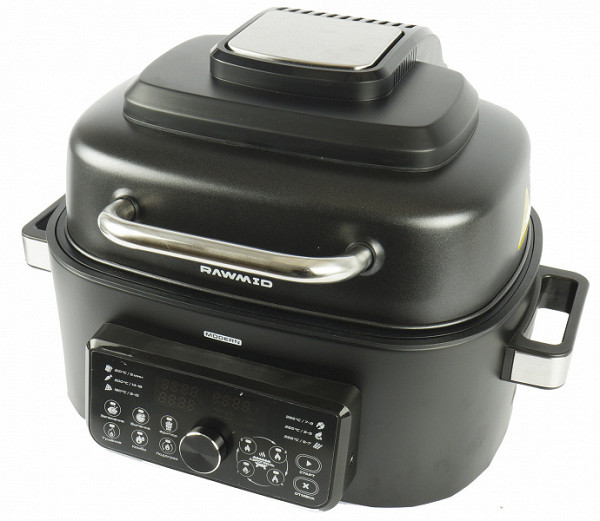
If you don’t have enough time to cook, but want to eat varied and healthy, then the Rawmid RMA-04 air fryer will become your indispensable assistant. And if you are ready for culinary experiments or simply adore juicy steaks, then the air fryer will also be indispensable in your kitchen.
Attractive design, minimal use of oil during cooking, speed of cooking and versatility — these are the advantages of this air fryer promised by the manufacturer. We'll run a series of tests to find out if they really live up to their claims.
Characteristics
| Manufacturer | Rawmid |
|---|---|
| Model | RMA-04 |
| Type | air fryer |
| Country of Origin | China |
| Guarantee | 2 years for registered goods |
| Life time * | 3 years |
| Power | 1650 W |
| Control type | sensory |
| Housing material | metal, plastic |
| Volume | 6 l |
| Number of programs | 10 |
| Control | electronic |
| Adjusting the grill temperature | 80–265 °C in 5 °C increments |
| Grill timer | 1 minute — 12 hours in 1 minute increments |
| Equipment | mesh basket, grill grate, temperature probe, steel container as a gift for your review |
| Weight | 5.7 kg |
| Dimensions (W×H×D) | 430×390×300 mm |
| Network cable length | 0.8 m |
* Contrary to popular belief, this is not the time limit after which the device will necessarily break down. However, after this period, the manufacturer ceases to bear any responsibility for its performance and has the right to refuse to repair it, even for a fee.
Equipment
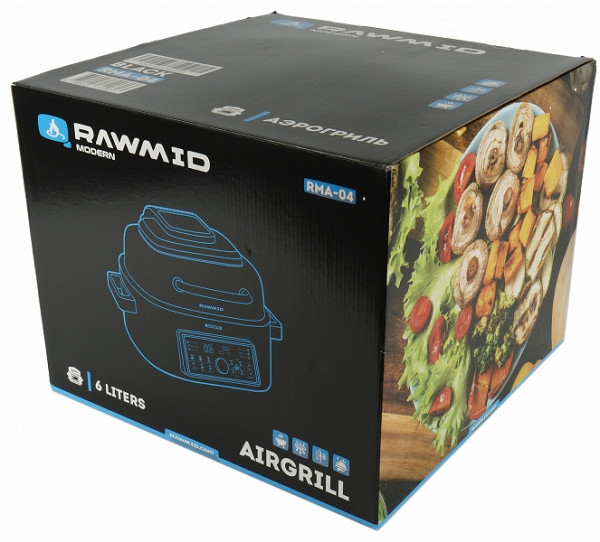
The Rawmid RMA-04 air fryer arrived for testing in a large technical cardboard box. Inside was another box, decorated in the Rawmid corporate style. On a black background there are images of the device, indications of its technical characteristics and capabilities, as well as a photograph of a dish prepared in an air fryer.
Opening the box we found:
- air fryer
- 6 liter bowl
- mesh basket
- grill grate
- temperature probe
- instructions and warranty card
- a steel container that is given as a gift for a review
At first sight
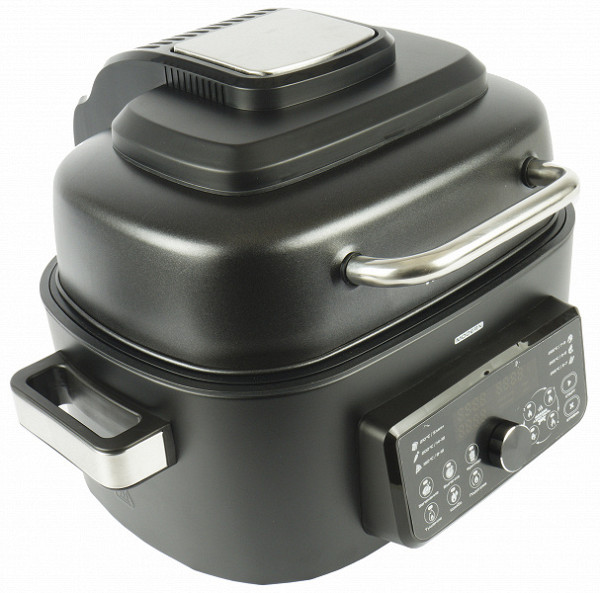
The air fryer made a good impression out of the box. Its black finish looks stylish and is easy to clean from various stains. The design of the device is also of interest. The lid of the air fryer opens upwards using a convenient large handle, which we find convenient.
There are convenient handles on the side surface of the device, which make it easy to transport the device if necessary.
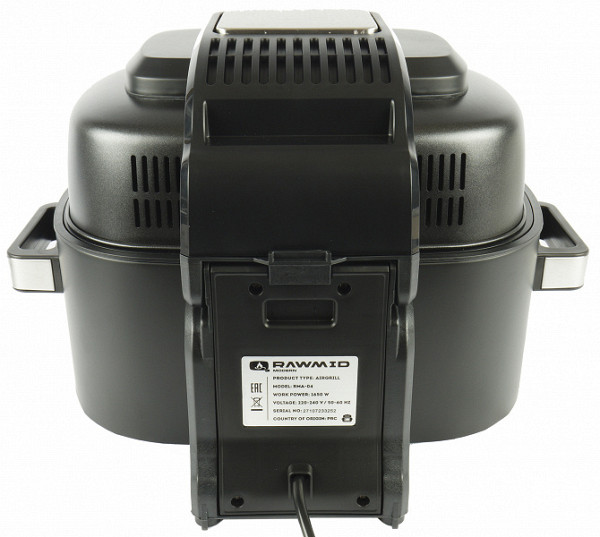
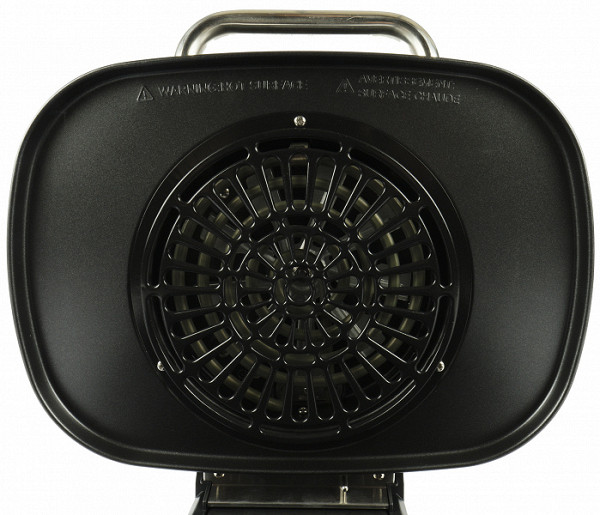
On the back side we notice the electrical cable outlet and the many ventilation holes that are also present on the top panel. These holes play a key role in ensuring efficient cooling of the device. Above the cable outlet there is a nameplate with information about the manufacturer.
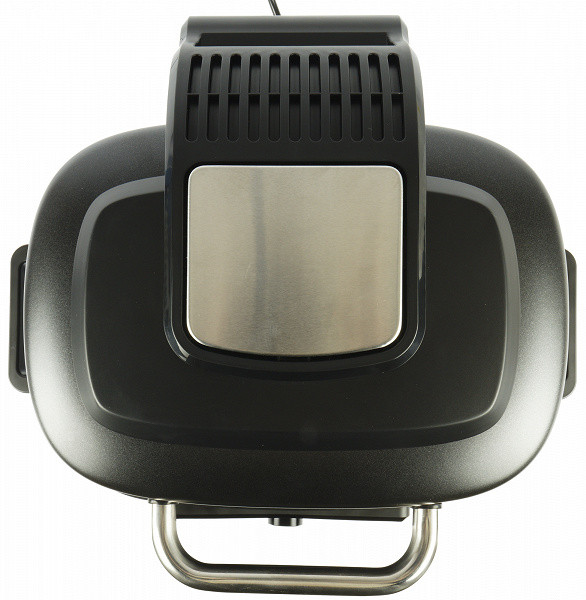
The photo below shows the ventilation holes on the cover of the device.
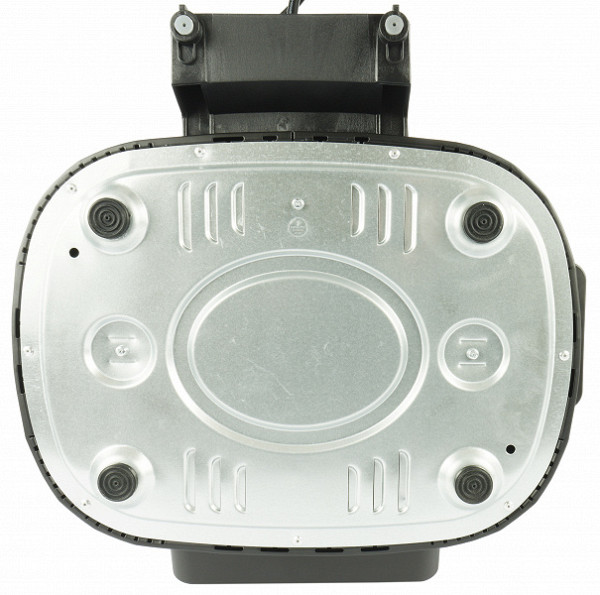
Four rubberized feet ensure the stability of the device and prevent it from slipping and scratching the surface of the kitchen table.
A separate plastic box contains a temperature probe that allows you to control the process of cooking meat to the desired temperature.
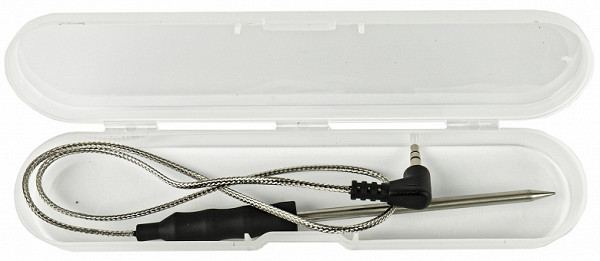
The temperature probe is connected to the control panel.
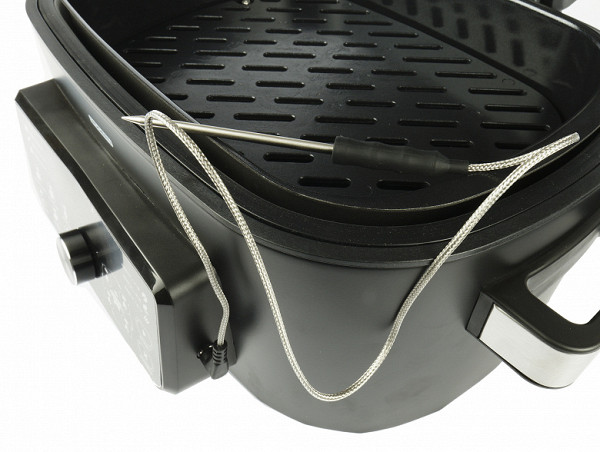
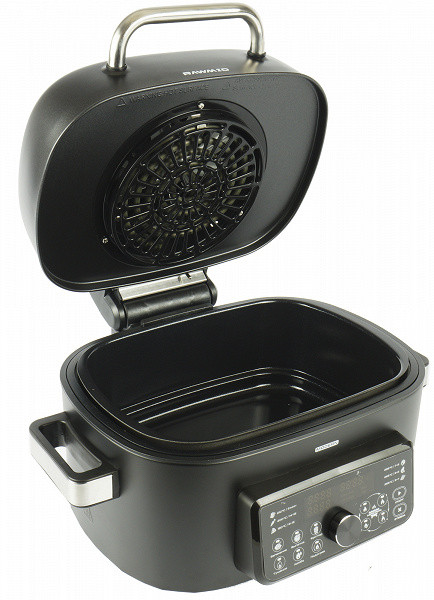
The lid of the device contains a heating element, which, when enlarging the photograph, can be seen in the form of a spiral shape. The manufacturer claims that this design provides wide space coverage and rapid heating of the air. The protective grille, designed to protect the heating element from splashes, is easily removable and can be washed separately if necessary.
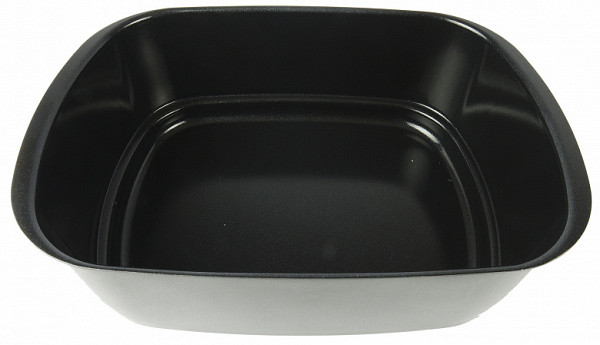
The removable bowl of a fairly large volume (6 liters) can accommodate most products that are used for cooking in a regular, non-restaurant kitchen.
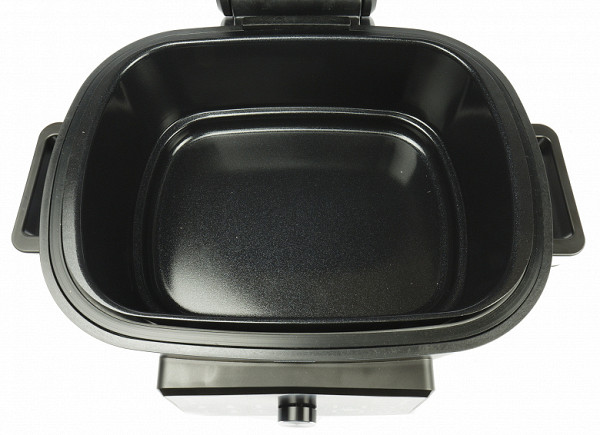
If we remove the bowl from the appliance, we will see the inner metal part of the air fryer.
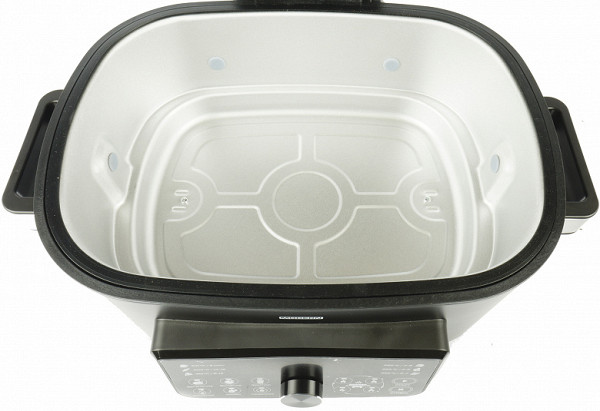
The bowl has a durable ceramic non-stick coating, from which food residues can be easily washed off.
Also included is a removable stainless steel mesh basket that can be used for french fries and similar dishes.

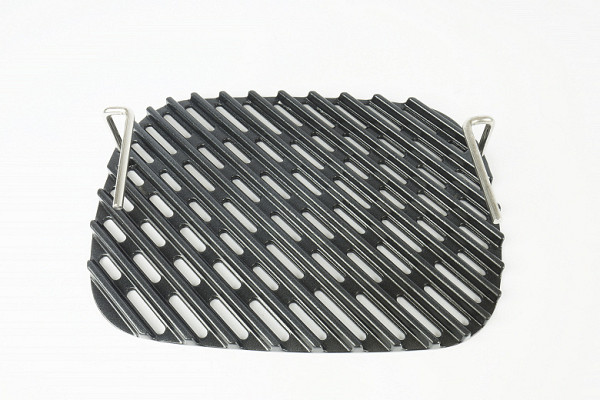
The grill grate, made of heat-conducting aluminum with a ceramic non-stick coating, has a characteristic relief with stripes and grooves. It is equipped with two convenient handles that make it easy to install and remove the grille.
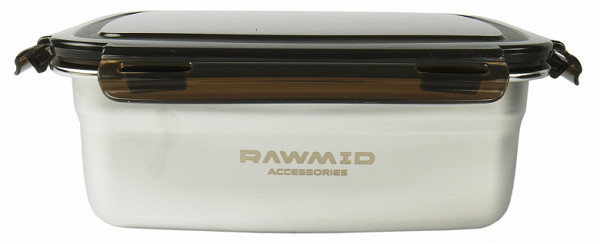
In addition, the set of accessories includes a steel container, which the manufacturer offers as a gift for reviewing the air fryer.
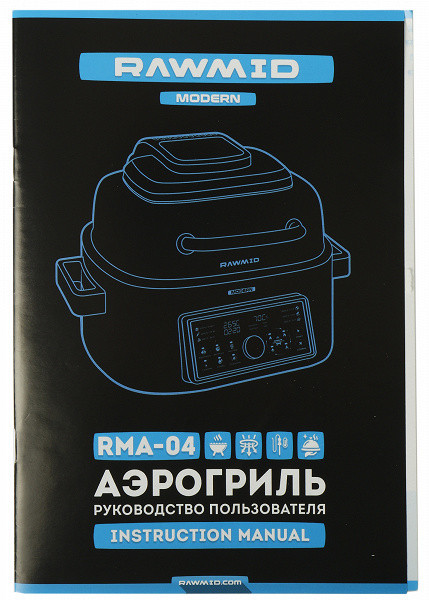
Instructions
The instructions for the Rawmid RMA-04 air fryer are printed on 26 A5 pages on durable glossy paper. It contains a detailed description of the device, including a table describing operating modes, permissible temperatures, times and default settings. Another table shows the parameters for working with a temperature probe, as well as recommendations for the cooking temperature of various products. However, the instructions do not indicate a specific location for connecting the temperature probe in the device, and temperature recommendations are presented only for cooking steaks of varying degrees of doneness. In general, the instructions are written in clear and understandable language, but users expressed a desire to receive a more detailed description of working with the temperature probe.
The instructions for the Rawmid RMA-04 air fryer also contain four recipes for cooking dishes in this device. In addition, it contains a QR code that leads to the manufacturer’s website with the promise of more air fryer recipes. Unfortunately, no recipes specifically for the Rawmid RMA-04 model were found on the site.
Control
Operating the air fryer initially caused some difficulties, but we quickly figured it out.
To turn on the device, just press the button of any mode, and the display will show the default values, while the temperature value will begin to flash. To change the temperature, you need to turn the round control knob (in the center) to the right or left. To confirm the temperature value, you need to press the control knob, after which the time value will also start flashing, and it can be changed or confirmed.
To the left of the control knob there are buttons for selecting from 6 automatic modes:
1. Baking
2. Baking
3. Deep frying
4. Braising
5. Combo
6. Heating
To the right of the control knob there are buttons for selecting the grill control mode, and depending on the number, different temperatures and power are selected:
- Grill control 1: Temperature 200°C, temperature probe connected
- Air fryer 2: Temperature 230°C
- Air fryer 3: Temperature 260°C
- Air fryer 4: Temperature 265°C
The automatic cooking time in grill control modes is 15 minutes, with the exception of the last, 4th mode, where the default cooking time is 10 minutes.
To the right of the buttons for selecting grill control modes there is a “Start” button, which starts the air grill, and a “Cancel” button, which can be used to cancel any program.
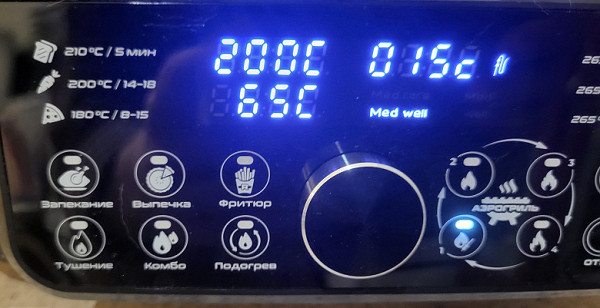
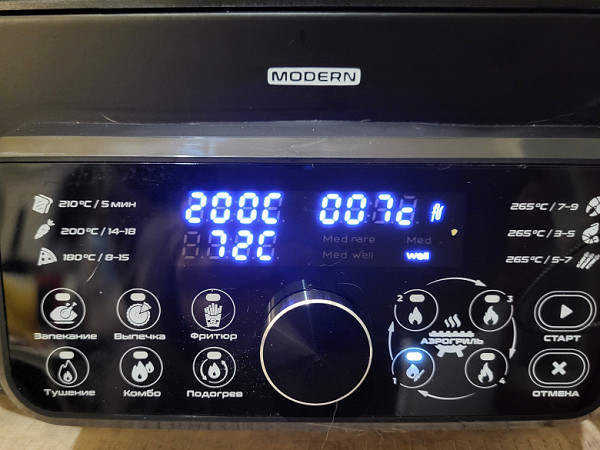
In the photo below we see a lit display and a control panel with a connected temperature probe. The upper value “265°C” is the temperature that the air fryer will reach during the cooking process. 00:10 — cooking time value, 10 minutes. The numbers 022 indicate degrees Celsius, determined by the temperature probe.
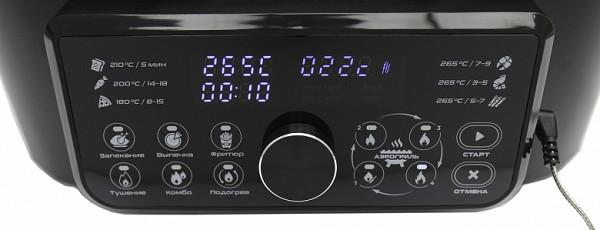
From the indicated parameters it is clear that the “Aerogrill-4” mode is selected, for which the default settings are set (temperature 265°C, cooking time — 10 minutes). For proper operation of the temperature probe, you must select grill control mode 1, which will be discussed in detail in the “Operation” section.
Exploitation
Operating the air fryer did not cause any serious difficulties, with the exception of some points that were mentioned in the “Instructions” section. For example, it took us some time to figure out where to connect the temperature probe and in what mode it should operate. It would be advisable to obtain more detailed guidance on this matter.
Another note concerns preheating. After turning on any mode, the convection oven begins to heat up to the set temperature, which is indicated on the display as “Pre”. Once the set temperature is reached, “Add” appears, indicating that you can open the lid and add food. It is important to remember this to avoid misunderstandings.
You should also pay attention to the fact that the convection oven does not allow you to extend the operation of an already started mode. After the end of the program, if additional preparation is required, a new session must be started, taking into account the preheating.
Separately, it is worth noting the ease of working with the temperature probe. It allows you to automatically turn off the device after reaching the desired temperature inside the product. However, it would be helpful to have more detailed temperature guidelines for different foods. The instructions provide information only for steaks of different doneness, which may not be enough for other types of dishes.
Finally, the values displayed on the display related to the temperature probe raised some questions for us. For example, the value “200°C” indicates the heating temperature of the air fryer, “65°C” indicates the temperature inside the piece of meat, and the value “015c” caused misunderstanding. We assume this is the time in seconds for the meat to cook, but a clearer explanation would be helpful.

These questions did not stop us, and we still decided to put the steak on the grill.
During the cooking process, we realized that the inscription, which we initially did not understand, shows the temperature recorded by the temperature probe. As you can see in the photo below, after some cooking time the temperature inside the piece of meat reached 30 °C, and when it reached 65 °C the air fryer turned off.
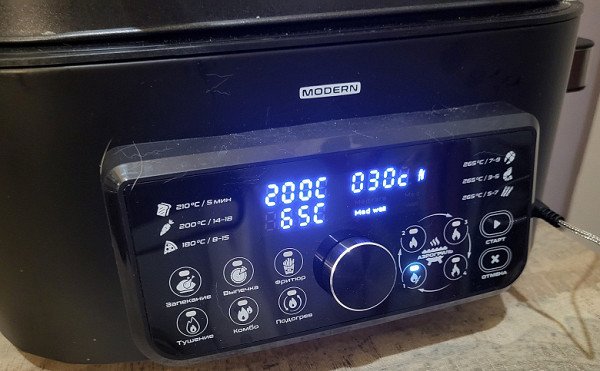
If the «C» in the temperature probe was written in capital letters, like degrees Celsius in automatic modes, we would have fewer questions (at least we hope so).
Perhaps these are all the operational features that we encountered. It is important to note that the air fryer bowl and grate are not very convenient to remove from a hot appliance, and silicone oven mitts would be useful here, which, unfortunately, are not included in the kit.
The grill grate is large enough to accommodate two steaks. It might be handy to have a second probe, but if we're cooking roughly identical cuts of meat at the same time, they'll probably reach the right temperature at about the same time, so it's not a major issue.
The grill heating mode performs its task flawlessly. The automatic program is set to 265 °C and for 10 minutes; It is clear that at this temperature and time everything heats up perfectly. However, if necessary, the heating time can be reduced: the range of values is from 5 to 30 minutes in 1-minute increments.
Care
Instructions for caring for the air fryer are standard: first unplug it before cleaning. It is recommended to wash containers and accessories after each use using water or detergent. The housing can be wiped with a light damp cloth, but do not use abrasives or immerse the housing in water.
All components of the air fryer are made of environmentally friendly, durable and easy to clean materials. The bowl and grate are protected with a non-stick ceramic coating and are dishwasher safe, as well as the mesh frying basket.
Our measurements
The maximum power of the device in operation reaches 1652 W.
The top panel heats up to a maximum of 83 °C, while the body remains at 50 °C.
The noise level during operation of the convection oven is considered normal, given its powerful fan. The noise is not annoying and the shutdown beeps are loud enough to be heard from the next room.
Practice tests
Warm grilled vegetable salad
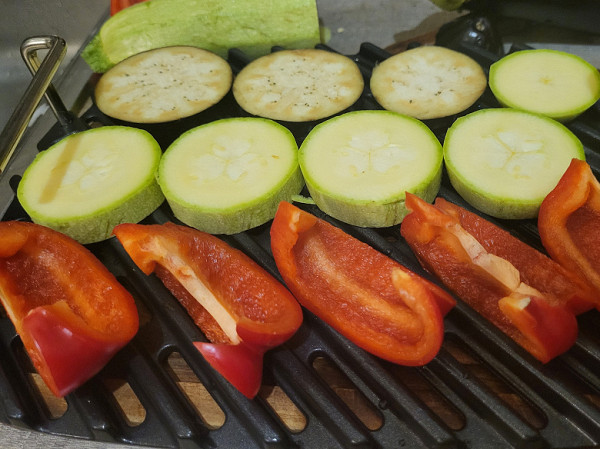
The first test for the air fryer was vegetables. We cut the zucchini, eggplant and bell peppers into small pieces and put them on the grill for 7 minutes at 265 °C, following the recommendations on the grill control panel (the icon depicting asparagus, indicating the temperature and cooking time of 5-7 minutes). To do this, we chose the “aerogrill” mode and power 4.
After 7 minutes we got the result you see below.
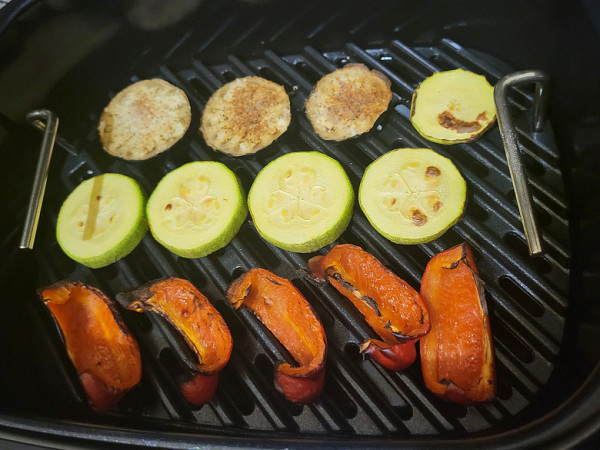
Deciding to make the vegetables crispier, we decided to extend the cooking time and turned on the grill for another 3 minutes, while forgetting about preheating the device. The result was a burnt dish.
For the next batch of vegetables, we set the cooking time to 10 minutes straight away, and this time we got satisfactory results.
After removing the vegetables from the grill, we prepared them into a warm salad with a dressing of lemon juice, olive oil, and a little salt and pepper.
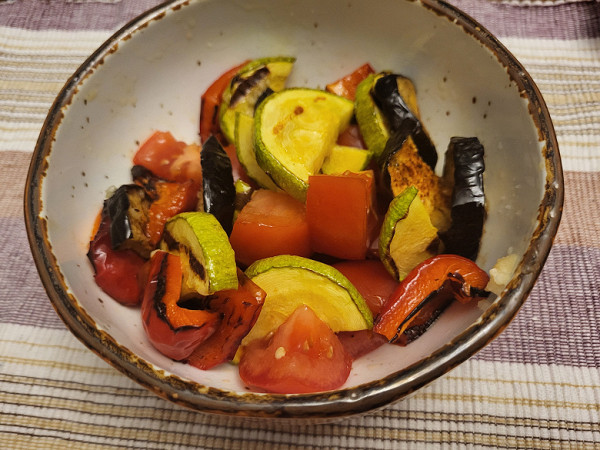
It turned out divine.
Result: excellent
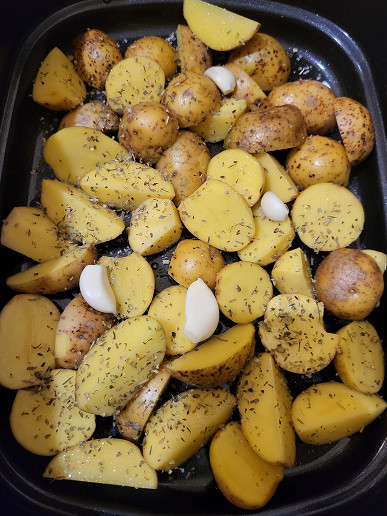
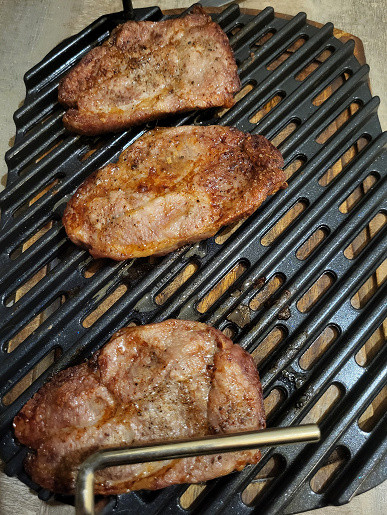
Grilled pork with fried potatoes
For our next test, we decided to test the grill's ability to cook two dishes at the same time. We placed the potatoes in the grill bowl, sprinkling them with seasonings and salt. We placed the pork on the grill grate, also sprinkling it with seasonings, salt and pepper. We set the temperature to 200 °C and the time to 18 minutes, selecting the “grill control without probe” mode. Before starting cooking, we adjusted the time by 3 minutes.
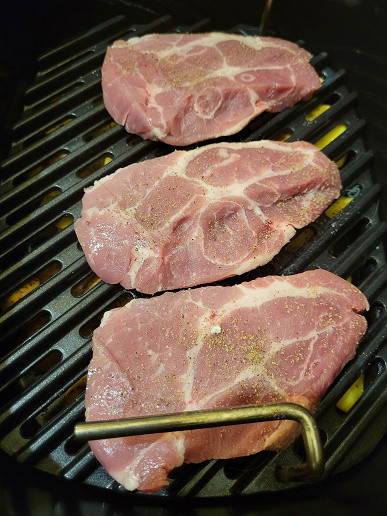
After 18 minutes, the meat was ready, but the potatoes still seemed a little damp to us. Therefore, we decided to keep it on the grill for another 10 minutes at the same setting. When removing food from the grill, we removed the meat, since it was already cooked, and the potatoes, since we didn't forget to preheat this time. When the grill was hot, we returned the bowl of potatoes to it.
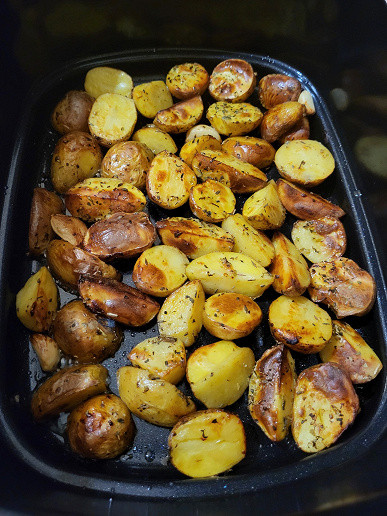
In total, after half an hour we received a ready-made dinner, which we laid out on plates and ate.
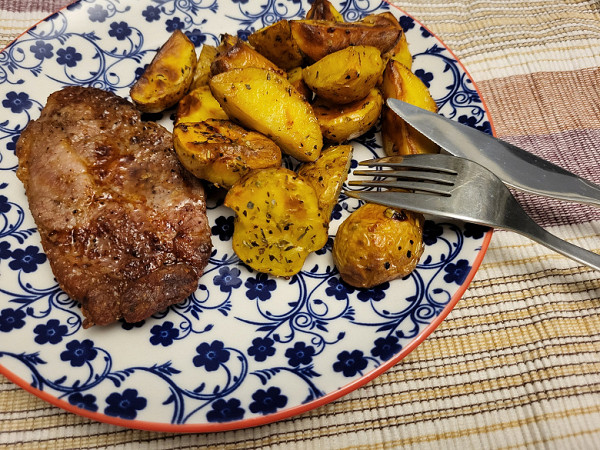
Result: excellent
Steak
We have cooked steaks in the air fryer using the temperature probe several times, and we have always been satisfied with the results.
As already mentioned in the “Operation” section, the temperature probe is inserted with one end into the control panel (small hole on the right), and the other end, the temperature probe itself, into the meat itself, preferably into its thickest part. The temperature probe wire is thin enough, so closing the air fryer lid is not difficult.
We followed these instructions, selecting the Grill Control with Probe mode and setting the probe temperature to 65°C, which is medium done. The numbers «015°C» displayed next to the probe symbol indicate the initial temperature of the meat before cooking.
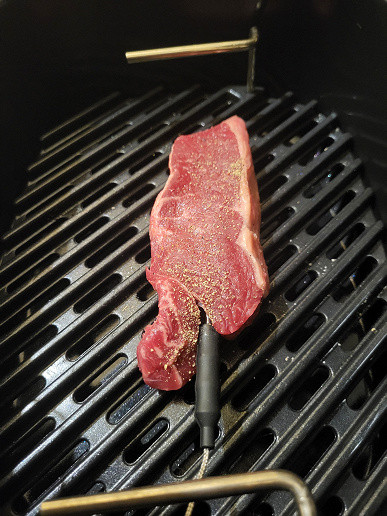
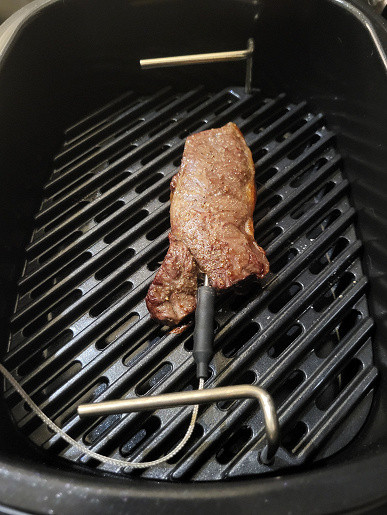
The steak took 7 minutes to cook medium rare. The grill seemed to do a great job. We experimented with different types of steaks — Striploin, Flank, pork steaks — and each time the result was excellent.
After removing the steak from the grill, we let it rest in foil for three minutes. Afterwards, we cut it into pieces and found that it was cooked just right: medium-rare with no visible “blood”, with a pinkish color and a slight brown tint.
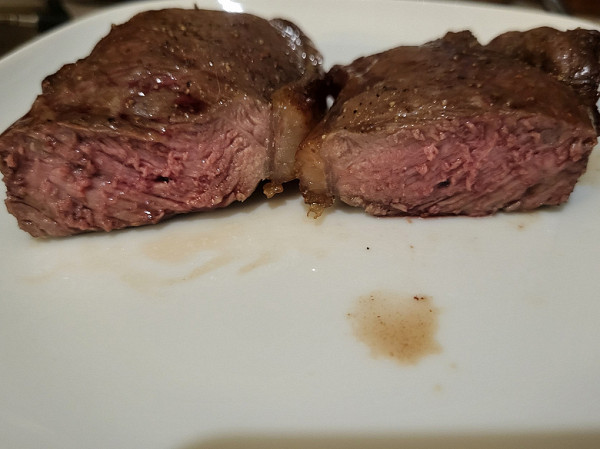
In the photo of the finished dish, the degree of frying of the steak is better visible.
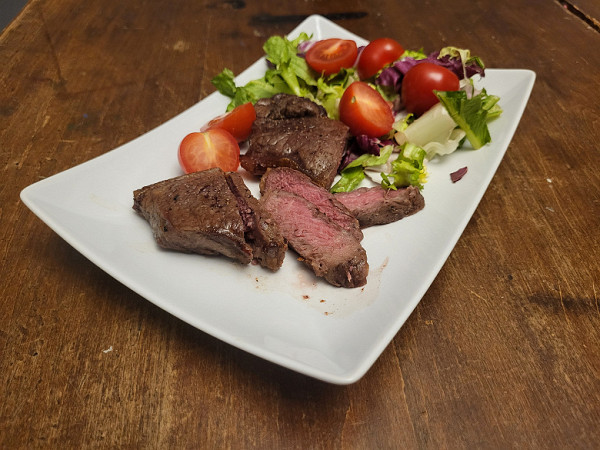
Result: excellent
Croissants
To test the bake mode, we usually use croissants, aiming to achieve the same result that you can get in a coffee shop for little money. However, we had never been able to do this before testing the Rawmid RMA-04 air fryer. Of course, the croissants were baked and edible, but the middle always remained soggy.
This time we did as usual: we took out the frozen croissants, left them for 10 minutes at room temperature and put them in the air fryer, following the instructions for the croissants exactly: 165°C and 20 minutes.
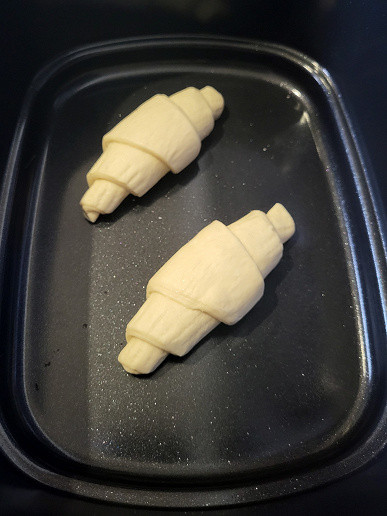
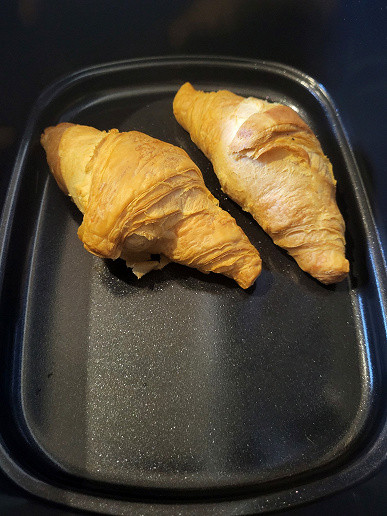
The croissants turned out perfect. Everything was baked in them, and even the middle was exactly as needed: flaky, with visible alternating layers of dough, baked, not wet to the touch or to look at.


Of course, we immediately ate the croissants. In order to photograph the middle, we had to prepare another batch, since this was not possible the first and second time. It is worth noting that the croissants turned out equally good every time.

Result: excellent
Grilled chicken
Well, for the last test we decided to bake a whole chicken on the grill, because we have a whole air fryer at our disposal, and it would be strange not to try this option.
Of course, we did not have enough information in the instructions about the temperature that the temperature probe should show when the chicken is ready. The instructions include temperature information for steaks, but not chicken. So we turned to Google and learned that the inside of the chicken should reach a temperature of 72 °C.
So, we set the grill control mode with a temperature probe and set the temperature to 72 °C.
stuck the temperature probe into the chicken, trying not to touch the bones (by the way, there are recommendations on how to insert the temperature probe into the chicken), and sent it to the grill.

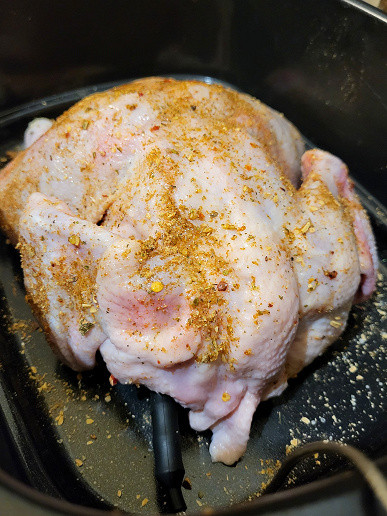
The chicken weighed 1412 grams and took 46 minutes to cook at 200 °C. After this time, the temperature probe showed 72 °C, and the air fryer completed its work.
We opened the lid and saw a completely cooked chicken with golden and crispy skin:
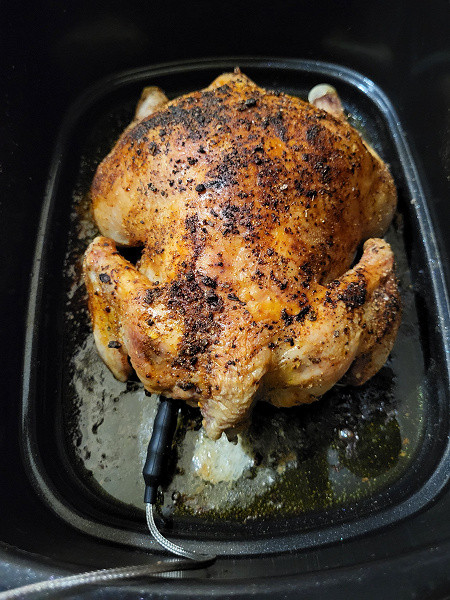
They put it on a dish, cut it up and ate it.
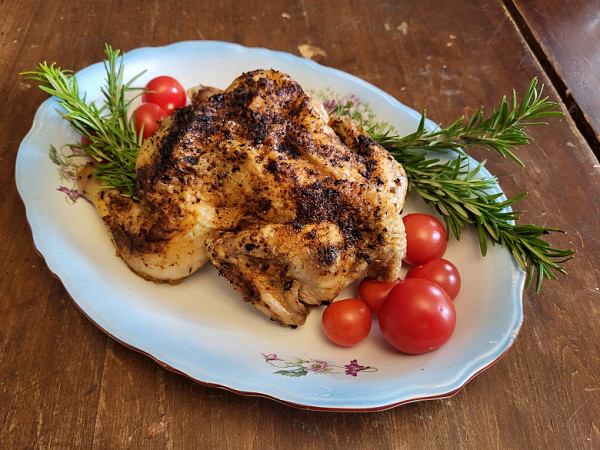
Result: excellent
conclusions
All the manufacturer's statements turned out to be true. Beautiful design, minimal use of oil when preparing dishes, speed — all this corresponds to reality. In addition, the device can easily replace the oven and microwave in your kitchen: it bakes and heats up, not to mention its main function — a grill, with which you can cook wonderful steaks, vegetables, and even fry bread if you suddenly want use this device instead of a toaster.
In addition, we can also note the ease of care and use, the excellent taste of the prepared dishes (our mother is still delighted with the grilled chicken that we treated her to), as well as the possibility of culinary experiments. In any case, our experiments on using the temperature probe in cooking steaks and chicken completely satisfied us, and the croissants baked in the grill were superior in quality to croissants prepared using other devices.
Pros:
- multifunctionality
- simple controls
- excellent cooking result
- ease of care
Minuses:
- insufficiently detailed instructions
- There are not enough silicone oven mitts to remove the bowl/grid from the air fryer