
Specifications, delivery set
| Matrix type | IPS panel with LED (WLED) edge (one line) backlighting |
|---|---|
| Diagonal | 27 inches |
| Relationship between the parties | 16:9 |
| Permission | 2560x1440 pixels (QHD) |
| Brightness | 280 cd/m² |
| Contrast | 1000:1 static, 1,000,000:1 dynamic |
| Viewing Angles | 178° (horizontal) and 178° (vertical) |
| Response time | 1 ms (overclocked) |
| Number of colors displayed | 1.07 billion (10 bits per color — 8 bits + FRC) |
| Interfaces |
|
| Compatible Video Signals | DisplayPort — up to 2560x1440/180 Hz ( edid-decode report ) HDMI — up to 2560x1440/144 Hz ( edid-decode report ) |
| Acoustic system | absent |
| Peculiarities |
|
| Dimensions (W×H×D) |
|
| Weight |
|
| Power consumption | 48 W , no more than 0.5 W in standby mode, no more than 0.3 W in off mode |
| Supply voltage (external power supply) | 100—240 V, 50/60 Hz |
| Delivery set (needs to be checked before purchasing) |
|
* Contrary to popular belief, this is not the time limit after which the device will necessarily break down. However, after this period, the manufacturer ceases to bear any responsibility for its performance and has the right to refuse to repair it, even for a fee.
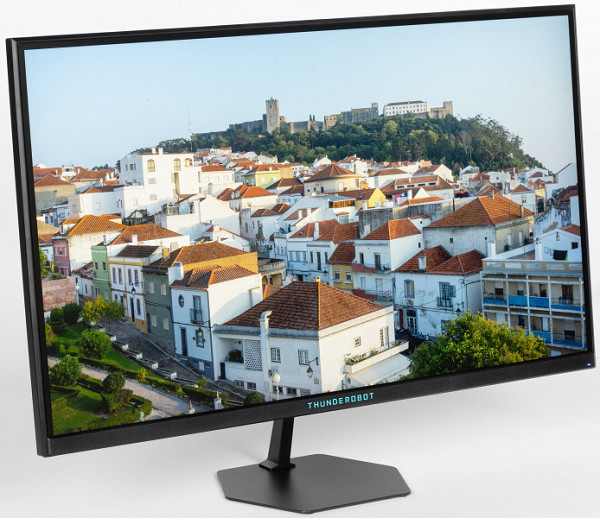
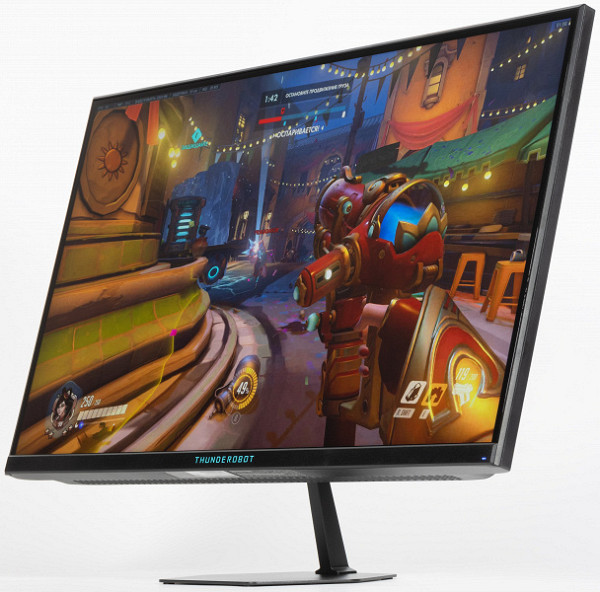
Appearance
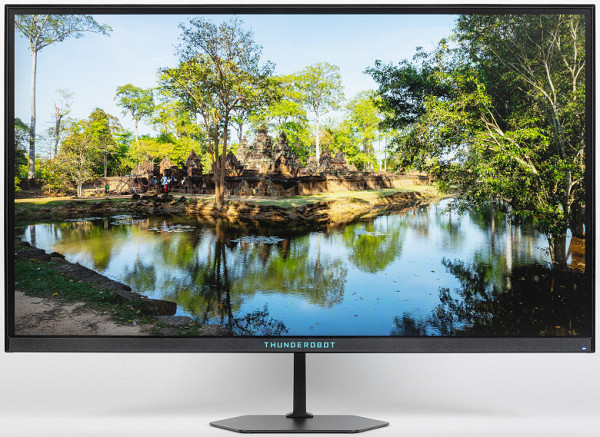
The design of the monitor looks strict and does not reveal a clear gaming focus. The screen block panels are made of black matte plastic. On the rear panel at the bottom there is a relief in the form of vertical ribs. The outer surface of the matrix is black, with a semi-matte tint (the specularity is clearly visible), and the outer layer of the matrix is quite hard. From the front, the screen looks like a homogeneous surface, limited at the bottom by a narrow bar and along the perimeter by a narrow border. However, when displaying an image on the screen, you may notice that there are small margins between the outer edges of the screen and the display area.
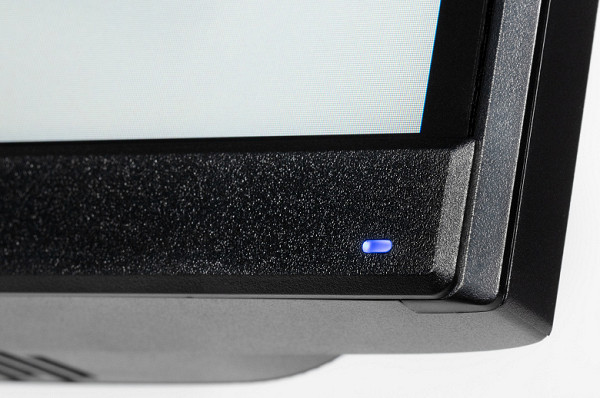
In the center of the bottom bar there is a manufacturer's logo made in blue paint, and closer to the right edge there is a light diffuser for a dim status indicator.
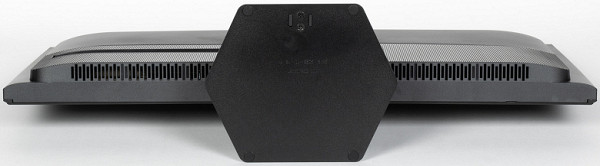
On the back of the monitor there is a convenient 5-way joystick in a shallow niche. This joystick allows you to perform 4-way rotation and push action. The joystick can be accessed from both the right and bottom. The second option allows you to use monitors installed back to back.
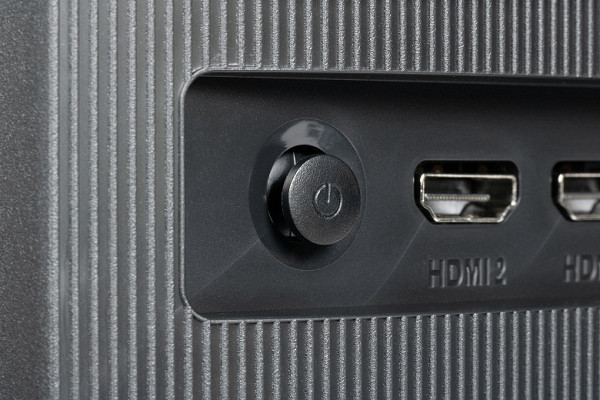
The power connector and interface connectors are located in the same niche at the back and are oriented towards the rear
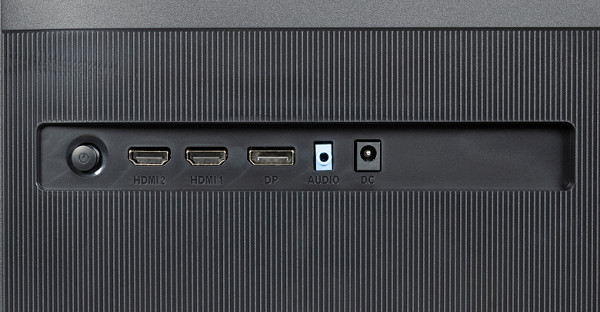
It is convenient to connect to these connectors.

There are ventilation grilles on the back and top of the monitor to ensure good air circulation.
The base of the stand has a fairly large area, providing the monitor with reliable stability. On the upper horizontal surface of the base you can place the edge of the keyboard or office items. Rubber pads on the bottom of the base protect the desk surface from scratches and prevent the monitor from slipping on smooth surfaces.
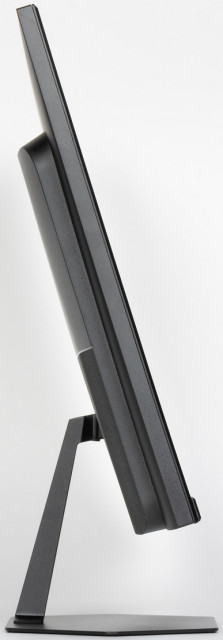
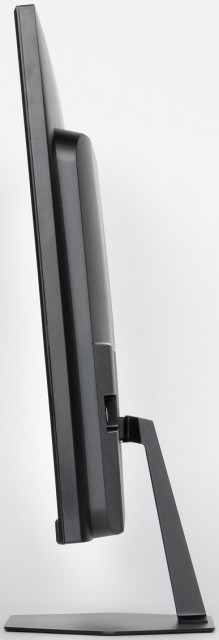
The supporting elements of the stand are made of metal. The design of the stand is quite rigid. The screen block can be tilted slightly forward from the vertical position and more backward.
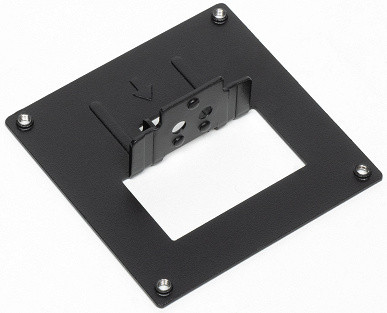
If you prefer, you can detach or not use the stand at all and mount the screen unit on a VESA-compatible bracket. To do this, use the supplied adapter and mount with a platform measuring 75x75 mm.
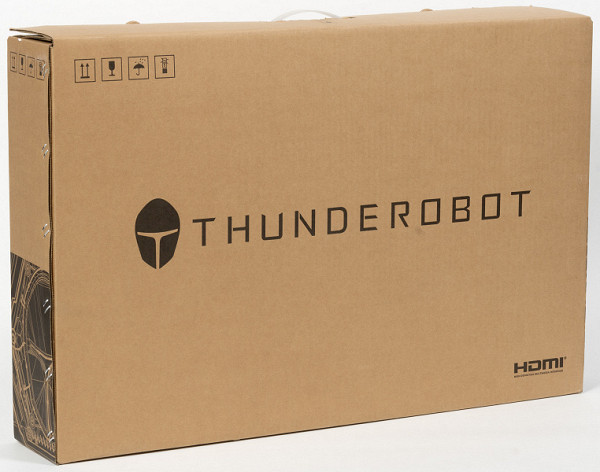
The monitor was packaged in a small corrugated cardboard box, modestly decorated. Foam inserts were used inside the box to protect and distribute the contents. The packed monitor is easy to carry alone by simply grabbing the plastic handle on top.
Switching
Information about the available interfaces is presented in the table with characteristics at the beginning of the article. Input selection is carried out in the main menu or in a short menu; if there is no signal at the current input, automatic selection of another input is activated.
The inputs support the reception of digital audio signals (PCM stereo only), which, after conversion to analog, are output via a 3.5 mm minijack. This allows you to connect an external active speaker system or headphones. The headphone output power is sufficient to work with 32-ohm headphones with a sensitivity of 92 dB with a good volume margin. The sound quality of the headphones is good — the sound is clear, without noise in pauses, and a wide range of frequencies is reproduced, including the lowest.
The package includes only one interface cable — DisplayPort: although it is not long, its quality is visually and actually high.

External power supply. This has both its advantages (easy replacement in case of failure) and disadvantages (it can get in the way).

Menu, control, localization, additional functions and included software
The monitor's power indicator glows blue during operation, goes into standby mode and lights up red, and does not light up at all during conditional shutdown. The monitor turns on by pressing the joystick and turns off by long pressing it. When the monitor is on and there is no menu on screen, moving the joystick up, down, or left will display a slider or short menu of three custom settings selected from an available list.
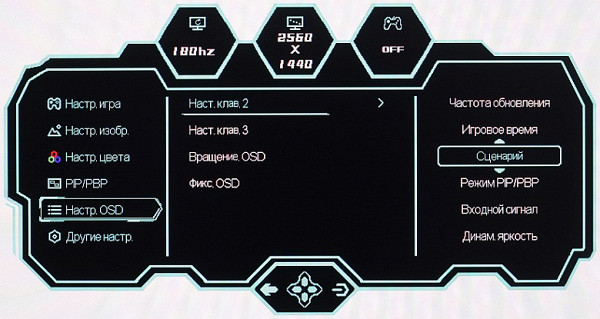
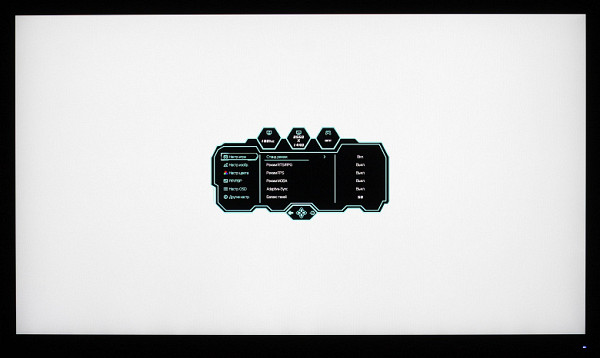
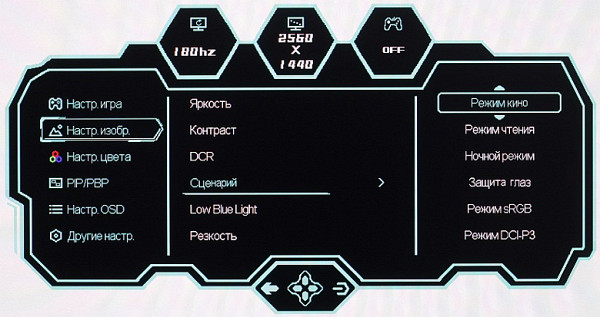
When you move the joystick to the right, the settings menu appears on the screen. The menu is quite large, the inscriptions are readable (the white field is the entire display area):
Navigation is easy, although it does take some getting used to in how the joystick responds. All actions are performed only by him, avoiding switching to buttons, and the number of steps is minimized, while the lists are looped for convenience. However, when adjusting the image, the menu remains on the screen, which can make it a little difficult to evaluate the changes made.
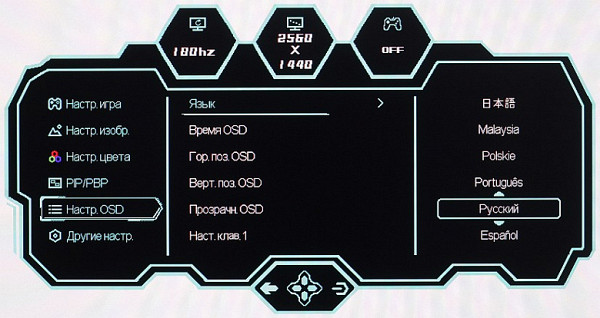
It is possible to adjust the position of the menu on the screen, adjust the transparency of its background, flip the menu in 90-degree increments and select a delay for automatically exiting it. Russian version of the on-screen menu is available.

The quality of the translation of the Cyrillic font into Russian is good, and the text is quite readable. The Russian user manual included in the package is not very informative, but is available for download in PDF format from the company's website.
Among the additional functions there are three “gaming” options: display of a frame rate counter with a graph of its changes (in one of the four corners of the screen), a crosshair of the selected type in the center of the screen, and a timer counting down from the specified values (also in one of the four corners). Only one of these options can be displayed on the screen at a time.
Image
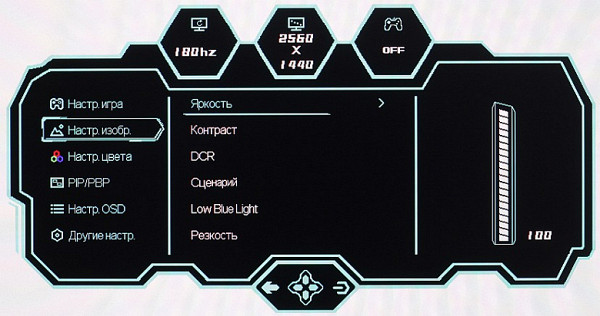
There are not very many settings that affect the brightness and color balance, which is expected for a gaming monitor.
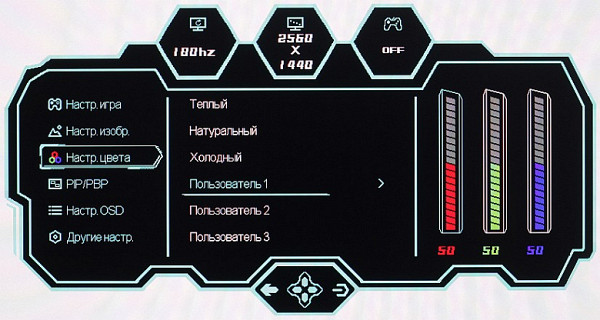
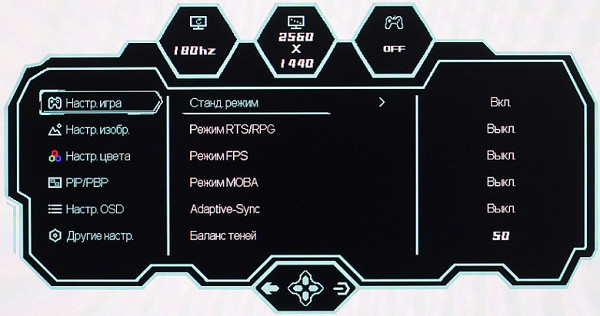
There is a choice of six pre-set general profiles with various combinations of Brightness and Contrast settings, as well as three game profiles where the user can change the values of game settings.
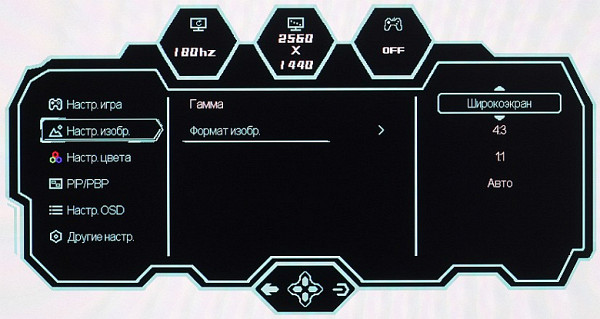
Several geometric transformation modes will help you choose the best option in the case of a source with a resolution and aspect ratio that is not native to the monitor.
The monitor is equipped with PIP and PBP functions, allowing you to display images from different sources. PIP mode allows you to choose the position of the secondary window and its size, while PBP mode allows you to get two 1280x1440 images.
Connecting to a computer with a resolution of 2560x1440 via DisplayPort supports 180 Hz frame rate at 10 bits per color without loss of color clarity, via HDMI — 144 Hz at 8 bits. By reducing the frame rate to 60 Hz, you can get a signal input of 10 and 12 bits per color in the case of HDMI.
FreeSync technology is supported across DisplayPort and HDMI inputs for smooth, tear-free motion. With Nvidia video cards, the monitor supports G-Sync Compatible mode only via the DisplayPort input.
The monitor also supports HDR, which is confirmed by using the official DisplayHDR test tool. The test results show good brightness and a wide color gamut, which makes HDR support more than just formal.
LCD matrix testing
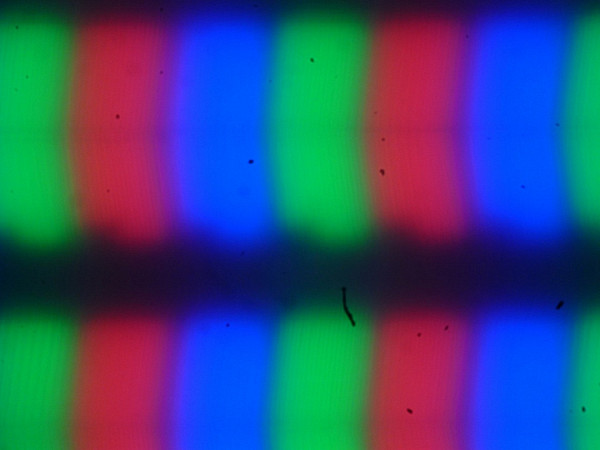
Microphotographs of the matrix
The image of the pixel structure is blurry due to the matte surface, but the structure characteristic of IPS can be recognized (black dots are dust on the camera matrix):
Focusing on the screen surface revealed randomly located surface microdefects responsible for the matte properties:
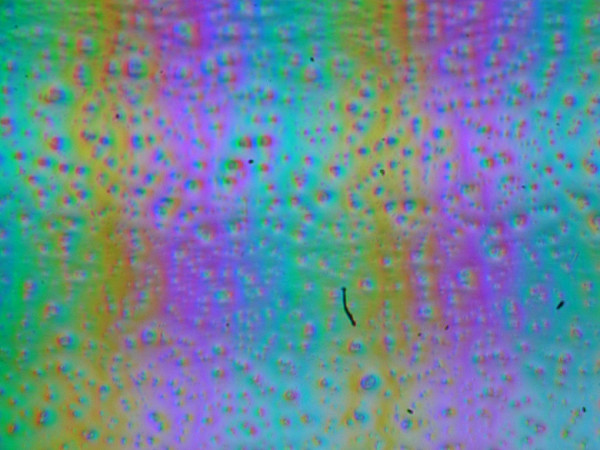
The grain size of these defects is several times smaller than the size of subpixels, which eliminates the possibility of focusing on microdefects and “jumping” focus across subpixels when the viewing angle changes. As a result, there is no “crystalline” effect.
Color rendering quality assessment
The real gamma curve depends on the selected profile in the Gamma list (the values of the approximating function indicators are given in parentheses in the captions, and the coefficient of determination is also there):
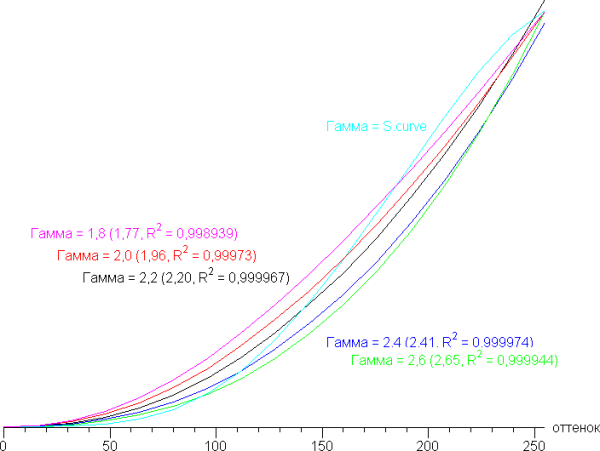
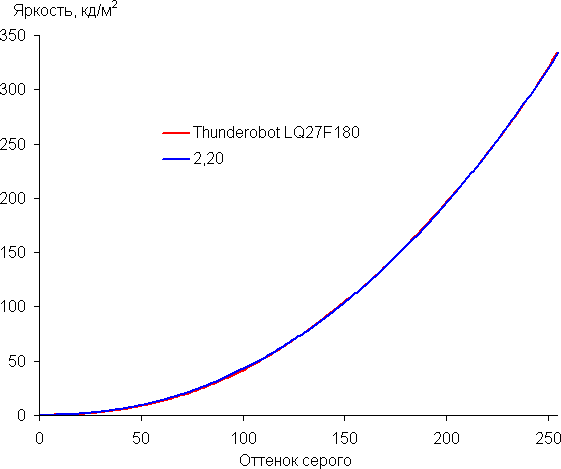
When you select Gamma 2.2, the actual gamma curve most closely matches the standard one. To test this, we measured the brightness of 256 shades of gray (0, 0, 0 to 255, 255, 255) at this setting. Below is a graph showing the increase (not the absolute value!) of brightness between adjacent halftones:
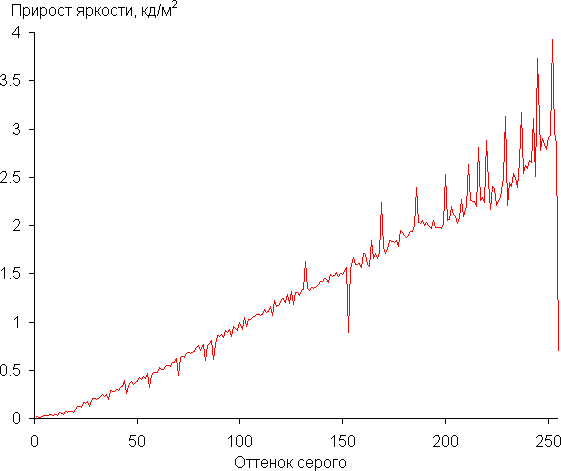
Throughout most of the gray scale, the increase in brightness is quite uniform, with each subsequent hue significantly brighter than the previous one. However, the white shade is too close to the lightest shade of gray in brightness.
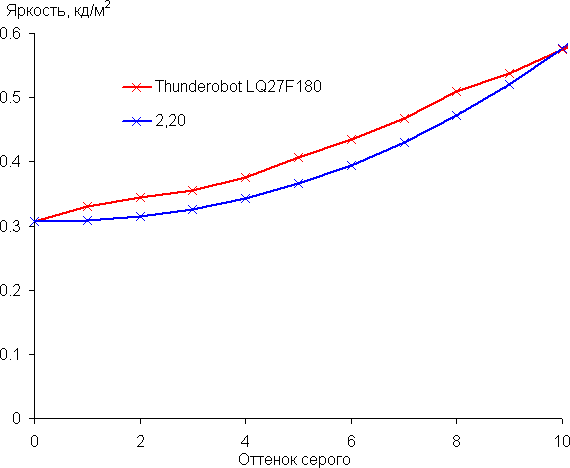
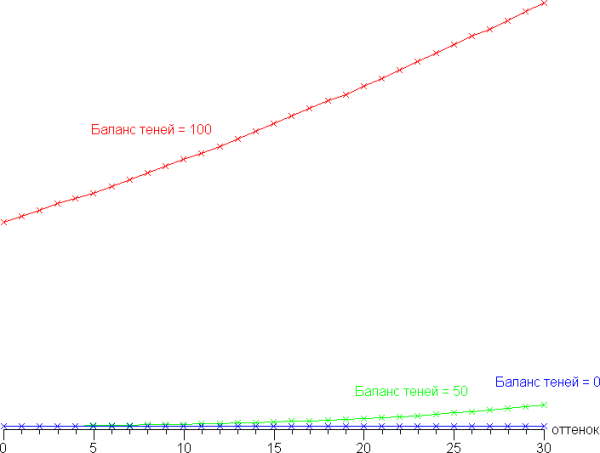
In the darkest area, all shades are hardware and visually distinguishable, which is especially important for a gaming monitor:
The approximation of the resulting gamma curve gave a value of 2.20, which is equal to the standard value of 2.2. In this case, the real gamma curve almost does not deviate from the approximating power function:
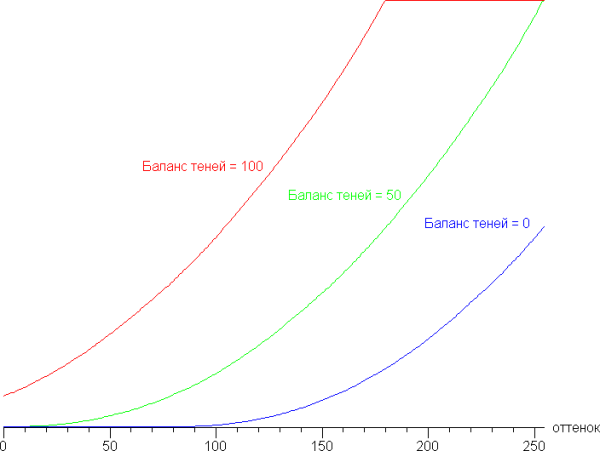
Using the additional setting «Shadow Balance» (values from 0 to 100, in increments of 1, default 50) you can adjust the gamma curve, improving (>50) or worsening (<50) the visibility of details in the shadows. The former can be useful in games with dark scenes. Below are the gamma curves for three values of this setting:
And a fragment in the shadows:
This changes the black and white levels, which is not very good.
To evaluate color quality, we used an i1Pro 2 spectrophotometer in combination with the Argyll CMS software package (version 1.5.0).
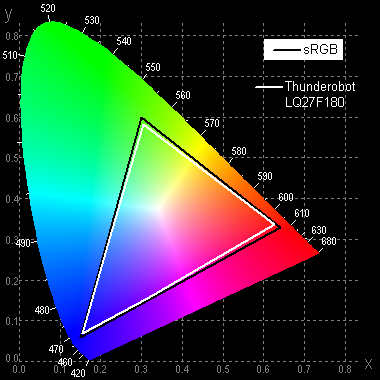
The original color gamut is slightly larger than sRGB:

When you select the sRGB profile, the coverage is compressed to the sRGB boundaries:
Below is the spectrum for the white field (white line), superimposed on the spectra of the red, green and blue fields (lines of the corresponding colors), when there is no explicit adjustment of the color gamut
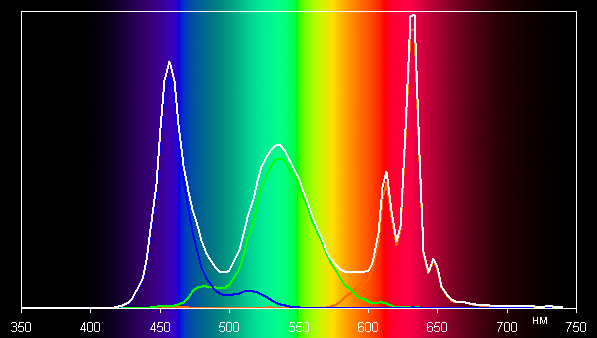
It can be assumed that the backlight LEDs use a blue emitter, and for green and red colors phosphors are used, possibly containing quantum dots. Thanks to good separation of color components, the monitor provides a wide color gamut.
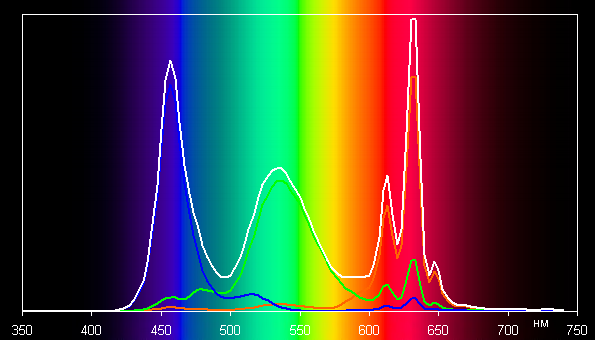
However, when the color gamut is corrected to the sRGB standard, the components begin to mix with each other to a significant extent.
It is noted that images optimized for sRGB devices may appear unnaturally saturated on wide-gamut screens unless appropriate color correction is made. However, color management systems such as color profiles and software like DisplayCAL can achieve the desired color correction, especially in operating systems such as Windows and imaging software.
When choosing profiles User 1-3 or without color correction, the compromise color balance maintains maximum brightness and contrast, but the deviation of ΔE from the standard blackbody spectrum exceeds 10 units, which is not a very good indicator even for consumer devices. While choosing the sRGB profile improves color balance, with ΔE below 2 units. The graphs below illustrate the color temperature at different parts of the gray scale and display the ΔE values.
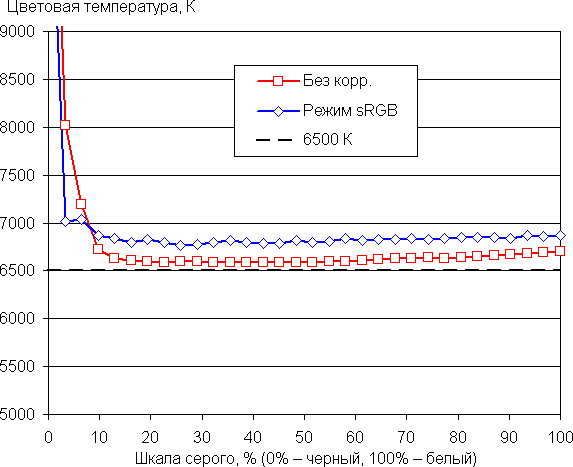
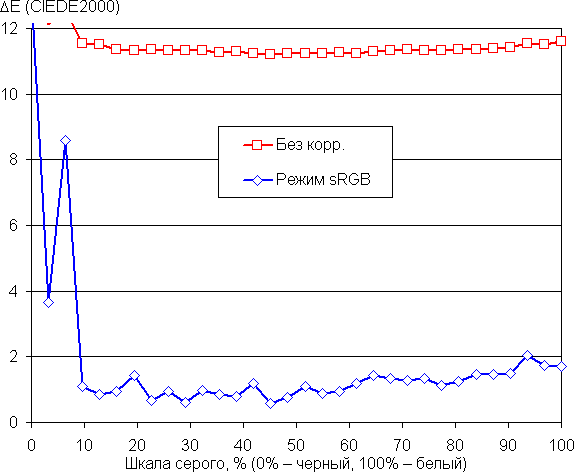
Considering that the range closest to black is of low importance for color reproduction, as well as the high error in measuring color characteristics, in most cases, for non-professional color work, it is enough to simply select the sRGB profile in the monitor settings.
Measuring black and white uniformity, brightness and power consumption
Brightness was measured at 25 points on the screen, evenly spaced at 1/6 increments of the screen width and height (ignoring screen borders), with monitor settings set to maximum brightness and contrast while maintaining acceptable image quality. Contrast was calculated by comparing the brightness of the fields at the measured points.
| Parameter | Average | Deviation from the mean | |
|---|---|---|---|
| min., % | max., % | ||
| Black field brightness | 0.28 cd/m² | −12 | eleven |
| White field brightness | 320 cd/m² | −9.1 | 10 |
| Contrast | 1100:1 | −8.4 | 3.5 |
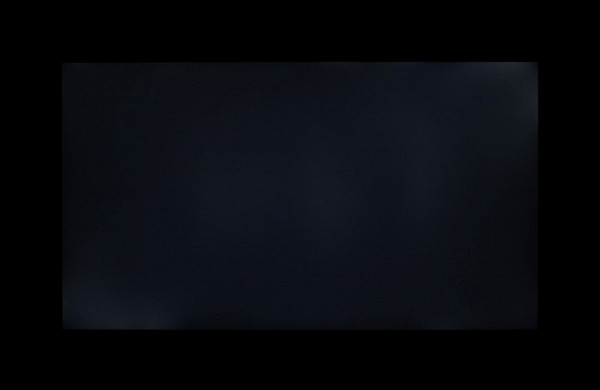
Aside from the edges of the screen, white uniformity and contrast are good, but black levels are slightly poorer. Contrast for this type of sensor is slightly above average by modern standards. It is visually noticeable that the black areas, especially closer to the edges, are slightly highlighted. The photo below illustrates this.
When dynamic brightness control is activated, the contrast is technically increased to infinity, since the backlight on a black screen turns off completely approximately 31 seconds after switching from white to black. The graph below shows the change in brightness (along the vertical axis) when moving from a black field (after five seconds of output) to white, both with dynamic brightness adjustment disabled and enabled.
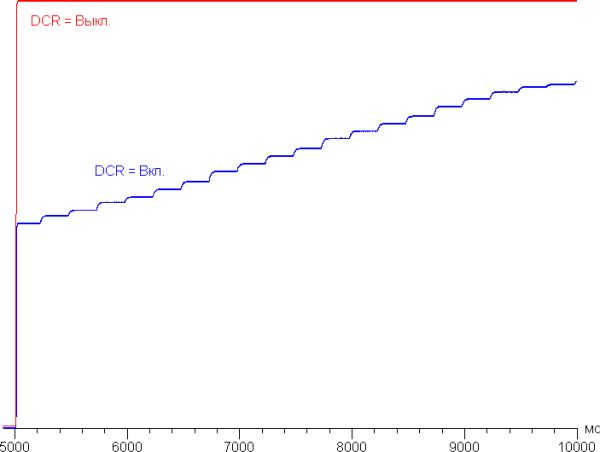
It can be seen that in dynamic mode, the change in backlight brightness occurs very slowly, and the practical benefit of this function turns out to be negligible.
Brightness of the white field in the center of the screen and power consumption from the network (with other settings that provide maximum image brightness while maintaining acceptable quality, established after prolonged use, 180 Hz mode):
| Setting value Brightness | Brightness, cd/m² | Electricity consumption, W |
|---|---|---|
| 100 | 334 | 28.4 |
| 50 | 180 | 18.9 |
| 0 | 50 | 12.5 |
In standby mode and during conditional shutdown, the monitor consumes about 0.2 W.
The brightness of the monitor is adjusted using the backlight, which does not affect the image quality (the contrast and number of shades are preserved). This allows you to comfortably use the monitor in both bright and dark rooms when working, playing games or watching movies.
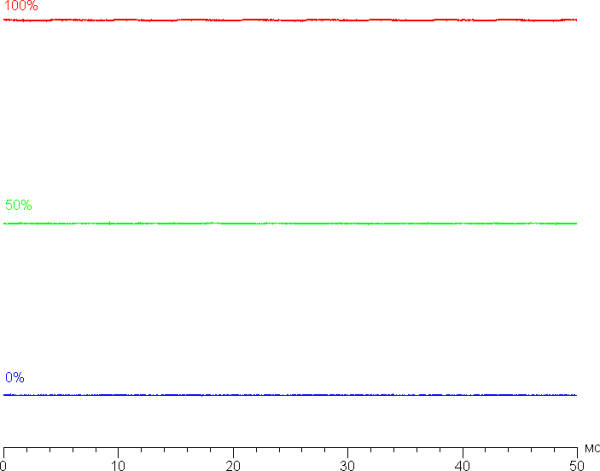
The monitor backlight does not flicker at any brightness level, eliminating visible screen pulsation. Technically, this is ensured by the absence of PWM (pulse width modulation). Below are graphs of brightness (vertical axis) versus time (horizontal axis) at various brightness levels:
There is a dark frame insertion mode called MPRT (Moving Picture Response Time). Below is a graph of brightness versus time with this feature enabled:
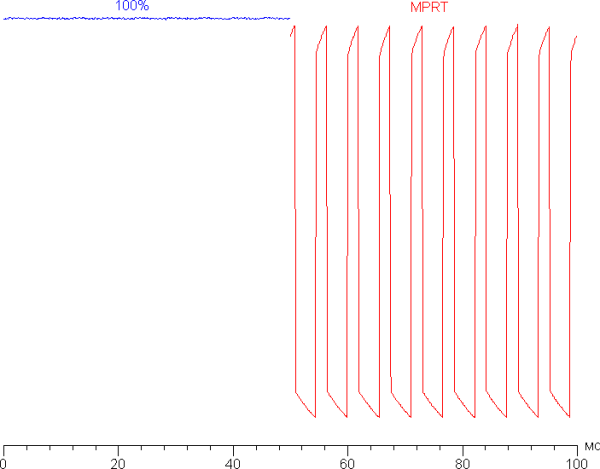
Motion clarity does improve with this mode enabled, however, artifacts may appear in a dynamic picture, which will be discussed below. You should also be careful when using this mode due to flickering up to a maximum of 180 Hz, which may cause increased eye fatigue. In addition, turning on this mode significantly reduces the brightness to 138 cd/m², which also reduces its attractiveness.

Determining response time and output latency
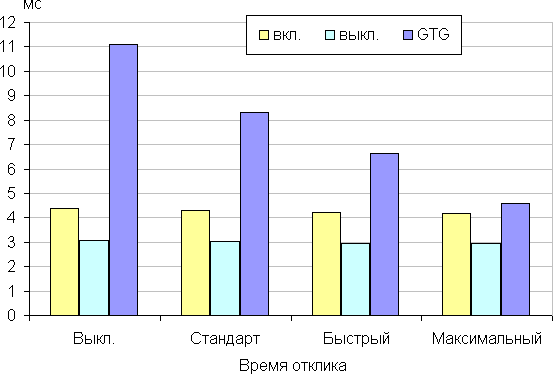
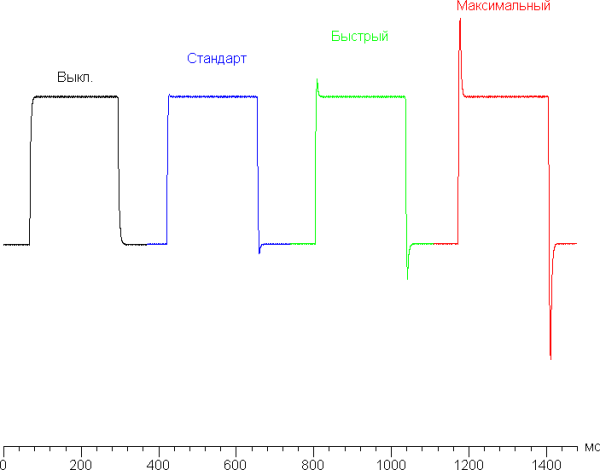
The response time depends on the value of the corresponding setting, which regulates the acceleration of the matrix. The graph below shows the change in on and off times for the black-white-black transition (on and off columns), as well as the average total time for transitions between halftones (GTG columns) in mode with a refresh rate of 180 Hz for four different values for this setting:
When overclocking is turned on, characteristic bursts of brightness are observed in the graphs of some transitions. Below are graphs of the transition between shades of 70% and 90% brightness and back for four different values of this setting. The vertical axis represents brightness, and the horizontal axis represents time. The graphs are arranged sequentially for better perception:
Of course, the use of such overclocking leads to the appearance of noticeable artifacts in dynamic images. From our experience, we can conclude that you can stop at the first overclocking level or not activate it at all, since the matrix is fast enough without this setting. At the last level of overclocking, artifacts become too noticeable.
The following are the brightness dependences when alternating white and black frames at a frame rate of 180 Hz:
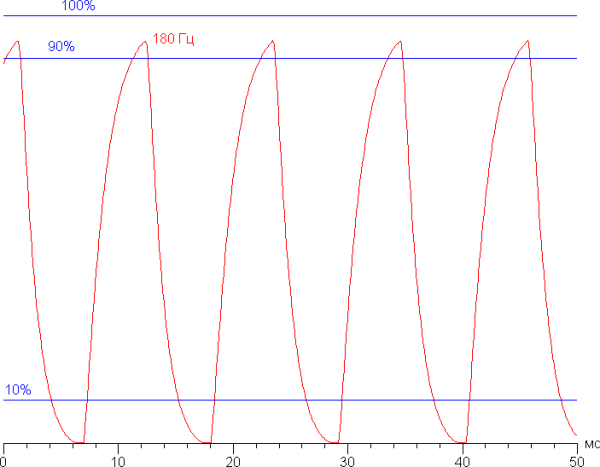
It can be seen that at a frequency of 180 Hz, the maximum brightness of the white frame exceeds the level of 90% of the white level, and the minimum brightness of the black frame decreases to the black level. The amplitude of the brightness change exceeds 80% of the white level. These formal criteria indicate that the sensor speed is sufficient to display images at a frame rate of 180 Hz.
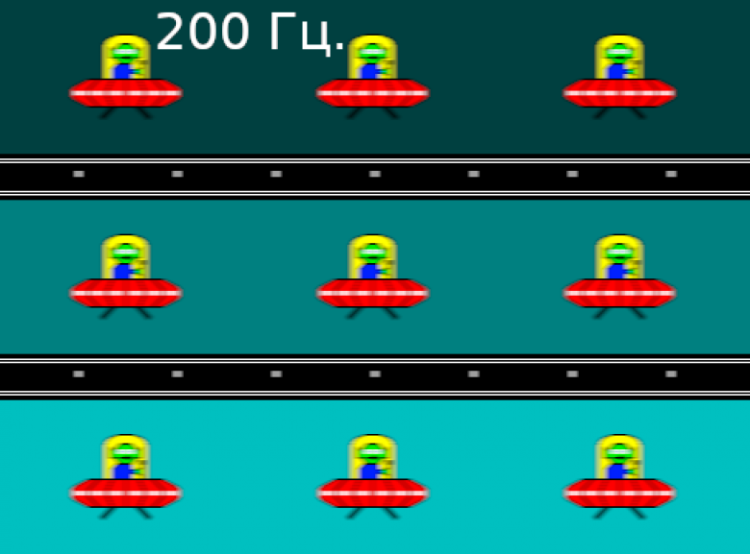
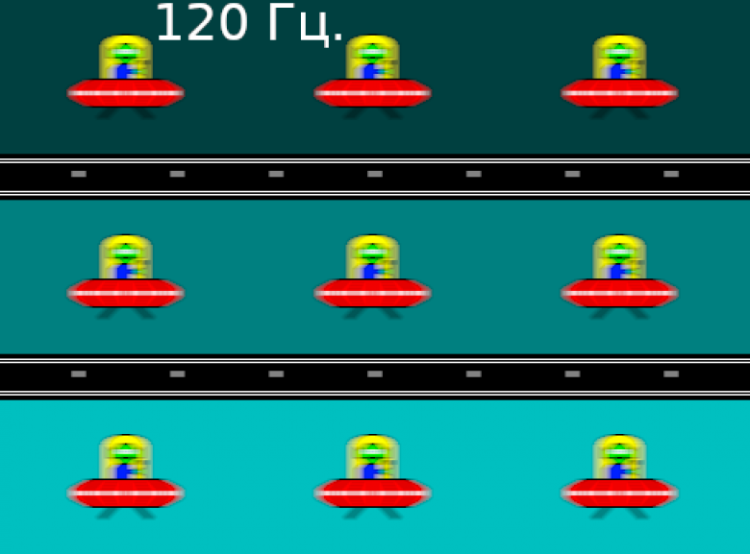
For a clear idea of what artifacts can arise from overclocking and how this affects human perception, we present a series of images taken using a moving camera. These images show what the human eye captures when it follows a moving object on a screen. We used the recommended settings (motion speed 960 pixels/s for 60 and 120 Hz refresh rates, or 900 pixels/s for 180 Hz, which is an integer number of pixels per frame), and a shutter speed of 1/15 sec. The pictures show the refresh rate values, as well as information about overclocking enabled (ODx; x = 0 — 3) and dark frame insertion mode (MPRT).
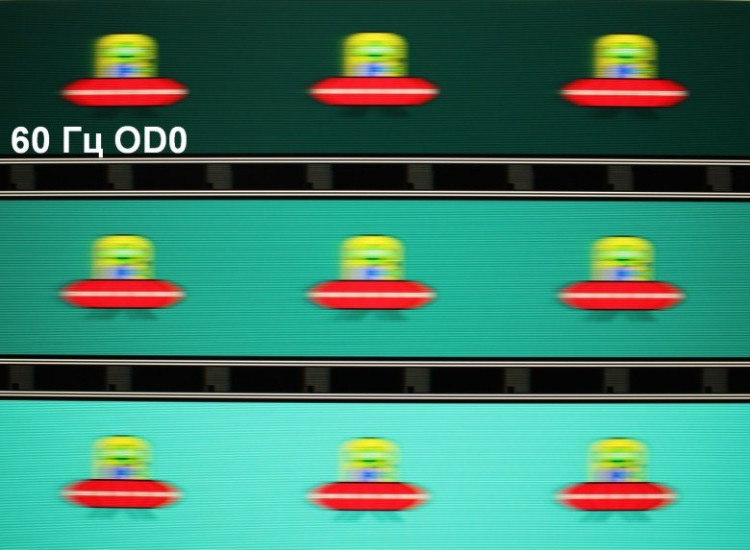
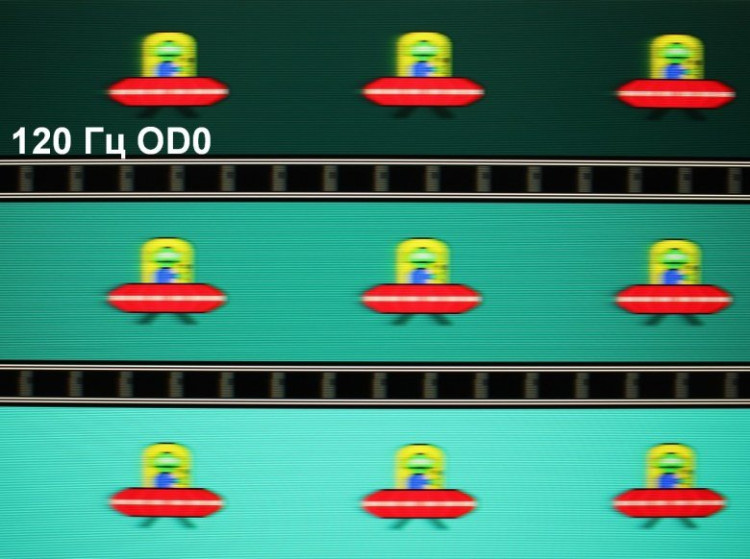
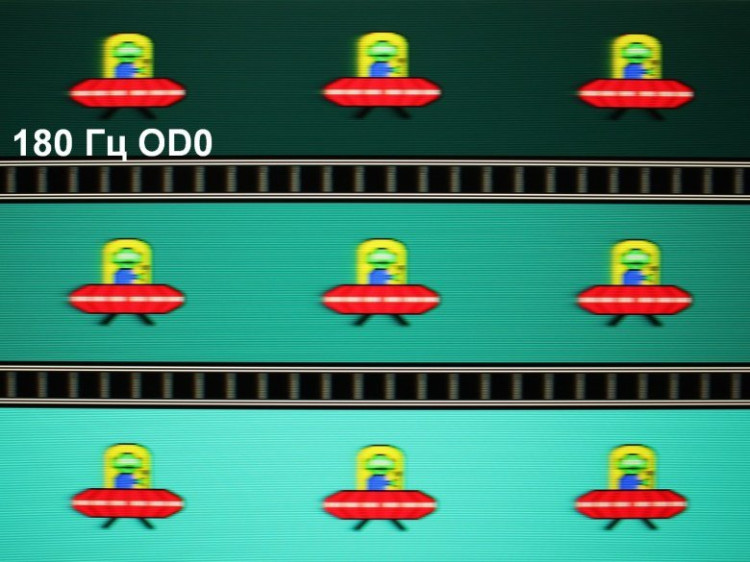
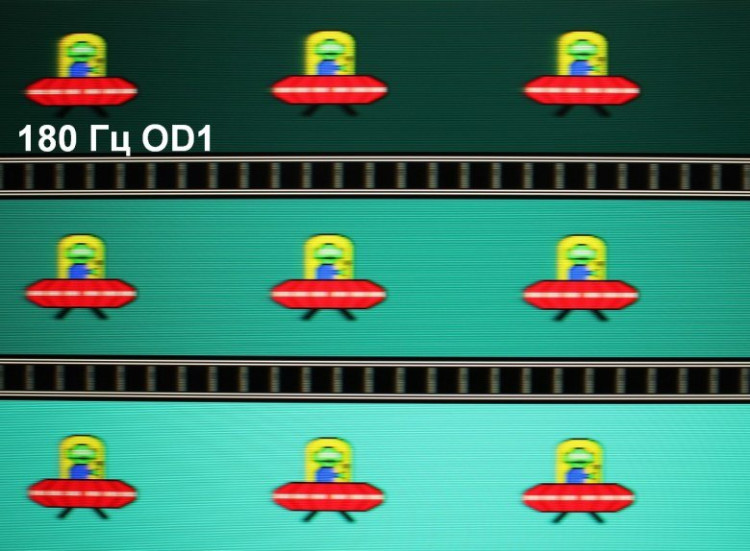
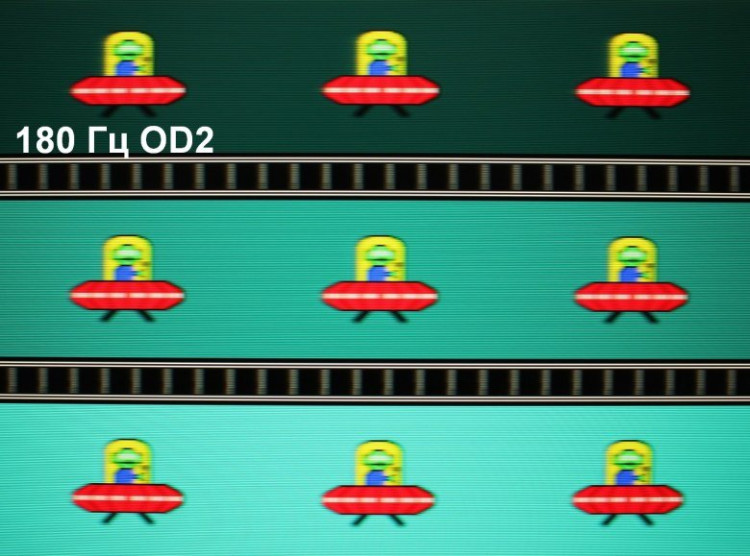
It can be seen that, under the same conditions, increasing the refresh rate and overclocking the matrix helps improve image clarity, however, with maximum overclocking, noticeable artifacts appear. Enabling the MPRT mode allows you to achieve almost single-pixel horizontal clarity, but objects in motion leave residual copies, which reduces the positive effect.
To illustrate what the image would look like using a matrix with instant pixel switching, consider the following. At a 60 Hz refresh rate, an object with a motion speed of 960 pixels/s is blurred by 16 pixels, at 120 Hz — by 8 pixels (at a speed of 960 pixels/s), at 180 Hz — by 5 pixels (at a speed of 900 pixels/s). This blur occurs because the focus of vision moves at the speed indicated above while the subject remains stationary on the screen for 1/60, 1/120, or 1/180 of a second. To make this effect clearer, we will simulate blurring the object by the specified number of pixels.

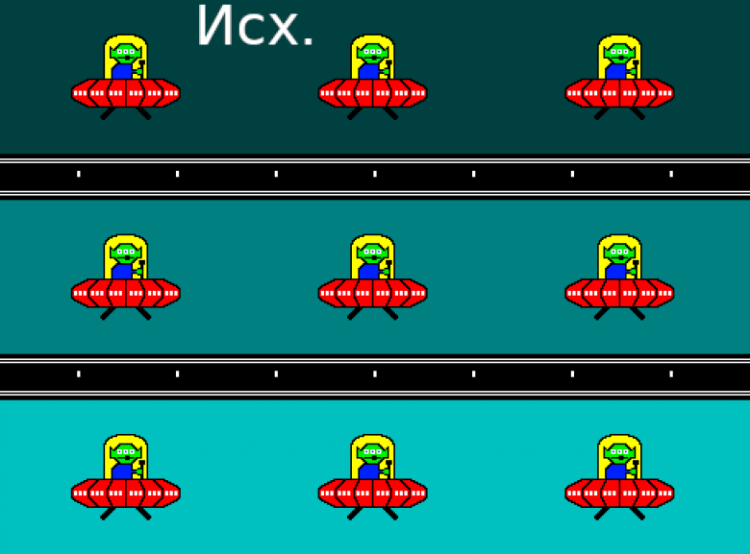
It can be seen that image clarity, even without overclocking the matrix, approaches what would be expected from an ideal matrix, and when using the MPRT mode it even exceeds this level.
We measured the total output latency from the moment the video buffer page is switched until the image begins to display on the screen (it is worth remembering that this latency depends on the operation of the Windows operating system and the video card, and not just on the characteristics of the monitor). At a refresh rate of 180 Hz, this latency was only 4 ms. This is an extremely low latency, which is practically not felt in everyday use of the computer and does not affect performance in games.
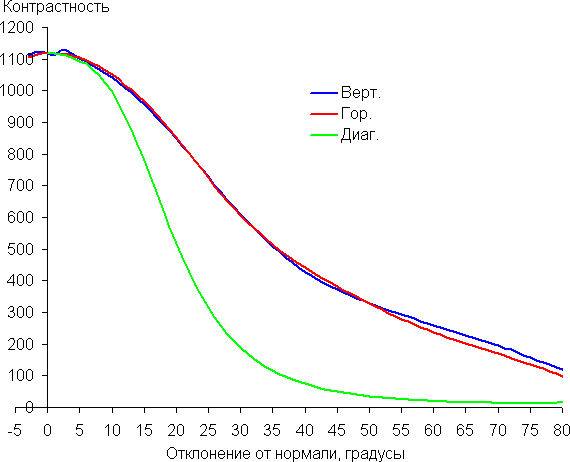
Measuring viewing angles
To study the change in screen brightness as a function of angular deviation from the perpendicular to the screen, we carried out a series of measurements covering black, white and gray shades at the center of the screen. We took measurements at a wide range of angles, including vertical, horizontal and diagonal directions (corner-to-corner for 16:9 format).
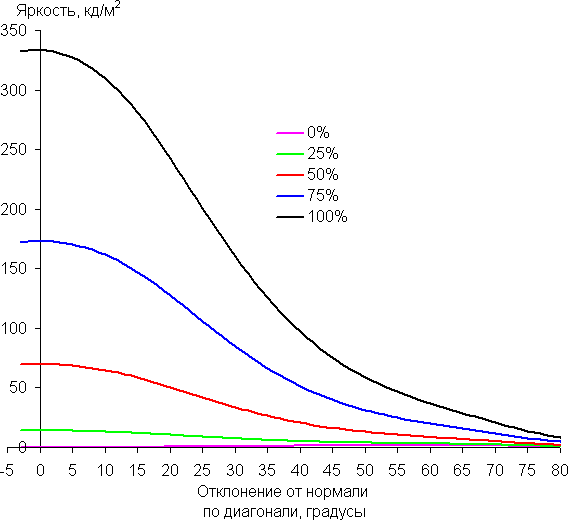
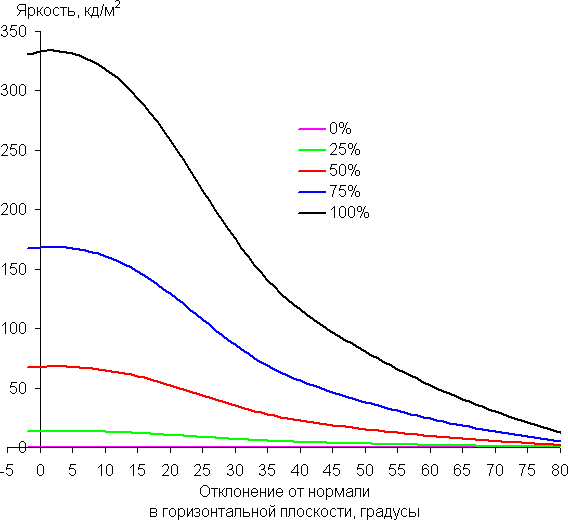
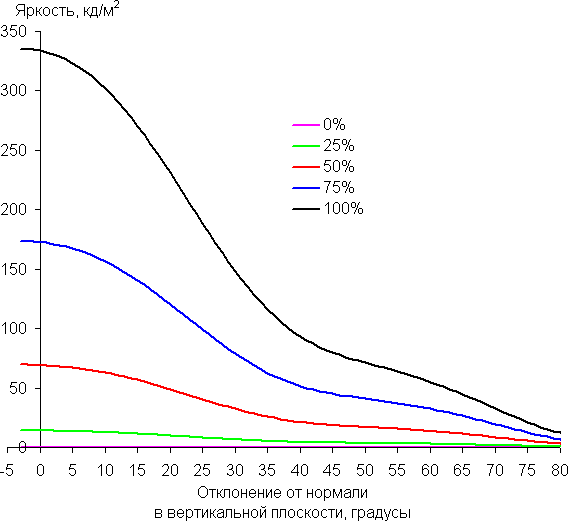
Reducing brightness by 50% of maximum value:
| Direction | Corner |
|---|---|
| Vertical | 28° |
| Horizontal | 30° |
| Diagonal | 29° |
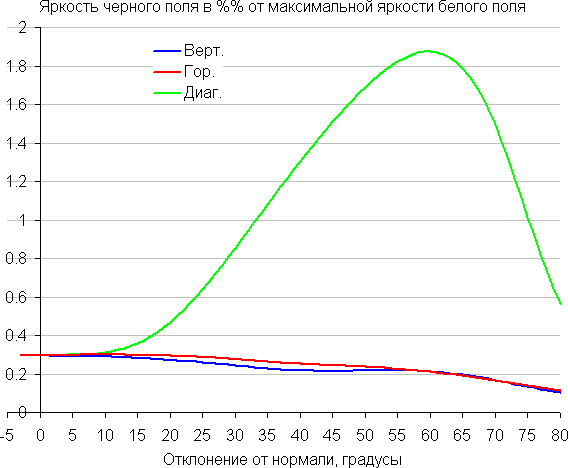
The rate at which brightness decreases as viewing angle changes is limited, indicating narrow viewing angles. A similar trend of decreasing brightness is observed when deviating from the perpendicular to the screen in all directions, while the graphs do not intersect in a significant range of measured angles. When deviating in the diagonal direction, the brightness of the black field begins to increase significantly already at a deviation of 20° from the perpendicular. As a result, at a short distance from the screen, the black field at the edges may appear lighter than in the center, maintaining a neutral gray tint. Contrast in the ±82° angle range approaches 10:1 only when tilted diagonally, remaining above this value in other cases.
To quantify changes in color rendering, we performed colorimetric measurements for different color fields across the entire screen. Measurements were carried out in the angle range from 0° (the sensor is directed perpendicular to the screen) to 80° in steps of 5°. The obtained values were recalculated into ΔE relative to the measurement of each field at a perpendicular position of the sensor to the screen.
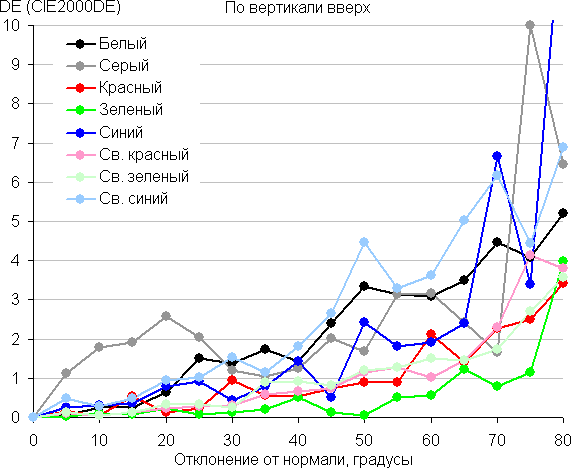
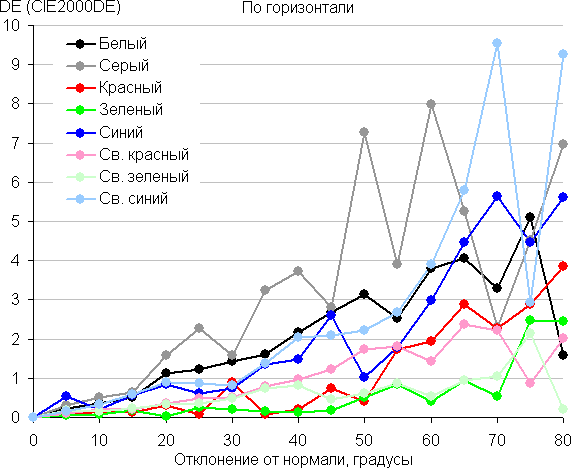
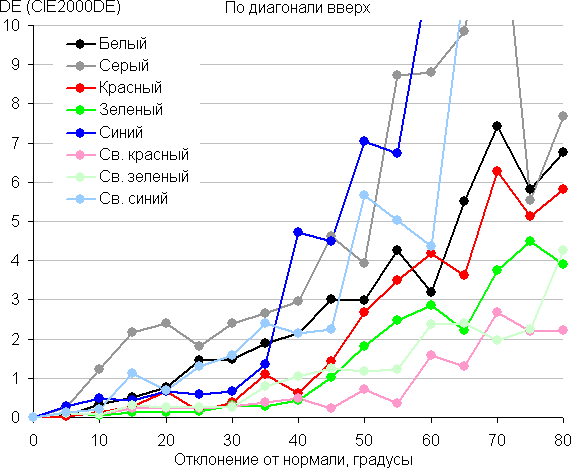
A 45° deflection angle can be used as a reference point, which can be important when two people are viewing the image at the same time. A ΔE value of less than 3 can be taken as a standard for color rendering quality. Color stability in this range is considered acceptable and is one of the main advantages of an IPS matrix.
conclusions
The Thunderobot LQ27F180 is a high-end gaming monitor that is almost perfect, except for the simple stand design. Its key features include a large high-resolution screen and a modern, stylish design. The monitor supports refresh rates up to 180Hz and is also compatible with AMD FreeSync and Nvidia G-Sync Compatible technologies. Thanks to these characteristics, it is ideal for games of any level of dynamism.
Advantages:
- Up to 180Hz refresh rate at QHD resolution
- Fast matrix (even without overclocking)
- Good color balance and sRGB coverage when selecting a preset profile
- AMD FreeSync and Nvidia G-Sync Compatible support
- Low output latency (4ms)
- Efficient adjustable sensor overclocking and dynamic sharpening function
- Adjusting the visibility of gradations in shadows
- On-screen crosshair, timer and frame rate counter
- HDR support available
- No backlight flickering
- Picture-in-picture and picture-by-picture modes
- Low blue mode
- Supports 10 bits per color operation
- Good sound quality in headphones
- Convenient 5-way joystick on the control panel
Flaws:
- No significant