
Over the past few years, robotic vacuum cleaners have moved from the category of exotic novelties and toys for technical enthusiasts to everyday household devices that are actively used in ordinary homes and apartments.
In this context, despite the general similarity in design, prices for such devices can vary significantly. Today we will test an expensive premium robot vacuum cleaner — Bork V831. Let's analyze its features and find out what it offers beyond the usual features that you might have to pay extra for.
Characteristics
| Manufacturer | Bork |
|---|---|
| Model | V831 |
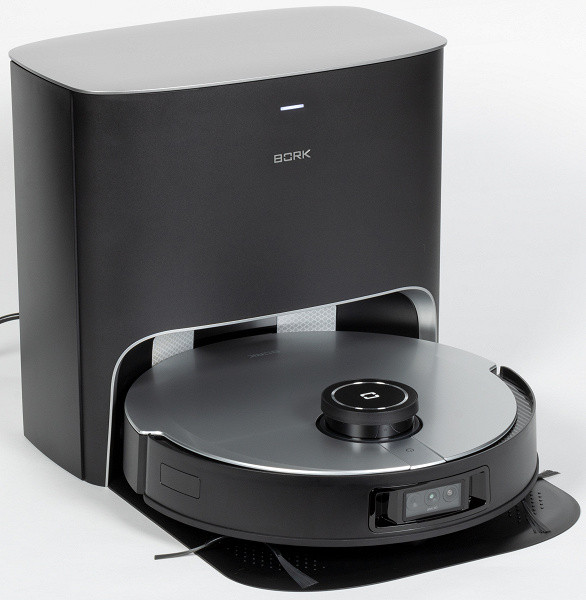
| Type | robot vacuum cleaner with self-cleaning station |
| Country of Origin | China |
| Guarantee | 1 year |
| Life time * | 3 years |
| Type of cleaning | dry/dry and wet |
| Self-cleaning system | dry waste (dust collector), dust bag volume — 3 l |
| Dust container volume | 400 ml |
| Water container volume | 240 ml |
| Noise level | up to 68 dB |
| Maximum power | 45 W |
| Battery | Li-ion, 5200 mAh, 14.8 V |
| Remote control | smartphone application |
| Weight | 4.3 kg |
| Dimensions | diameter 362 mm, height 103.5 mm |
| Dimensions of self-cleaning station | 365×483×350 mm |
| Network cable length | 1.5 m |
* Contrary to popular belief, this is not the time limit after which the device will necessarily break down. However, after this period, the manufacturer ceases to bear any responsibility for its performance and has the right to refuse to repair it, even for a fee.
Equipment
The vacuum cleaner comes in double packaging. The inner box, designed to protect the device, is additionally protected by an outer box made of technical (brown) cardboard.
The packaging design looks strict, which is typical for expensive devices. It's probably assumed that the end user (or whoever receives the vacuum cleaner as a gift) doesn't need to get bogged down in the technical details — everything should just work perfectly.
Therefore, all that remains is to enjoy the image of the device on the packaging and proceed to unpacking. It should be noted that the packaging is very high quality. Inside there is a separate box for the vacuum cleaner and accessories, as well as a separate one for the base station. All components are neatly arranged in their respective sections, eliminating clutter and possible damage inside the box.
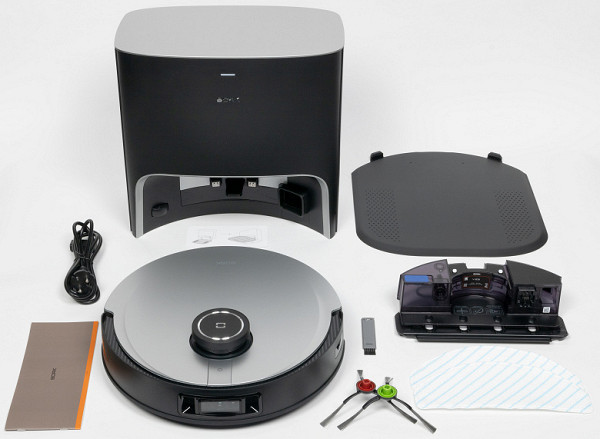
Having opened the box, we found inside:
- the vacuum cleaner itself with a container for dry cleaning
- container for wet cleaning
- base with a platform for the robot to enter
- side brushes
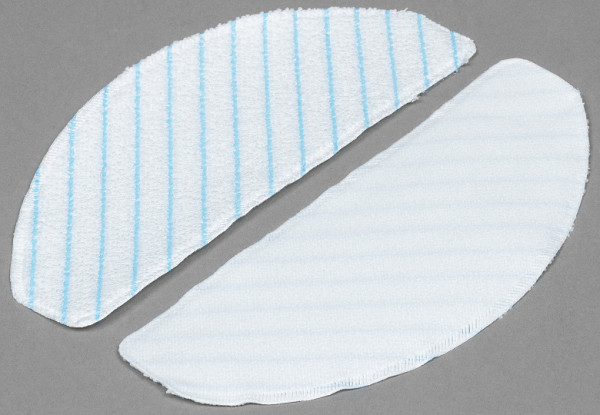
- two microfiber cloths for wet cleaning
- disposable wipes for wet cleaning
- base (aka self-cleaning station)
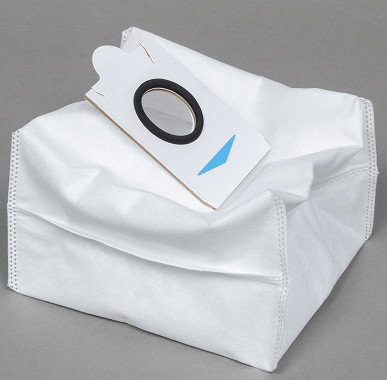
- garbage bag
- cleaning brush
- operating instructions
The package, therefore, allows you to immediately start using the vacuum cleaner; we are not provided with additional accessories.
At first sight
Despite the fact that this is a standard robot vacuum cleaner, at first glance it is easy to spot some nuances that make our Bork special compared to average models. Various details attract attention and give the vacuum cleaner a premium rather than ordinary appearance. Let's take a closer look at these features.
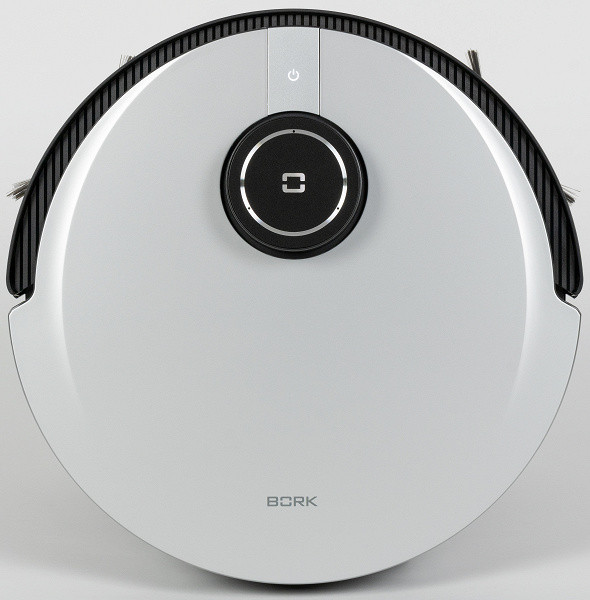
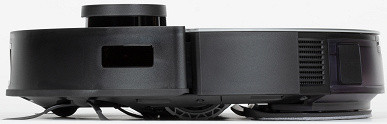
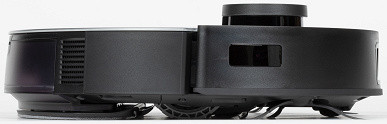
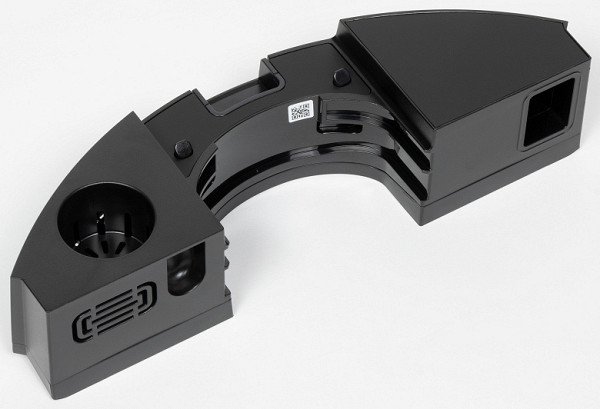
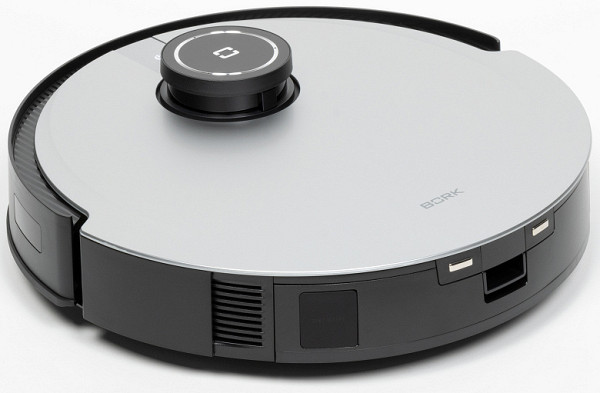
The first thing that catches your eye is the excellent design of the case. You can give him a solid five. The front bumper, which functions as a collision sensor, is decorated with stylish shading. The lidar protruding upward has a ring-shaped coating that imitates metal. The top panel is made of plastic in a matte metal style. And here we see the first unique feature — the top panel does not open, as is common with cheaper models, but is completely removable. It is secured with six magnets, making it easy to remove and reinstall.
We lift the top panel and find a red power switch, an indicator button for Wi-Fi, and a container (by default, intended for dry cleaning).
Particular attention is paid to details. The red power switch looks and feels more durable than touch buttons. The Wi-Fi button (which also doubles as an indicator) has a noticeable tactile response, providing the user with reliable feedback — it is immediately clear whether a press has been made.
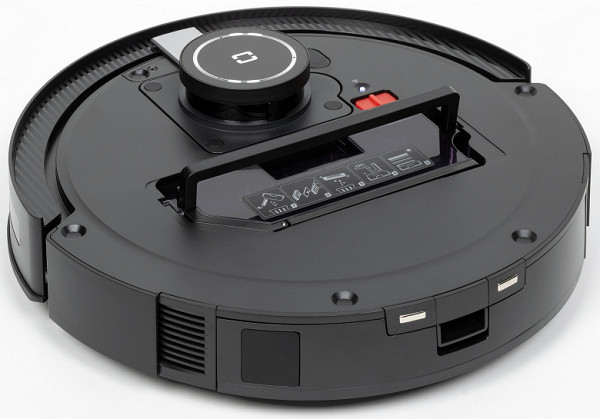
Containers for collecting dust or carrying out wet cleaning are equipped with a folding handle, which not only makes it easier to remove the container for taking it to the trash can, but also serves as a latch. By lifting the handle, you remove the container from the robot body, and by lowering the handle, you lock it in place. This small detail brings additional comfort to using the robot vacuum cleaner.
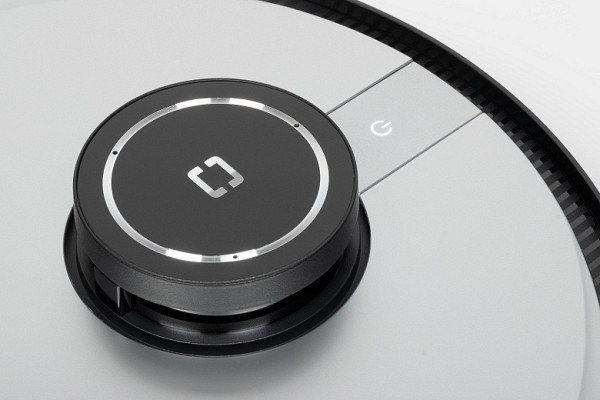
The lidar tower rises above the smooth top panel, in which the main navigation organ of the vacuum cleaner, consisting of an optical emitter and receiver, rotates. The LDS sensor accurately measures the distance to obstacles, building an instant map of the room for cleaning planning. Next to the lidar there is a button to start the automatic mode with LED backlight.

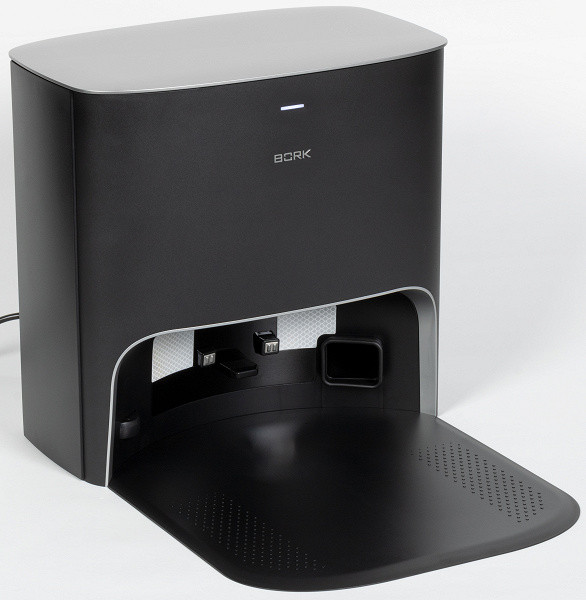
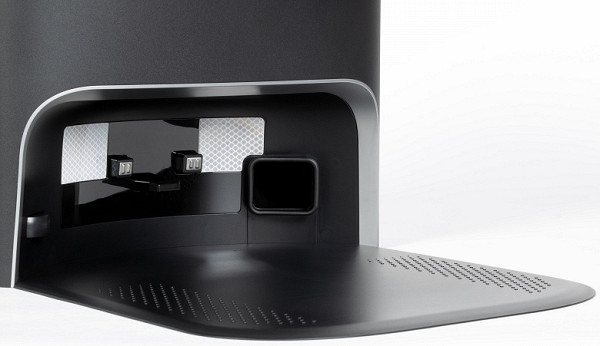
A movable bumper takes its place on the front part of the side, behind which mechanical collision sensors are located. In addition to them, there are infrared sensors hidden behind darkened glass.
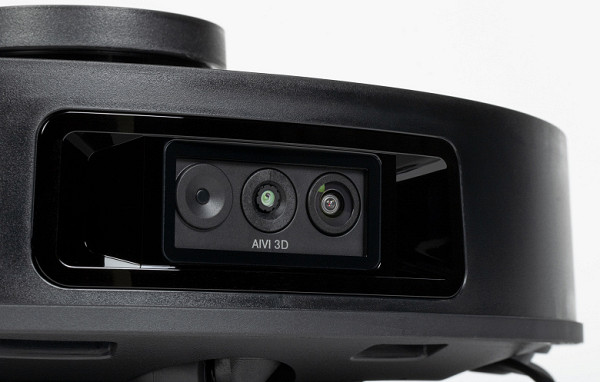
The front part of the bumper is occupied by a module that visually resembles a camera with three lenses. In fact, it is a combination module that includes a camera indicator (left), a sensor called Truedetect 3D (center) and, of course, a camera (right).
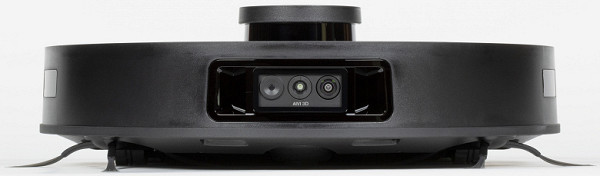
Along the lower edge of the bumper there is a protective rubber belt, which serves to protect the device and pieces of furniture from damage during touches and collisions. Air exhaust grilles are located near the rear of the bumper.
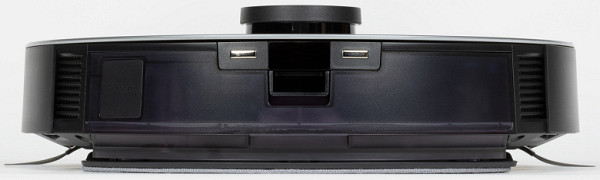
On the back side you can see the dust discharge port (located on the left and closed with a movable rubber plug) and charging contacts (in the center). Also on the back is a module for dry cleaning (dust is discharged through it) or a module for wet cleaning.
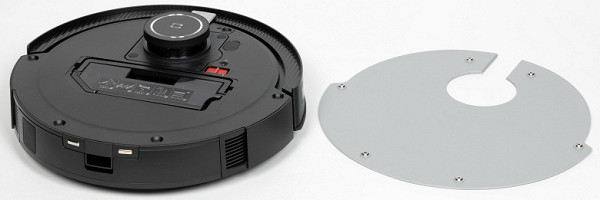
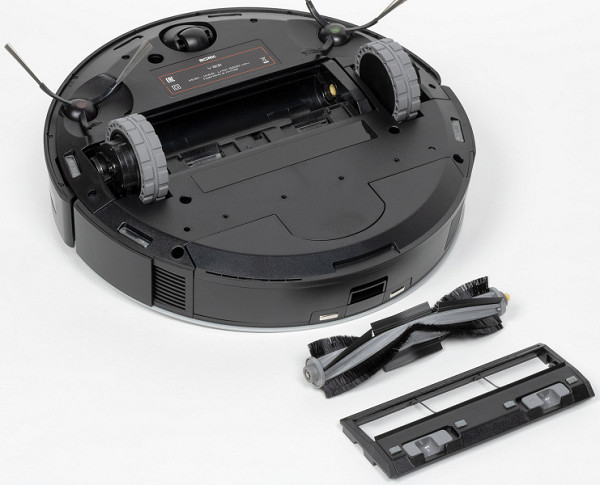
Turning the robot over, we find a completely standard design. Immediately noticeable is the presence of six height sensors located around the perimeter, and in the center you can see the carpet detection sensor, located to the left of the central wheel.
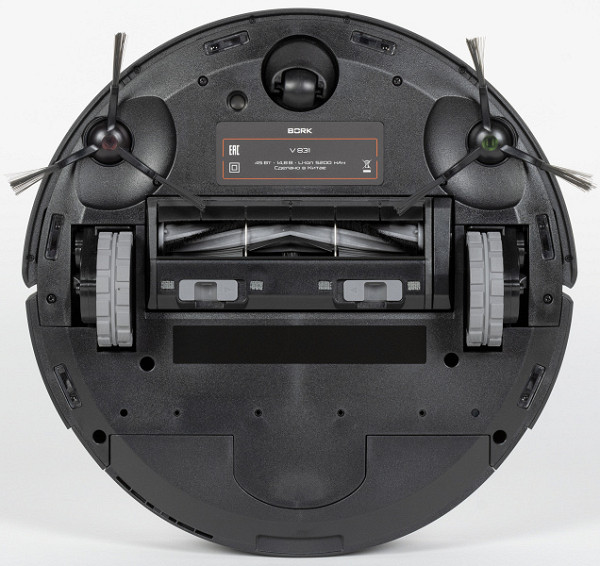
The chassis of our robot uses a traditional layout: two drive wheels on the sides and a spherical support wheel in the front.
The suspension of the drive wheels has a pitch from 8 to an impressive 42 mm, which allows the robot to easily overcome thresholds and uneven surfaces. The wheels themselves are equipped with a pronounced rubber tread that prevents slipping on a smooth floor.
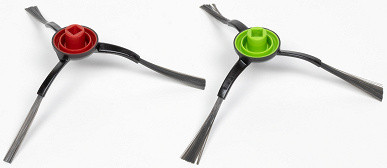
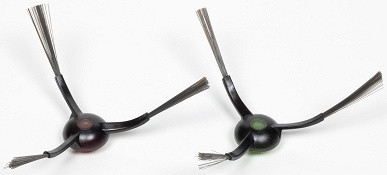
Interestingly, this robot has two side brushes. While many high-end models get by with just one, having two can improve the cleaning experience. The brushes are divided into right and left sides, indicated by green and red colors respectively. They are installed by lightly pressing and clicking into place.
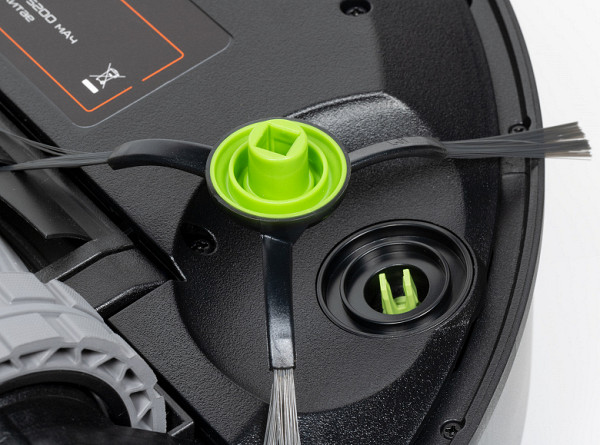
On the central brush of the robot there are two V-shaped rows of medium-hard bristles, between which there are rubber slats. To prevent accidental winding of electrical wires, the rotor is protected by two transverse jumpers attached to the frame. This frame is secured using two spring-loaded latches.
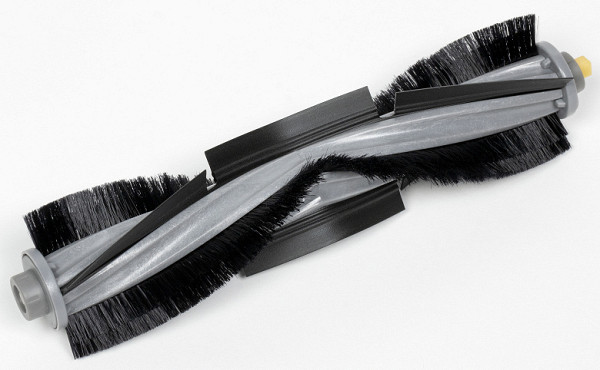
The left brush axis is inserted into the quadrangular hole of the bearing, the right one into the drive hole. Thus, there is only one (correct) way to install it in a vacuum cleaner.
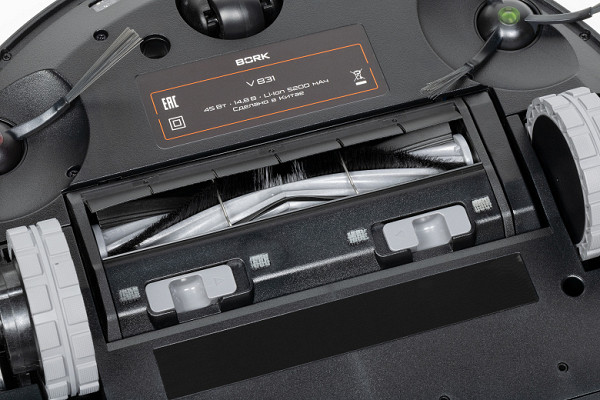
Please note that the frame and central brush are mounted on a movable suspension, which ensures the best fit to the floor or carpet.
Another interesting point was noticed: the air duct connecting the compartment with the brush and the dust container is made in the form of a flexible rubber socket, which should probably improve the efficiency of dust suction.
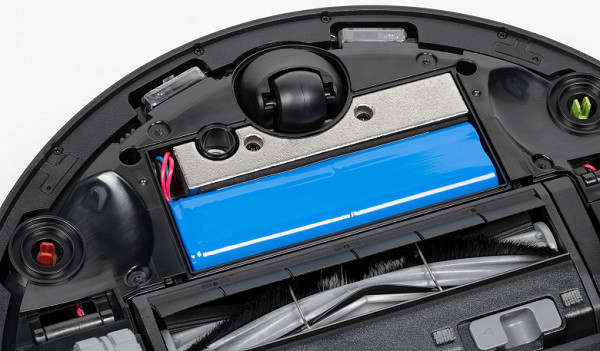
Next to the charging contacts on the base there is a battery compartment cover that is closed with two screws. The power supply is an assembly of four 18650 form factor batteries. The nominal capacity of the battery (Typical Capacity) is 5200 mAh.
Now let's look at modules and containers. Let's start with the dust container. We have already mentioned the convenient folding handle.
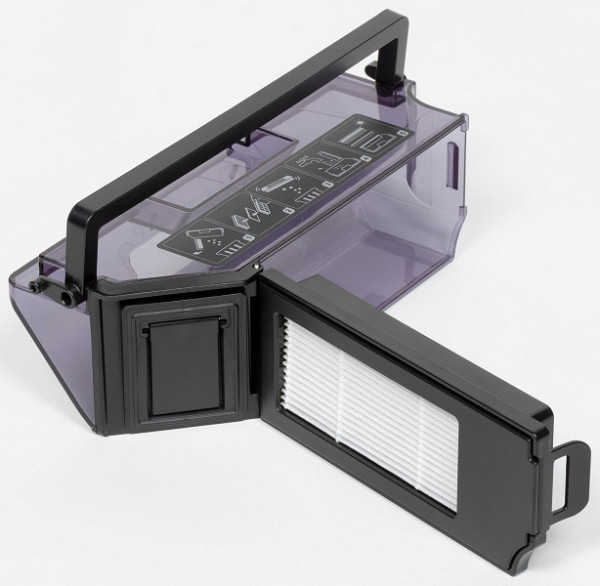
Let's take a look at the filtration system. The pre-filter is a mesh made of synthetic material.
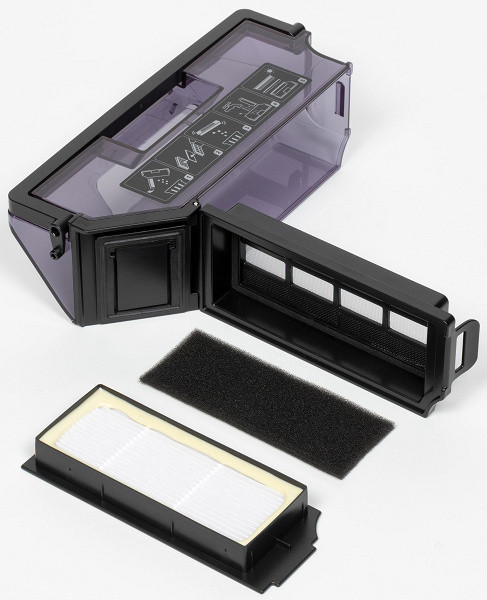
This is followed by a foam filter, and then a frame lid with (surprise!) a built-in HEPA filter. This decision is, one might say, unexpected and introduces some inconsistency.
In order to avoid debris spilling out when removing the container, the dust supply opening is closed with a folding plastic curtain. To empty the container, there is a special port that is automatically closed by a spring-loaded plastic plug. There is a sticker on the top of the container with instructions for cleaning it.
During the dry cleaning process, a dry cleaning module is installed on the back of the vacuum cleaner.
This is essentially an adapter that directs dust and debris into the dock. There is an interesting aspect here: the round socket (in the photo on the left) is designed to install aroma capsules, allowing the vacuum cleaner not only to remove dust, but also to distribute a pleasant aroma around itself.
What about wet cleaning? For this purpose, a separate module is provided, which is installed in place of the module for dry cleaning. On the left there is a compartment for filling the module, closed with a rubber stopper. On the right is an air duct for dust, and next to it are contacts that ensure the operation of the built-in mechanism.
Inside the container compartment there are four contact plates that connect the module to the main body. These plates are designed to transfer energy to the motor, which ensures the mobility of the vibrating brush (sole).

The napkin is attached to the sole using Velcro and a rigid rod, which is inserted into a special groove. During the floor cleaning process, water from the reservoir is supplied to the napkin through through holes in the frame using a pump.
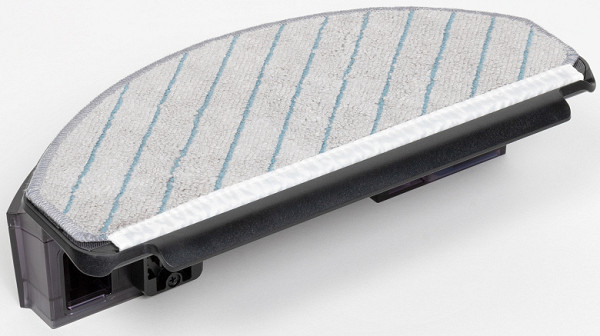
A special sticker on the wet cleaning module contains recommendations for proper care. It is specifically emphasized that the user should not attempt to remove the movable sole to which the napkin is attached, since it is not removable.
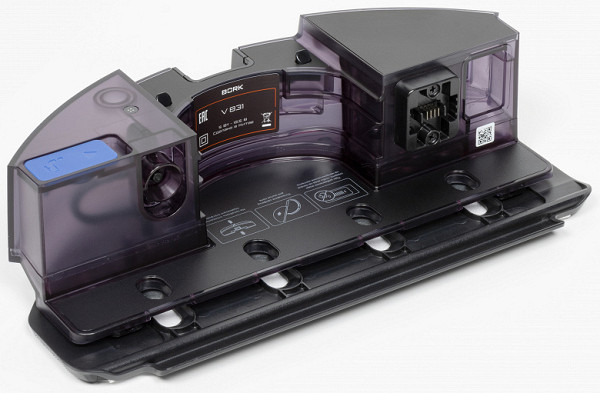
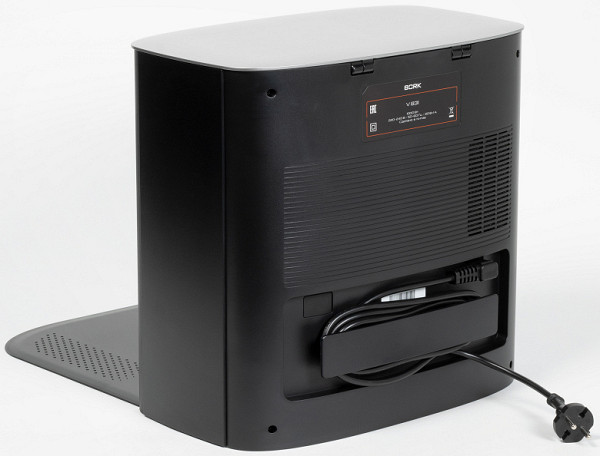
The base station is made in the shape of a parallelepiped with rounded corners. At the top there is an LED status indicator. At the bottom there are contacts for charging the robot, and between them there is an infrared port that helps the robot when parking.
On the right side of the base station there is a rubberized socket designed to remove dust and debris from the vacuum cleaner container.
Before starting work, you need to connect a special platform to the base on which the robot will drive. The platform is easy to remove and install back, so there will be no problems with cleaning.
Under the base cover on the right there is a compartment for installing a replacement bag. On the left is a small shelf for storing accessories.
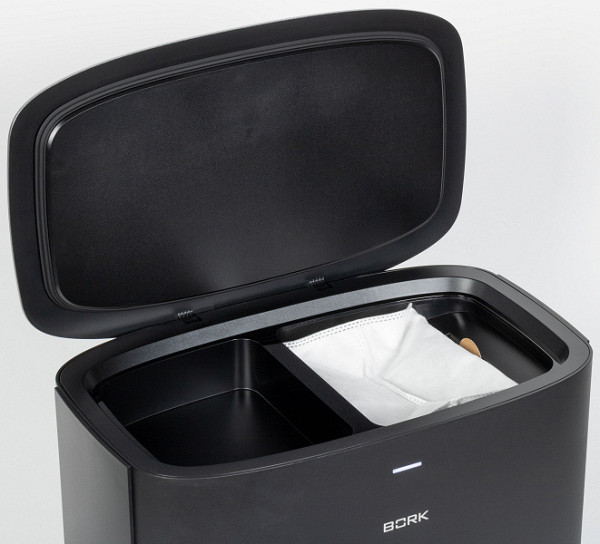
Under the base cover on the right there is a compartment for installing a replacement bag. On the left is a small shelf for storing accessories.
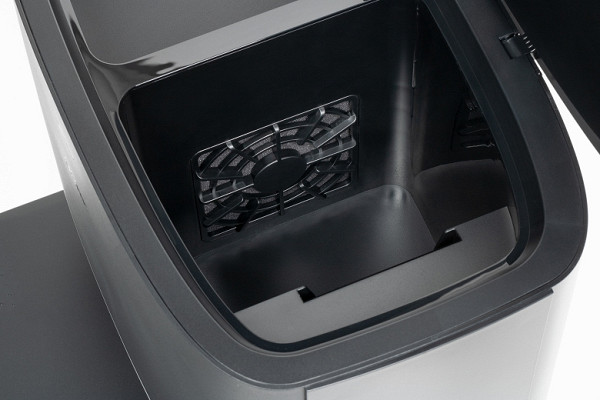
Dust and debris coming out of the container are directed into a disposable bag placed in the base station compartment. There is a special seat with a sensor under the bag, and the self-cleaning function is activated only when the bag is installed. The 3-liter bag is equipped with a cardboard latch that ensures a tight seal when removed from the container and prevents waste from spilling on the way to the bucket. The latch also tells the base that the bag is installed correctly.

At the bottom of the container there is an outlet protected by a fine nylon mesh. This mesh additionally protects the engine from possible debris, such as, for example, in the event of a bag rupture.

There is nothing remarkable on the sides of the base.
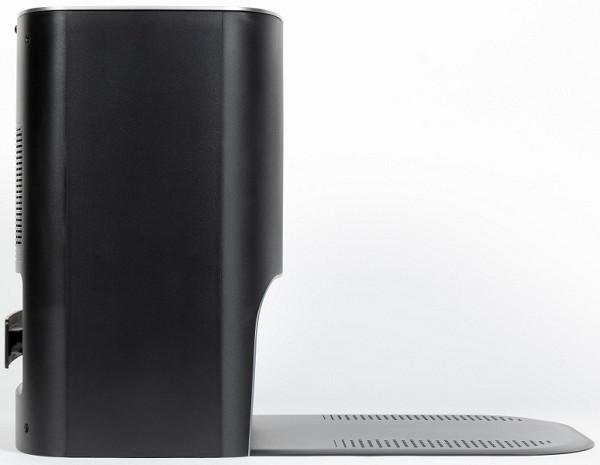
On the back side of the base there is a power cord outlet, a place to store excess wire and an air outlet grille.
At the bottom of the base there are rubber pads with a grooved texture that provide stability on any type of floor covering.
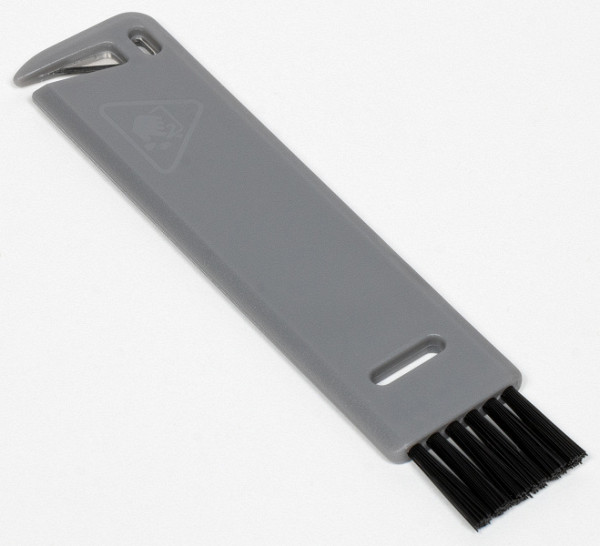
The vacuum cleaner comes with a handy accessory that includes a brush for cleaning hard-to-reach corners of the dustbin and a blade for removing tangled threads and hair from the rotor.
Instructions
The user manual for the vacuum cleaner is presented in the form of a small brochure printed on high-quality glossy paper. The manual contains detailed step-by-step instructions in Russian, accompanied by numerous illustrations.
Indeed, this approach is to everyone’s taste: not many people like to study long instructions on a new technique, even if it is familiar. Visual step-by-step illustrations allow you to quickly learn what to do and what to avoid — simple and convenient.
However, for those who prefer more detailed information, the manual also provides meaningful reading. It is written in simple and clear language, is well designed, and is a pleasure to hold.
The structure of the instructions includes sections such as technical specifications, equipment, assembly and use processes, selection of operating modes, operation and care of the device, and much more.
Control
The robot vacuum cleaner is controlled by a single button located on the top panel, which performs the function of starting/stopping the standard cleaning mode.
The same button performs the function of pausing cleaning and, when pressed for a long time, directs the robot to the charging station.
As for the base itself, depending on the state of the device, its indicator is highlighted in different colors:
| Device status | Indicator color |
|---|---|
| The station is in standby mode/the robot is in do not disturb mode | does not burn |
| The robot returns to the station, dust is collected, pairing is established between the robot and the base station | white, lit |
| The dust collector is not installed, the top cover of the station is open, the power of the station has decreased or it has failed to collect dust | red, lit |
Smartphone control
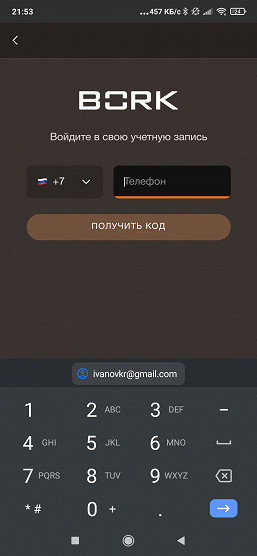
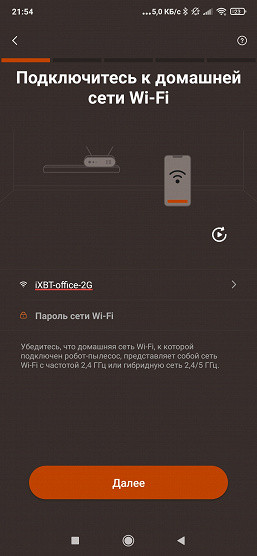
It is also possible to control the device through a mobile application, provided that there is a home Wi-Fi network at a frequency of 2.4 GHz and a special application from Bork is available on the user’s smartphone.
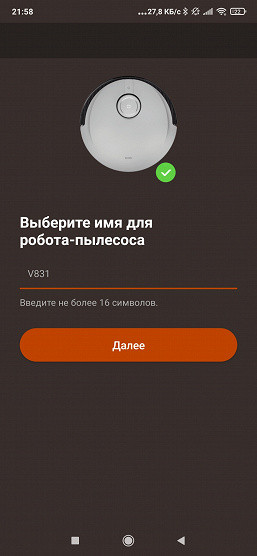
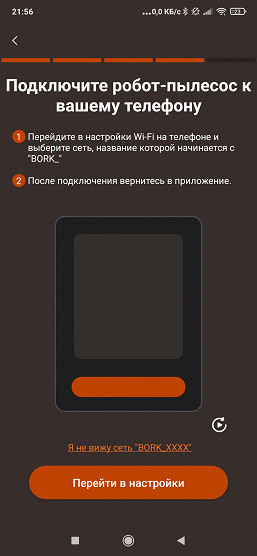
Initial setup includes adding the vacuum cleaner to the list of devices. This process includes registration, searching for the robot in the list, connecting to the vacuum cleaner’s Wi-Fi network and transferring home network data (name and password) to it.


It is important to note that not only the appearance of the application is pleasing to the eye, but its user interface is extremely friendly. Each step is illustrated, and the user is literally led by the hand during the initial setup process, providing detailed step-by-step instructions.

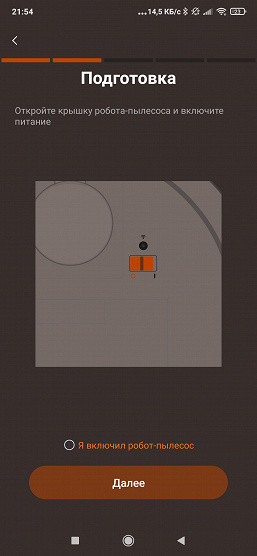
At first glance, this may seem like a minor point. However, even experienced users will appreciate the ease of use of such hints. It's much nicer than sitting next to a vacuum cleaner, holding a smartphone in one hand and instructions in the other.

After completing the initial setup, the application does not require additional actions from the user. In return, the user gets access to a variety of information, as well as additional functions and settings.
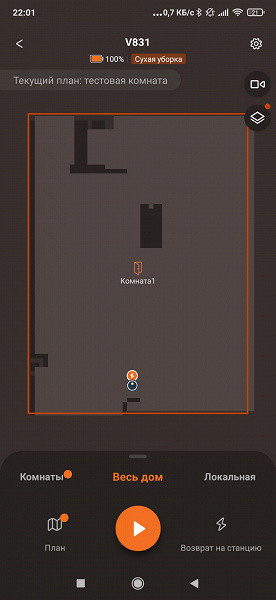
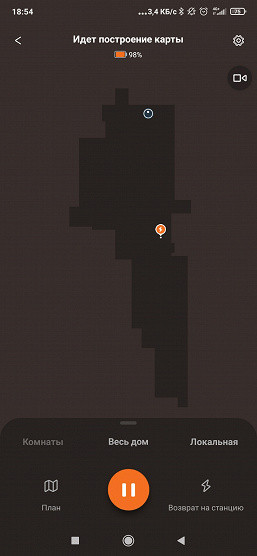
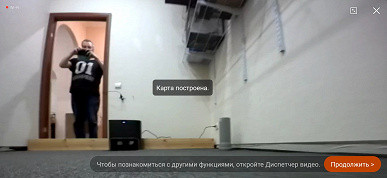
Next, the robot is asked to perform a “quick orientation”. In a few minutes, the robot will look around and approximately determine the scope of the upcoming work. This may not yet build a complete map, but after orientation the robot will be aware of its location and the general configuration of the room.

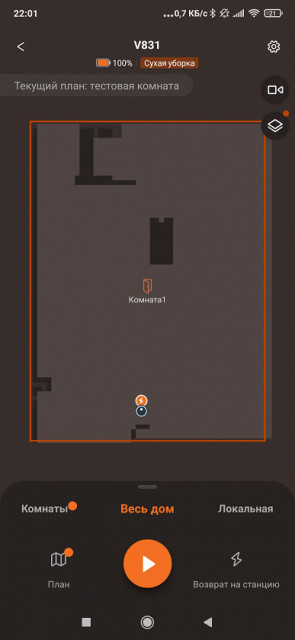
There is no need to create a separate map. It will be created during the first cleaning process.
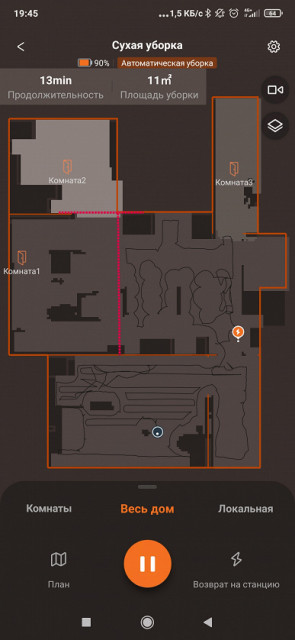
This is what the map of our test room looks like at the beginning of cleaning.
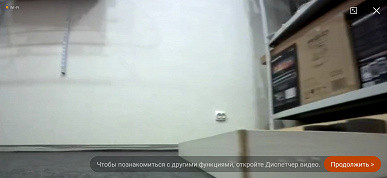
And like this — after its completion.
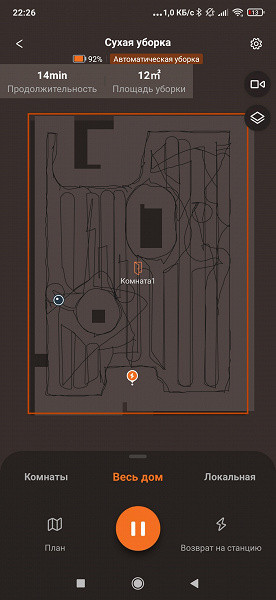
As you can see, the map has been updated to reflect small obstacles and obstacles. The route the robot took is also visible: it effectively cleared the bulk of the area, following a “snake” path. The obstacles were carefully circumvented. There was a small area left at the base that was not cleared.
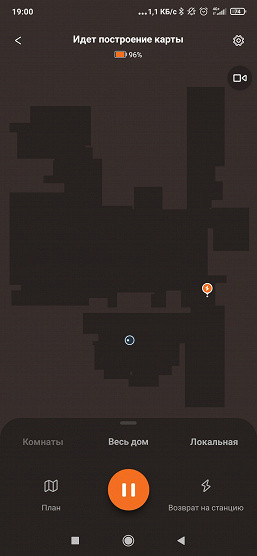
Let's look at another example. Here is the map in progress:
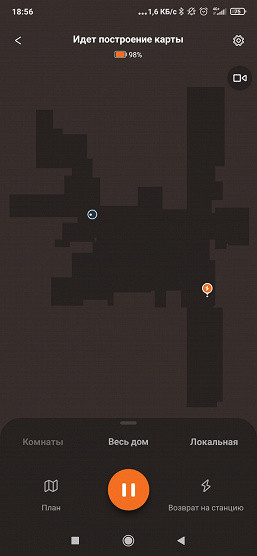
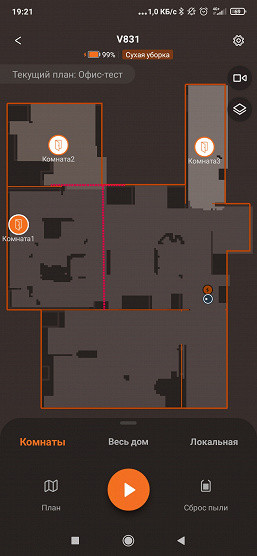
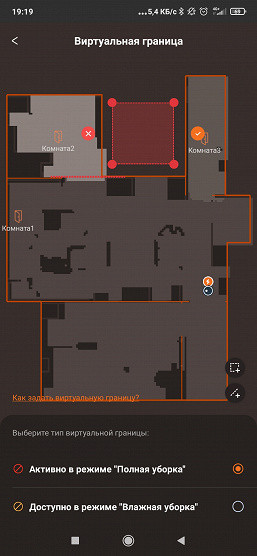
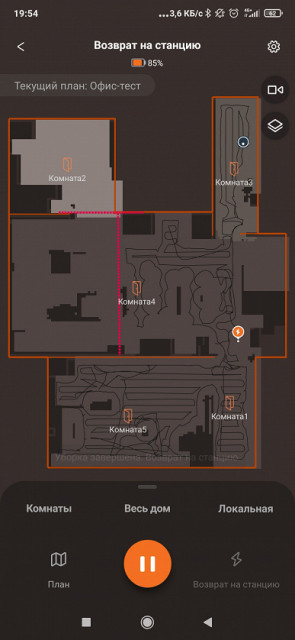
And here is a ready-made version, automatically divided into rooms.

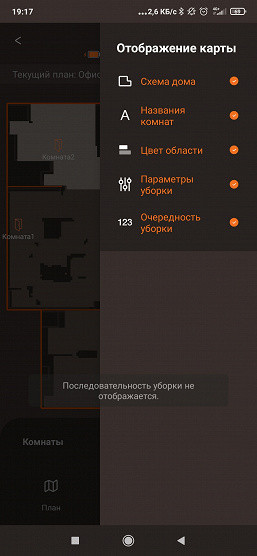
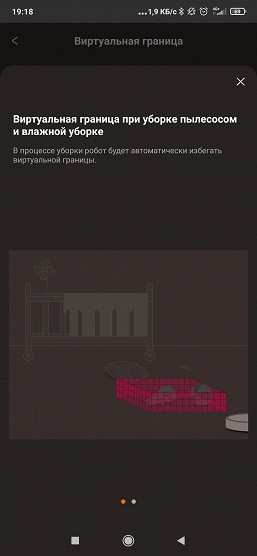
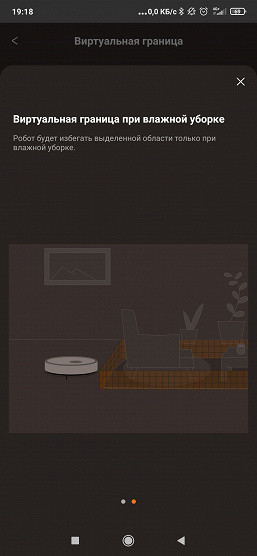
As usual, after creating a map, we have the opportunity to make changes to it manually. We can divide and merge rooms, rename them, set virtual walls and exclusion zones (especially important for full and wet cleaning!), customize cleaning parameters and set the order in which rooms are cleaned. It is also possible to launch the robot only in certain rooms.
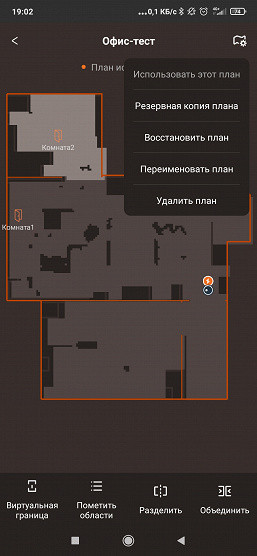
The editor's interface is simple and intuitive. However, just in case, the application will show hints from time to time.
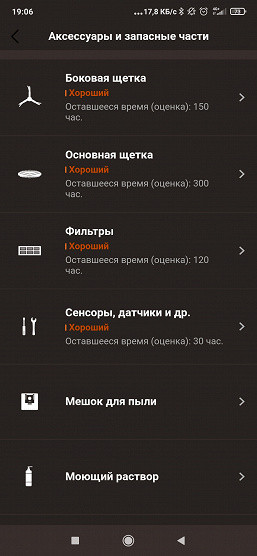
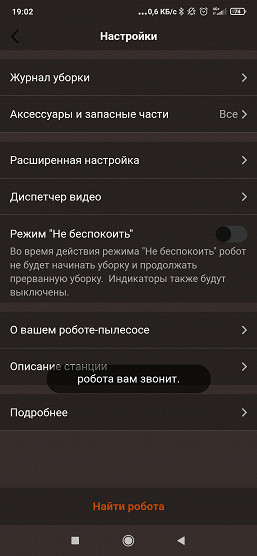
The settings menu provides a fairly standard set of options. Here you can view the cleaning log, update the firmware, track the wear of brushes, filters and other accessories, and also get answers to frequently asked questions.
Naturally, it is possible to adjust the intensity of dust suction or enable automatic power control. In the latter case, the vacuum cleaner will automatically increase the suction power on carpets. You can also enable or disable the AIVI 3D function, which is responsible for more effective obstacle recognition. The user can allow or disallow the robot to continue cleaning after recharging if it runs out of power without finishing cleaning the entire apartment.
The ability to customize the frequency of dust discharge — after cleaning the entire house — every 10, 15 or 25 minutes is a great satisfaction. This option allows you to optimize cleaning in homes with children or pets, preventing the dust bin from clogging and effectively cleaning the room. The ability to specify that dust needs to be dumped every 10 minutes solves the problem that many robots face, chasing dust around the apartment after the first minutes of cleaning. Bork, thanks to this setting, copes with the task more efficiently. If there is a little dust and little hair in the apartment, the robot may not return to the base until all cleaning is completed.
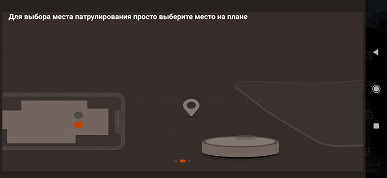
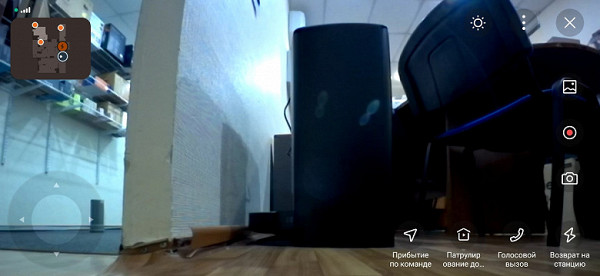
Now regarding the video. The front camera allows you to monitor the apartment in real time during cleaning, manual control or scheduled patrolling of the territory.
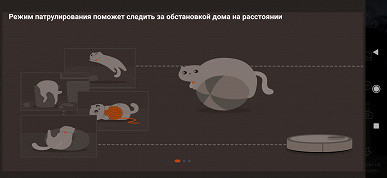
In doing so, we have the ability to take photos and record videos, which are then instantly available for viewing on a smartphone. The image quality may be average, but it's worth remembering that this is still a vacuum cleaner, not an action camera!
The robot will inform you that surveillance is in progress with a voice notification or a flashing indicator next to the camera.
What’s also fun is the ability to “call a robot” – transmit voice messages in real time and listen to the answer from someone nearby. The use of this function can be varied — reminding a child about homework, saying hello to grandma who forgot her phone in another room, or even funny jokes for family members.
Concluding the discussion of the application, I would like to note that we are completely satisfied with it. We didn't encounter too many bugs, feature malfunctions, or any other annoyances. The design of the application looks solid and stylish, and the process of interacting with it went smoothly and without problems.
Ideally, a similar experience with the application is expected when using any robot vacuum cleaner in the high price segment. However, reality sometimes fails: when purchasing a device for 50-60 thousand rubles or more, the user may encounter an application of terrible quality — with poor design, errors in the translation of terms, malfunctions of functions and other shortcomings. This gives rise to a logical question: what exactly did I pay that kind of money for? Is it really for this?
Fortunately, in the case of Bork such problems do not arise. Therefore, we confidently highlight the application as a big and positive plus.
Exploitation
Before use, it is recommended to empty the vacuum cleaner of all packaging materials, including the porous rubber transport pads that secure the bumper, and remove the advertising stickers from the body.
The side brushes are installed in their places. To do this, the vacuum cleaner is positioned with the bottom panel up, and the brushes are recessed until it clicks.
The base should be connected to the power adapter and placed so that there are no obstacles nearby (0.5 meters from the sides and 1.8 meters directly). It is important to avoid reflective surfaces level with the base to prevent the vacuum cleaner from getting tangled.
Before first use, it is recommended to fully charge the battery, leaving the vacuum cleaner on charge overnight.
The first time you run it, the dry cleaning module is installed to create a map of your home that includes carpeted areas.
We carry out wet cleaning by filling the appropriate container with water. For dry cleaning, simply install the appropriate module.
The vacuum cleaner has several programs:
- “whole house” — standard mode;
- «spot» — cleaning of a specified area;
- “rooms” — cleaning of selected rooms.
Please note that the names of the programs and their characteristics may change with updates to the application and robot firmware.
The device informs about the start of work and events using sound signals with a pleasant, slightly robotic voice. The robot introduces itself using the «I» form, such as «I'm here» or «put me on the floor.»
In automatic mode, the vacuum cleaner effectively maneuvers around the room, avoiding obstacles and successfully bypassing them, with the exception of electrical wires. Bork successfully copes with various obstacles, did not get lost among office chairs and did not violate security, without colliding with people in the room.
It should be noted that the accuracy of the robot’s work was pleasantly surprising: there is nothing more tedious than cleaning the apartment before the robot starts cleaning.
The robot manages its time (and therefore the user's time) efficiently: it increases its speed on flat surfaces and reduces it near obstacles. Upon entering a room, the robot does a quick scan to determine where to go. If problems occur, such as the brush getting stuck due to an object wrapped around it, once cleared, Bork quickly regains its position, determines where it is and continues cleaning without delay. Some of the robot's movements may seem fidgety, but careful analysis shows that the robot is clearly aware of its actions, location and future plans.
In wet cleaning mode, the robot wipes the surface evenly and drip-free. The movable soleplate significantly improves cleaning efficiency, although it is difficult to visually assess the “increase in cleanliness.” It can be argued that the floor will become noticeably cleaner than with regular wiping with a rag.
As for accessories, it’s worth mentioning their prices. The set of accessories for Bork is not very extensive (although it could be at such a price!). On the official website you can purchase 3 wipes for wet cleaning for 3000 rubles (1000 per set), 3 dust bags for 4500 rubles (1500 per piece), 2 sets of replacement filters for 2000 rubles (1000 per set), as well as 3 aroma capsules for 3000 rubles (1000 per piece). Side brushes cost 3,000 rubles per pair (or 1,500 per set).
You can calculate the total cost of regular vacuum cleaner maintenance yourself.
By the way, we did not find any aroma capsules in the kit, so we were not able to enjoy the pleasant aromas.
Care
The maintenance and cleaning requirements of the robot vacuum cleaner turned out to be quite standard.
It is recommended to wipe the module for wet cleaning with a dry cloth. The reusable napkin should be rinsed under running water and allowed to dry.
The dust container must be emptied regularly, the filters removed and cleaned using a brush. The filters can then be washed under running water. This also applies to the HEPA filter, which is known to be built into this model, making its replacement not such an easy task. Therefore, it is recommended to handle it carefully and avoid unnecessary wetting procedures.
The main and side brushes should be cleaned regularly using a multi-tool to remove hair, threads and other tangled debris.
It is recommended to wipe the sensors with a clean, dry cloth, avoiding the use of detergents and cleaning sprays.
As for the base station, it is necessary to promptly change the dust bag, as well as, as necessary, clean the fan cover and wipe the contacts through which the vacuum cleaner is charged. Here, perhaps, are all the recommendations for caring for the device.
Our measurements
In the first 10 minutes, the device followed almost the entire test area: first it walked around the perimeter of the room, stopping several times to more thoroughly clean certain areas, then it ran a serpentine route throughout the room. If it were not for a small amount of rice grains remaining in the center of the room, then such cleaning would be quite enough (provided that the robot is started daily) — in total, the robot collected 96.3% of the garbage!
Particularly pleasing is the fact that the robot is not afraid of its base station, unlike many other models, and is capable of cleaning in close proximity to it.
The robot spent the second ten minutes mainly in the central part of the room. First, he conducted an inspection, pinpointed his location, and then went to remove individual grains that scattered from under the brushes in the first 10 minutes. Cleaning completed slightly earlier — in 6 minutes and 20 seconds, and the overall garbage collection result increased by 1.9%, reaching a value of 98.2%.
Thus, we can say that the cleaning was carried out almost perfectly.
| Interval | Total cleaning time | % (total) |
|---|---|---|
| First interval | 10:00 | 96.3 |
| Second interval | 16:20 | 96.3+1.9=98.2 |
The device, placed on the base after finishing work in automatic mode, charges for approximately 5 hours. At this time, the base consumes up to 12.6 W; in standby mode, its power consumption is less than 0.4 W.
The noise level in the standard mode in the immediate vicinity (at a distance of about 1 meter) from the vacuum cleaner reaches 57 dBA, in the enhanced suction mode — 64 dBA, which turned out to be even slightly lower than the values declared by the manufacturer. The base, as usual, makes a loud noise, so it is better to refrain from dumping garbage into a bag at night.
conclusions
When we started testing the Bork V831, we asked ourselves: what is the feature for which the manufacturer sets such a high price? After all, no “unique functions” were announced. The overall appearance is that of a regular vacuum cleaner with a base station. It is, of course, beautiful and has some non-standard design and technical solutions, but they seem not so significant for the final quality of cleaning. So what did we pay for?
We pay for the fact that the robot itself and all the promised functions work at the highest level.
The robot effectively cleans the entire area, avoids obstacles and quickly returns to its base to empty the dust bin. The mobile application is easy to customize, has a nice design and does not cause any problems or negative emotions for the user. The application developers carefully provided tips for solving non-standard situations, ensuring a smooth and immediate process of use. Unlike other robots, where the user often has to understand the instructions or repeatedly reset the device to factory settings, here everything happens easily and naturally.
Is it possible to achieve the same results for other robots? Quite possible. It requires small efforts such as fixing bugs in the application, good translation of documentation, an intuitive voice interface and a friendly attitude towards users. In most cases, the technical basis for this already exists. However, many manufacturers encounter difficulties at this stage, which leads to a situation where the device is technologically advanced, but unpleasant to use. Bork was able to overcome these difficulties, why can't others? This question remains open.
Pros:
- high quality garbage collection
- dry and wet cleaning
- Wi-Fi control
- convenient and high-quality application
- general comfort from using the device
Minuses:
- relatively high price of the device and consumables