
Progress is no longer just knocking on the door — it has broken through and comfortably settled in your living room, bedroom, office, and even your bathroom. And, of course, in the kitchen. Here it is represented not only by a washing machine (which can be found in every home) and a dishwasher (which not everyone has yet), but also by a food waste disposer. The latter is still a rarity. Why? Perhaps people do not see any obvious benefit in it. But is this really so?
Let's look at an example of an affordable version of a shredder that can be found in online stores: Rautt RW-800. We will not delve into the history of the brand, because today many brands are simply trademarks that often change owners. We will also not indicate the country of manufacture, since the origin of most modern goods is already clear. We will not provide direct links to the product, since the site is just an empty stub without content and navigation. Nevertheless, this product is successfully sold in many online stores.
Characteristics
Some parameters in the table are marked as N/A, since this data is not available on the manufacturer's website, from sellers and in the instructions. The remaining parameters are either taken from available sources or obtained as a result of our own measurements.
| Manufacturer | Rautt |
|---|---|
| Model | RW-800 |
| Type | food waste disposer |
| Country of origin | China |
| Guarantee | N/A |
| Power | 800 W |
| Maximum engine speed | 3900 rpm |
| Volume of the grinding chamber | 1.5 l |
| Camera material | stainless steel |
| Material of the grinding element | stainless steel |
| Number of grinding stages | 3 |
| Autoreverse | N/A |
| Download method | continuous |
| Average power consumption | N/A |
| Connecting the dishwasher | Yes |
| Weight | about 6 kg |
| Dimensions | ∅210 mm, height 330 mm |
| Length of network cable | 0.8 m |
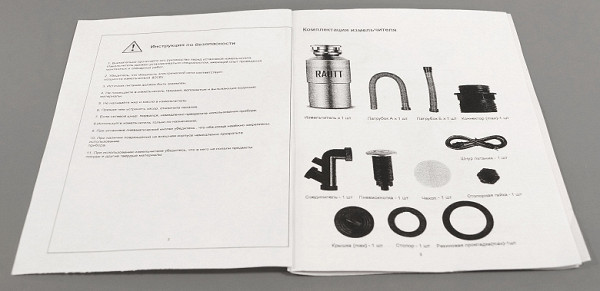
Equipment
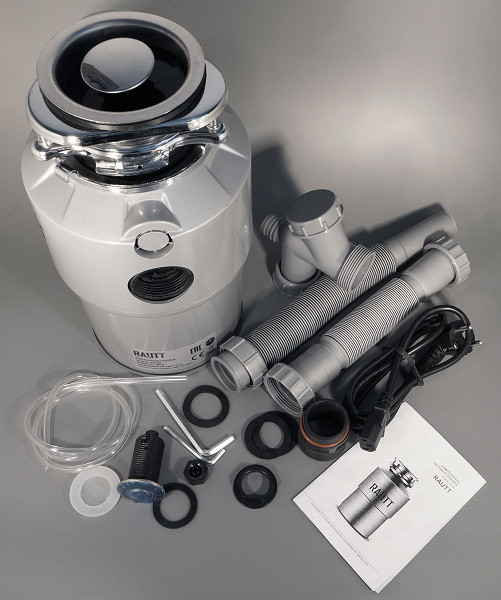
The disposer is packed in a standard cardboard box, which does not require a separate photo. Inside you will find the following accessories:
- The main unit of the disposer with a power cord and a European standard plug.
- Sink flange with a mounting ring, ring spring, seal and three screws (Twist Lock mounting system).
- Waste pusher, which also serves as a stopper.
- Rubber petal blocker.
- A set of fittings for connection to the sewer.
- Two Allen keys.
- Installation kit for the start button.
- User manual.
As it often happens, the complete sewer fittings, including pipes, corrugations and rubber gaskets, turned out to be of rather low quality. Therefore, it was immediately decided to purchase more reliable components separately.
At first glance
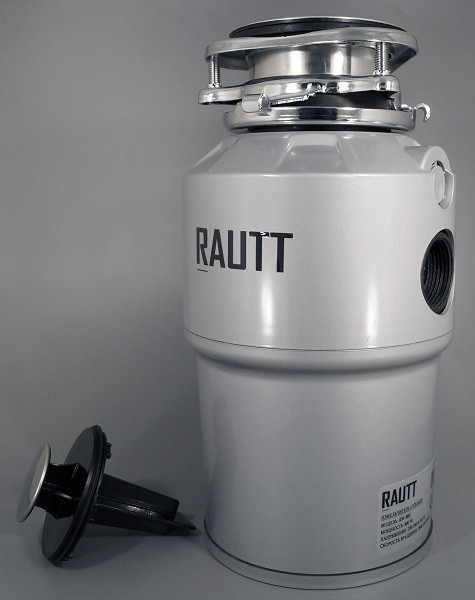
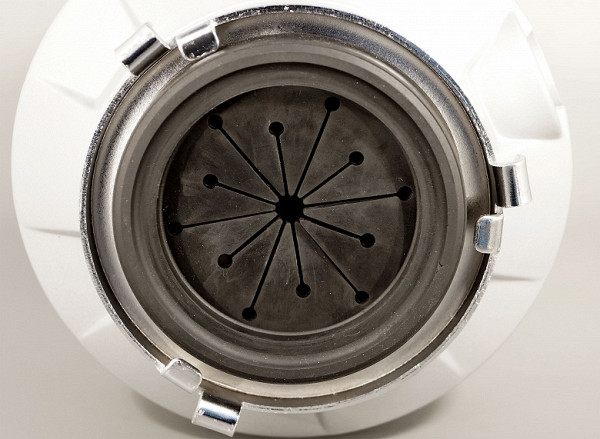
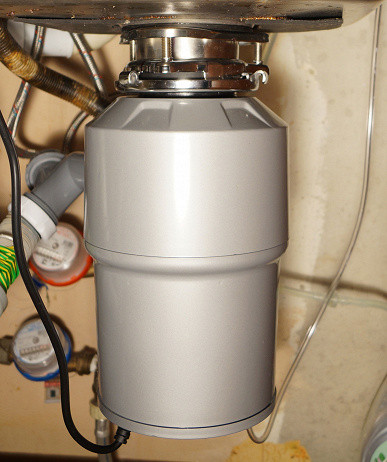
The grinder looks like metal, but it is actually plastic painted to look like metal. However, the plastic seems quite durable. The fastening system is made of metal. At the top of the device there is a neck through which it is attached to the kitchen sink, replacing the sink siphon. Food waste enters through this neck into the working chamber, where it is ground and then discharged into the sewer through the drain pipe on the side. The electric motor that drives the grinder rotor is located at the bottom of the body.
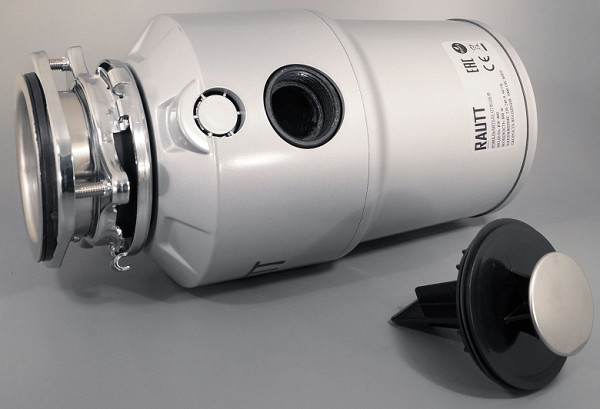
The flange is designed for installation in kitchen sinks with a drain hole diameter of 85 to 110 mm, which makes it universal. The flange is closed with a plug, which also serves as a waste pusher. This element is very useful, since the hard rubber petals of the blocker prevent waste from spontaneously entering the chamber.
Although the blocker is called a “noise blocker,” its function is not exactly related to that. The rubber petal plug serves other purposes. First, it prevents foreign objects, such as knives or forks, from accidentally falling into the working chamber. Second, it serves as a valve that helps prevent splashes and pieces of waste that are spinning around inside from escaping. It may also reduce noise to some extent.
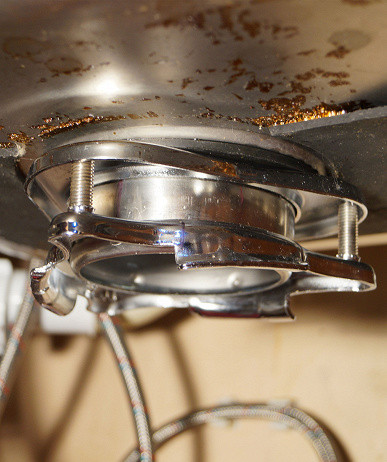
The mounting system is made of thick steel and looks promisingly reliable. It is heavy and does not bend at all.

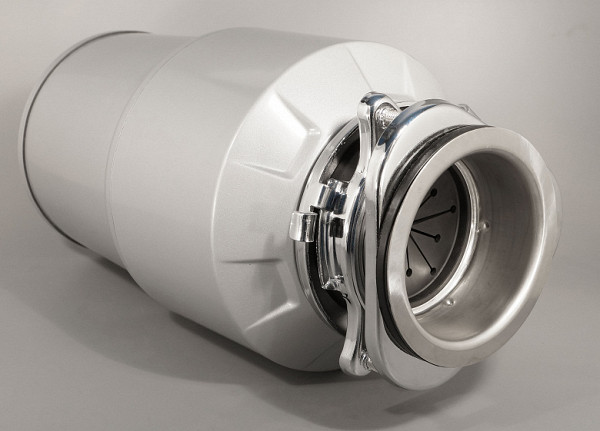
The inside of the working chamber can be seen through the opening of the neck. At the bottom of the chamber there are two movable cams that help direct large waste to the walls of the chamber. A steel rim with sharp teeth that crush the waste is installed along the perimeter. Under the teeth there are openings through which the crushed residues mixed with water leave the chamber.
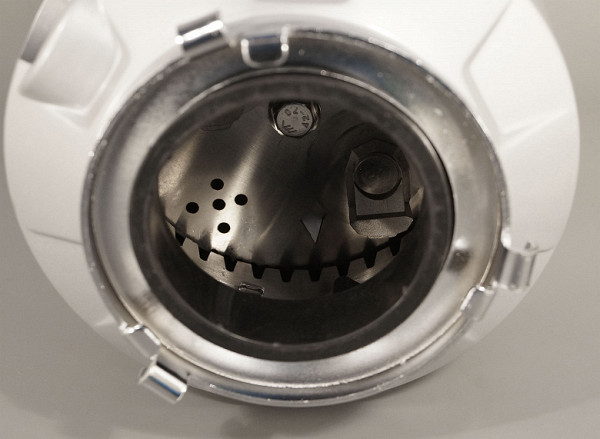
This is what the destruction mechanism looks like if you look inside through the side drain hole.
It is worth noting that due to the high rotation speed of the engine, a vortex with high centrifugal force is formed in the working chamber, which leads to a rapid ejection of a mixture of water with crushed waste. The first obstacle on the way — a 90-degree elbow — reduces the flow rate to a normal level. However, before installing the device, it is important to carefully check the entire sewage system for possible leaks. We will talk about this later.
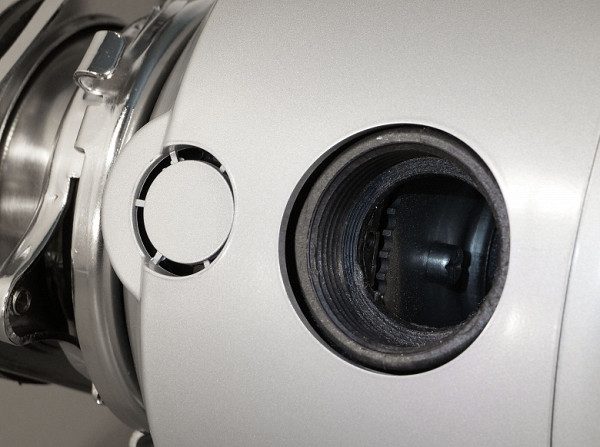
At the bottom of the device there is a power connector, a nipple for connecting a pneumatic button to turn the grinder on and off, as well as a reset button for the locking system.
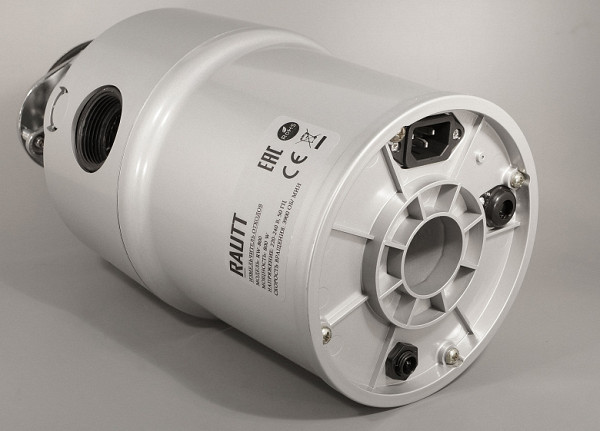
There is a comment about the power connector. It is a standard computer format and points downwards, which is inconvenient in the limited space of a kitchen sink cabinet. It would be better if an L-shaped plug was used so that the cable exits to the side, rather than downwards.
In addition, from the experience of using a disposer, one of my colleagues knows that due to vibrations, the plug can sometimes be pulled out of the socket. Although this is only a serious concern in the event of an unexpected shutdown of the device, when panic occurs, it is still worth considering.
Instructions
The instruction manual for operation and installation in Russian is declared as clear and simple. However, in reality it is a thin booklet measuring 10×15 cm with poor quality printing and careless layout. Do not believe the advertising promises on the sellers' websites.
Neither glasses nor a magnifying glass will help you to see the details in the 10x10 mm drawings. They contain almost no information. It seems as if the instructions are a photocopy of a photocopy. Fortunately, the installation is described by a person who understands how to use the tools and knows the names of the parts. It is clear that the instructions were not written by a modern manager or designer, but by someone who really understands the process.
Such mockery of buyers in instructions has become a real epidemic. Of course, you can try to find the instructions on the Internet, but there is no luck here either — it is not even in the form of small scans. We decided to fill this gap and offer you a scanned and slightly corrected version of the instructions: Rautt-RW-800.pdf.
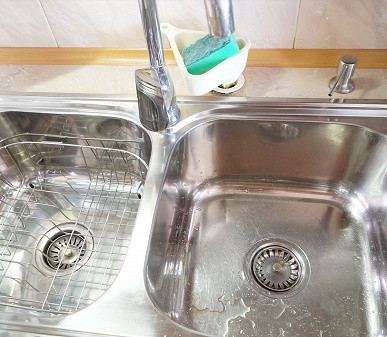
Before you buy a disposer, it’s important to consider the size of your sink cabinet. Make sure there’s enough space inside to accommodate this fairly large device. If you already have certain items in your cabinet, such as chemicals, tools, or other accessories, you may need to reconsider their placement. Habits need to be reviewed and adapted.
We were lucky, as our corner cabinet with an L-shaped door accommodates two full-size sinks (one of which serves as a drainer), and was originally spacious enough to store chemicals and a trash can, plus a 30-liter boiler that is now unused. As a result, the disposer fits perfectly into the available space.
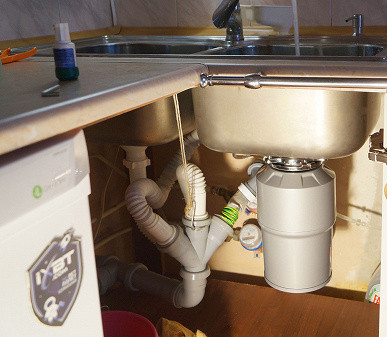
Now about the main problem: sewerage. It must be airtight and withstand a little pressure, and the drain into the main pipe (in the apartment) must have sufficient capacity. We were convinced of this when a clogged system led to the overflow of both sinks. We had to completely disassemble and clean the system to the main pipe, which runs along the entire entrance.
In the process, we discovered that the input into the old cast-iron pipe was made strictly perpendicular, without a slope. Apparently, builders in the 80s had a special idea about sewerage. As a result, grease and other contaminants accumulate at the junction of the horizontal pipe with the main vertical one. This pipe, as it turned out, no one had cleaned for 36 years. Now we know where the problem with blockages is.
Installing the grinder is not difficult. If difficulties arise, they are most likely due to the carelessness of the installer or low-quality consumables. As already mentioned, the complete flexible hoses have thin walls and do not provide tightness, it is better to replace them. The more complex your old system, the more difficult it is to integrate a new component. It is often easier to build a new system than to rebuild the old one.
What I liked about the installation was the Twist Lock mounting system. It is simple and reliable. Despite the initial doubt that such a heavy device can be held on only three hooks, the system proved to be reliable. The shredder did not turn or fall, even despite the vibrations during operation.
Control
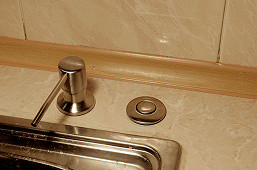
The grinder is controlled by one pneumatic button. Why pneumatic? It's simple: the button is installed next to the tap on the sink, where electricity could create dangerous situations due to contact with water. The pneumatic button works on the piston principle: when you press the button, air is transferred through a flexible tube to the main switch. Press it — turn it on, press it again — turn it off.
When installing, the button is attached to the countertop with a plastic nut. The kit includes a button, nut, silicone tube and one union nut. Why only one, although two are needed? Perhaps this is a way to save money.
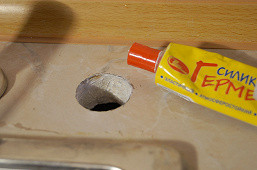
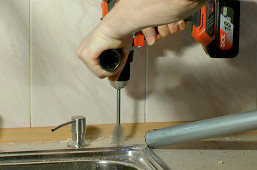
The button is installed in several stages. First, you need to drill a 30 mm diameter hole in the countertop or use a step cone drill for a metal sink. It is advisable to treat the inner surface of the hole with a sealant to prevent the material from swelling over time. After that, we install the button in place. Everything is ready!
Operation
The first and most important rule when using a disposer is to always turn on cold water. You can use slightly warm water, but you should not use hot water. Water is needed not only to flush waste into the sewer, but also to cool the engine. After the disposer has processed another batch of waste, do not turn off the water immediately — leave the stream for a few more seconds.
The working chamber of the disposer is large enough to process chicken bones, apple cores and watermelon rinds cut into pieces. Small waste, such as peelings, eggshells and seeds, are also easy to dispose of. The depth of the chamber from the bottom to the rubber petals of the blocker is 80 mm. Is this a lot or a little? If you try to put large pieces, such as watermelon rinds, into the chamber, the volume may be insufficient.
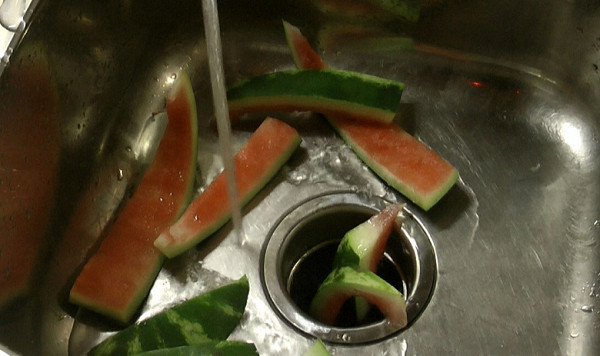
Conclusion: Long items, such as watermelon rinds, are best broken up or cut into pieces before disposal. Otherwise, the free end can move around and even hit your fingers, which will scare you more than it will hurt you.
The blocker petals work reliably and do not allow waste to enter the chamber on their own. To do this, you either need to push the waste manually with the grinder turned off, or use the included pusher. This pusher also serves as a plug that completely closes the drain.
It is very convenient: you close the drain with a plug-pusher, wash and peel the potatoes, leave the peelings in the water, and then — whoosh, and all the waste is sent to the sewer in a crushed form.
In the first days of operation, it may seem that we eat little. The grinder is used rarely and for a short time, for example, a minute after dinner, but the volume of the garbage bag in the bin does not decrease, but even increases. Why is that?
Analysis shows that now only empty milk and sausage packages, as well as candy and cookie packages, end up in the bag, but no food waste. This means that there are no decomposing remains, such as fish peelings, chicken skin or bones. The garbage bag has become lighter — ice cream packages weigh little, and watermelon rinds, for example, are significantly heavier.
Over time, using the grinder reveals additional aspects. For example, when grinding a small volume of waste, you can use a smaller stream of cold water, and vice versa. Wet waste, such as watermelon rinds or apple cores, requires less water. It is important to monitor the sounds: when the rattling stops and a steady hum sets in, you can turn off the disposer.
Care
Cleaning your disposer involves two steps: daily and periodic, and both are fairly easy if you follow a few rules.
Daily Cleaning:
- Do not overload the chamber; add waste gradually.
- Only run the disposer with cold running water and leave the water running for a while after use.
- Handle fibrous waste such as corn cobs, celery stalks, and eggshells with care to avoid clogging.
- Do not pour oil, lard, or other greasy substances down the sink to prevent clogging the chamber and drain.
Periodic Cleaning:
If you have a dishwasher drain, regularly rinsing with hot water and detergent will help reduce the need for frequent cleaning. If you notice any stubborn residue or odor, follow these steps:
- Unplug the disposer.
- Clean the inside chamber, top edge, and bottom surface of the safety deflector with a sponge and detergent.
- Plug the drain, fill the sink with hot water and 60 ml of baking soda, turn on the disposer and immediately remove the plug.
If clogged:
- Unplug the disposer and turn off the water.
- Unplug the appliance.
- Use the Allen key (included) to turn the hole in the bottom of the disposer until it makes a full turn.
- Remove foreign objects from the chamber with long-handled tweezers.
- Restart the appliance by pressing the red button on the bottom (on the outside).
- Allow the appliance to cool for 3-5 minutes.
For a pleasant aroma, you can grind lemons, oranges, melons and coffee beans in the device.
Our measurements
After an accident with a blockage, there was a desire to better understand what the mass that comes out of the grinder into the sewer looks like and what its composition is. It is important to understand what the drain pipe should be like and what the input to the general sewer system is. How can this be done? The most visual way is to conduct a video experiment. You can’t do without an assistant here. We will record a video to see the process, as well as track energy consumption and noise levels in real time.
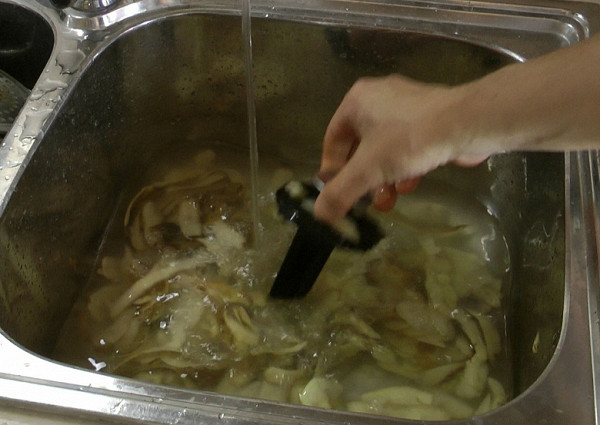
For the experiment, we will use potato and carrot peelings and add a few chicken bones.
The following conclusions can be drawn from the experiment:
- Consistency of the mass: The chopper produces a mass of a thin consistency due to the large amount of water supplied during operation. The particles of chopped chicken bones have a size of one to four millimeters. However, unlike hard bones, these particles become soft and similar to soggy sawdust, as they pass through the cams and teeth of the chopper.
- The importance of water: When chopping, you should not save water. The drier the original product, the more running water there should be for effective chopping.
- Power consumption and noise level: In idle mode, the chopper consumes no more than 200 W, the noise level is about 65 dBA (measured at a distance of 10 cm from the device with the open door of the kitchen sink). When shredding waste, power consumption can increase to 270 W, and the noise level to 75 dBA. These figures are insignificant compared to the noise of some vacuum cleaners, while the shredder works much less in time.
In conclusion, we suggest watching a video that demonstrates the process of processing various types of food waste.
The performance is not that great, but let us remember that we are dealing with a budget solution. For an ordinary family it will be more than enough.
Conclusions
The Rautt RW-800 chopper is designed to dispose of small amounts of food waste and has proven itself to be a reliable and economical device in everyday use. Its chamber and engine power allow you to effectively chop vegetable peelings, bones and other food scraps.
Using this chopper significantly improves the atmosphere in the kitchen, eliminating unpleasant odors from the trash can. Although it is too early to talk about the long-term reliability of the device, its simple design suggests good fault tolerance.
As with most budget solutions, before installation, it is recommended to replace some parts with higher quality ones purchased separately. Despite this, additional costs are insignificant, given that the Rautt RW-800 is one of the most affordable devices of this type on the Russian market.
Pros:
- good power
- low noise level
- sufficient chamber volume
- reliable design
Cons:
- low quality of the included documentation and fittings for connection to the sewer